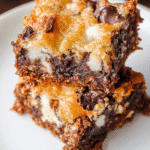
Rich, chocolatey, and dripping with buttery caramel — my Easy Turtle Bars are the kind of treat that makes you wonder why you ever bothered with store-bought desserts. The moment you bite into that chewy chocolate base, get a gooey caramel pull, and crunch into those nutty pecans, you’ll realize this isn’t just dessert… it’s love at first bite. I’ve made these Easy Turtle Bars for bake sales, holiday parties, and those random Tuesday nights when my sweet tooth refuses to take a day off. And guess what? Every single time, they disappear faster than I can say, “Who wants seconds?”
What’s on the Plate
Overview
- Cuisine: American
- Course: Dessert
- Prep Time: 15 minutes
- Cook Time: 30 minutes
- Total Time: 45 minutes
- Servings: 16 bars
What’s in Every Bite
- Calories: 298
- Carbs: 37g
- Fats: 17g
- Protein: 3g
- Fiber: 2g
- Sugar: 24g
- Sodium: 165mg
Total Recipe Cost
- Estimated Total Cost: $9.50
- Cost Per Serving: $0.59
- Main Cost Factors: Chocolate chips, caramel, pecans
The Story Behind the Flavor
Turtle candies have been making people swoon since 1918, when a candy company in Chicago came up with the idea to cover caramel and pecans in chocolate, creating a shape that looked (kind of) like a turtle. Fast forward a century, and the combination of chocolate, caramel, and pecans is still just as irresistible. My Easy Turtle Bars are a modern spin on that classic, turning the nostalgic treat into an easy-to-share dessert bar. Traditionally, turtles are made individually, which is fun but time-consuming. This version skips the tedious shaping and delivers all the classic flavor in a simple, slice-and-serve format.
Perfect For
- Holiday dessert tables – These easy turtle bars shine like little jewels on any festive spread. Their glossy chocolate top, golden caramel layer, and nutty crunch make them irresistible alongside cookies, pies, and candies. They’re the treat guests will “just take one” of… until they’re back for three more.
- Bake sales and potlucks – When you need something that wows without requiring a pastry degree, these bars are your best friend. They cut cleanly into neat squares, pack beautifully, and hold their texture, making them the MVP of any shared dessert table. Bonus: they disappear faster than you can say “Who made these?”
- Gifting in cute boxes or tins – Want a homemade gift that makes people light up? Stack these turtle bars between sheets of parchment in a festive tin or bakery box, tie it with ribbon, and watch the magic happen. They travel well, stay fresh for days, and taste like something from a boutique bakery.
- Sweet comfort after a long day – Whether it’s been a marathon workday or just one of “those” weeks, a chewy, chocolatey square of turtle bar with a cup of tea or coffee is the kind of hug-from-the-inside you deserve. No fuss, no fork, just sweet satisfaction.
- Impressing guests without breaking a sweat – These look like a bakery masterpiece, but they’re secretly a breeze to make. Serve them on a pretty platter, and everyone will think you’ve been in the kitchen all day (your secret is safe with me). Perfect for dinner parties, game nights, or when your in-laws drop by “unexpectedly.”
Why You’ll Love This Recipe
- All the flavors of classic turtle candy in an easy bar form – You get the rich chocolate, buttery caramel, and toasty pecans you love from turtle candies, but without all the fuss of hand-dipping or shaping each piece. These bars capture that indulgent flavor combo in a fuss-free, slice-and-serve dessert.
- Perfectly balanced texture: chewy, gooey, crunchy – Every bite is a little adventure. The chewy base holds up the silky caramel, which oozes just enough without making a mess, while the pecans add that satisfying crunch. Top it off with smooth chocolate, and you’ve got a treat that keeps your taste buds guessing.
- No candy thermometer needed – Forget hovering over a boiling pot, praying for the perfect temperature. This recipe keeps things simple and stress-free, so you can focus on enjoying the process (and licking the spoon).
- Great make-ahead treat – Turtle bars are one of those magical desserts that actually taste better after a day, when the flavors have had time to cozy up together. You can bake them ahead of a party or event, and they’ll still be show-stoppers when you serve them.
- Stores beautifully for days – Thanks to their sturdy yet indulgent layers, these bars keep their texture and flavor for several days. Whether in an airtight container on the counter or packed up for gifting, they stay as irresistible on day four as they were fresh from the oven.
Ingredients You’ll Need
Core Ingredients:
- 2 cups all-purpose flour
- 1 cup unsalted butter, softened
- 1/2 cup granulated sugar
- 2 cups semi-sweet chocolate chips
- 1 cup chopped pecans
- 1 cup packed brown sugar
- 1/2 cup unsalted butter (for caramel)
- 1/4 cup whole milk
Optional Add-ins:
- Sprinkle of flaky sea salt on top
- Swap pecans for walnuts or almonds
- A drizzle of white chocolate for contrast
Ingredient Highlights
- Pecans: The signature crunch that gives turtle bars their classic charm.
- Brown Sugar & Butter: Cooked together for that deep, buttery caramel flavor.
- Chocolate Chips: Semi-sweet keeps the bars from being overly sweet.
Step-by-Step Instructions
- Preheat oven to 350°F (175°C). Grease a 9×13-inch baking dish.
- In a large bowl, cream together 1 cup butter and granulated sugar until light and fluffy. Mix in flour until crumbly.
- Press mixture evenly into prepared pan. Bake for 15 minutes until lightly golden.
- While crust bakes, combine brown sugar, 1/2 cup butter, and milk in a saucepan. Bring to a boil over medium heat, stirring constantly. Boil for 3 minutes.
- Remove crust from oven, sprinkle evenly with chocolate chips and pecans.
- Pour hot caramel mixture over the top, spreading gently with a spatula.
- Return to oven for 12–15 minutes.
- Cool completely before cutting into bars.
Pro Tips
- Line your pan with parchment for easy removal – Trust me, this step is a total lifesaver. Parchment paper isn’t just about keeping the caramel from welding itself to your pan; it’s also your secret weapon for picture-perfect bars. Leave a bit of overhang on the sides so you can lift the whole cooled slab out in one smooth motion. This means no broken corners, no prying with a spatula, and definitely no sad, mangled pieces that you have to “taste test” (unless you want to—which, let’s be honest, is never really a problem).
- Don’t overcook the caramel — 3 minutes is your sweet spot – This is the make-or-break step. Caramel can be dramatic—it either rewards you with silky smooth sweetness or punishes you with a bitter, rock-hard disaster. Stick to 3 minutes of bubbling once it reaches a gentle boil, stirring constantly to keep the sugar from scorching. That’s the golden ticket to a rich, chewy caramel that holds its shape but still melts in your mouth. If you’re using a gas stove, keep the heat even; if you’re on electric, be mindful that it stays at a consistent simmer and doesn’t suddenly go volcanic.
- Cool completely before slicing to get clean edges – Patience is your friend here. Cutting too soon will have your caramel oozing like it’s making a daring escape. Wait until the bars are fully cooled—about 2 hours at room temperature or 30 minutes in the fridge—then use a sharp knife (or better yet, a hot knife wiped clean between cuts) to get those crisp, bakery-worthy edges. You’ll end up with bars so neat and tidy, people will think you bought them from a fancy bakery… and you can just smile knowingly.
Recipe Variations
- Nut-Free – No pecans? No problem! You can swap them for sunflower seeds, pumpkin seeds, or even crushed pretzels for a salty, toasty crunch that still gives your bars personality. If you’re baking for someone with a nut allergy, you can skip the nuts entirely and still get a decadent, chewy bar that’s all about the caramel-chocolate magic. The beauty is that the buttery crust and gooey caramel are already doing the heavy lifting—so no one will be asking, “Where are the nuts?” They’ll be too busy asking for seconds.
- Extra Chocolatey – For the true chocoholics in your life (or, let’s be honest, yourself), stir a generous handful of mini chocolate chips right into the crust before baking. As they melt, they create little molten pockets of fudgy goodness that surprise you in every bite. Feeling extra? Drizzle more melted chocolate over the cooled bars and let it set. You’ll officially have a “triple chocolate threat” situation going on, and your friends will think you moonlight as a chocolatier.
- Salted Caramel – Want to instantly make these bars taste like they belong in a fancy bakery display case? Sprinkle flaky sea salt right over the caramel layer before baking. The salt works its magic by enhancing the sweetness, cutting through the richness, and adding that crave-worthy sweet-salty contrast. Each bite feels balanced, elevated, and—dare I say—slightly addictive. It’s the kind of twist that makes people stop mid-bite and say, “Oh wow… these are dangerous.”
- Mocha Turtle Bars – Coffee lovers, this one’s for you. Add 1–2 teaspoons of instant espresso powder to the crust mixture before baking. That little kick of coffee deepens the chocolate flavor and gives your bars a subtle café-style vibe. Bonus: Pair them with a latte, and you’ve just created the ultimate afternoon pick-me-up.
Gluten-Free Version
Living that gluten-free life? No problem! Just swap the all-purpose flour in the crust for your favorite 1:1 gluten-free baking blend. Brands like Bob’s Red Mill or King Arthur have great cup-for-cup options that keep the texture spot-on. You’ll still get that tender, buttery base without any grainy aftertaste. The caramel stays luscious, the chocolate still melts into a glossy dream, and the whole bar keeps its chewy-meets-gooey magic—only now it’s safe for your gluten-free friends to enjoy. No one will guess it’s “different,” and trust me, they won’t stop at one piece.
Kid-Friendly Version
Kids already go wild for these turtle bars just the way they are, but if you want to earn “Coolest Parent” points, let’s dial up the fun! Before the caramel sets, sprinkle on a handful of colorful rainbow sprinkles, mini M&M’s, or even edible glitter for that extra “wow” factor. You can also cut the bars into fun shapes using cookie cutters once they’ve cooled—think stars, hearts, or little animals. It turns snack time into an edible craft project! And if you’ve got tiny helpers in the kitchen, let them be in charge of the topping—they’ll beam with pride when they see their decorated treats on the dessert table.
Easy Turtle Bars
Ingredients
Equipment
Method
- Preheat oven to 350°F (175°C). Grease a 9×13-inch baking dish.
- In a large bowl, cream together 1 cup butter and granulated sugar until light and fluffy. Mix in flour until crumbly.
- Press mixture evenly into prepared pan. Bake for 15 minutes until lightly golden.
- While crust bakes, combine brown sugar, 1/2 cup butter, and milk in a saucepan. Bring to a boil over medium heat, stirring constantly. Boil for 3 minutes.
- Remove crust from oven, sprinkle evenly with chocolate chips and pecans.
- Pour hot caramel mixture over the top, spreading gently with a spatula.
- Return to oven for 12–15 minutes.
- Cool completely before cutting into bars.
Notes
- Toast your pecans first – Even though it’s tempting to skip, this step deepens their nutty flavor and makes the bars extra rich. Just 5–7 minutes in the oven does the trick.
- Use room-temperature ingredients – This helps the caramel and chocolate layers spread smoothly without seizing or clumping.
- Chill between layers – Let the caramel set in the fridge before adding the chocolate to keep layers neat and distinct.
- Cut while slightly warm – If the bars are too cold, the chocolate may crack. Use a sharp knife and wipe it between slices for clean edges.
- Store in an airtight container – These bars keep best at room temperature for 3–4 days, but you can also refrigerate them for a firmer texture.
- Try sea salt flakes on top – A sprinkle adds a pop of flavor that balances the sweetness beautifully.
Taste What’s Next
Brown Sugar Peach Cake
Lemon Raspberry Cookies
Lunch Lady Brownies
or you Can Dig Deeper Recipes by clicking this: Appetizer, Breakfast, Lunch, Dinner, and Desserts.
Storage & Reheating
These Easy Turtle Bars are pretty sturdy little treats, which makes them perfect for making ahead or stashing for later cravings.
- Room Temp: Keep them in an airtight container at room temperature for up to 5 days. If you live in a warmer climate, place parchment between layers to keep the caramel from getting too sticky.
- Freezer: For long-term storage, wrap each bar individually in plastic wrap, then pop them into a freezer-safe bag or container. They’ll keep beautifully for up to 2 months without losing their texture or flavor.
- Reheating: Honestly, these bars are delicious straight from the counter or fridge, no reheating required. But if you’re craving that gooey, melty chocolate-caramel magic, give them a quick 5–10 second zap in the microwave. Just be careful—the caramel will be hot!
Equipment
- 9×13-inch baking dish
- Mixing bowls
- Hand or stand mixer
- Saucepan
- Spatula
FAQs
Can I use store-bought caramel sauce?
You can, but homemade caramel in this recipe gives a richer flavor and better texture.
Can I make these ahead of time?
Absolutely! These actually taste even better the next day.
Do I have to use pecans?
Nope! Walnuts, almonds, or even hazelnuts work just as well.
External Resources
Conclusion
If you’re craving the perfect balance of chocolate, caramel, and crunch, these Easy Turtle Bars are the answer. They’re easy, addictive, and absolutely crowd-pleasing. So go ahead — snap a photo and post it online! Don’t forget to tag me! I want to see your cooking success. Happy cooking!