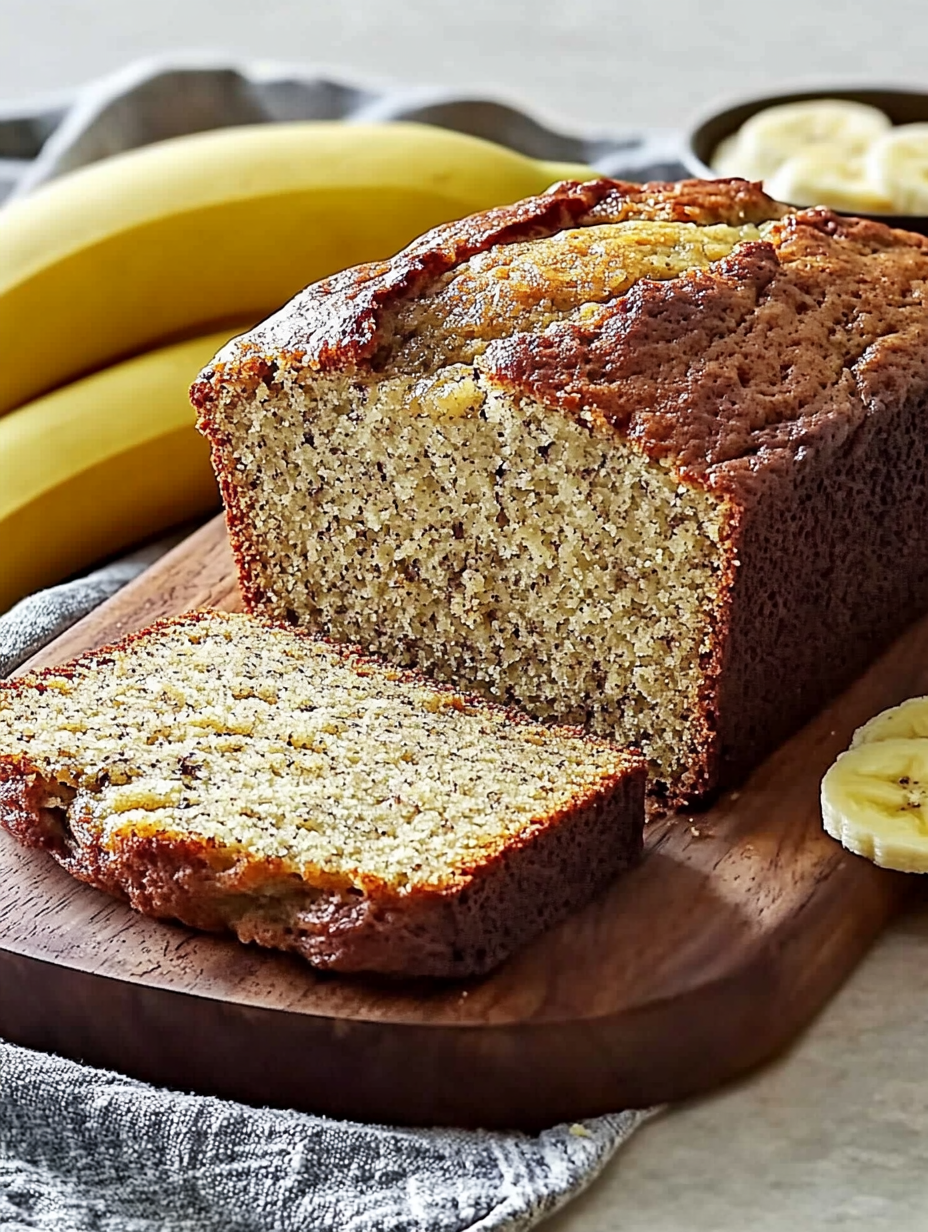
There are few things in life that bring the same kind of comfort as a slice of freshly baked banana bread. I’m talking about that golden-brown loaf that fills your kitchen with a cozy, sweet aroma the moment it hits the oven. My moist banana bread recipe has become a family tradition in my home, and I promise it will become a staple in yours too. I love how versatile it is—you can enjoy it warm with a pat of butter, toasted with a drizzle of honey, or simply grab a slice on the go. The secret to getting that perfect texture and rich flavor lies in using extra-ripe bananas and just the right balance of sugar, butter, and flour. This moist banana bread recipe is foolproof, flexible, and absolutely delicious. Whether you’re baking it for breakfast, snack time, or a sweet treat after dinner, I know you’re going to fall in love with it just like my family has. And let me tell you, there’s nothing better than watching everyone sneak back into the kitchen for “just one more slice.”
What’s on the Plate
Overview
- Cuisine: American
- Course: Breakfast, Snack, Dessert
- Prep Time: 15 minutes
- Cook Time: 60 minutes
- Total Time: 1 hour 15 minutes
- Servings: 10 slices
What’s in Every Bite
- Calories: 220
- Carbs: 35g
- Fats: 8g
- Protein: 3g
- Fiber: 2g
- Sugar: 18g
- Sodium: 200mg
Total Recipe Cost
- Estimated Total Cost: $5.50
- Cost Per Serving: $0.55
- Main Cost Factors: Bananas, butter, flour
The Story Behind the Flavor
Banana bread has such a rich and relatable history. The earliest printed moist banana bread recipe showed up in American cookbooks around the 1930s when housewives were finding clever ways to use overripe bananas instead of tossing them out. During the Great Depression, nothing went to waste, and banana bread became a household hero. Traditionally, it was made simply with mashed bananas, sugar, and flour, baked into a hearty loaf that stretched budgets and lifted spirits. Over time, it evolved into the moist, fluffy, flavorful banana bread we know today—sometimes jazzed up with nuts, chocolate chips, or even cream cheese swirls. I love that every family seems to have their own version, each carrying a bit of tradition and nostalgia in every bite.
Perfect For
This recipe fits into so many moments of family life, and that’s what makes it such a keeper. Here’s where it really shines:
Family Breakfasts: Nothing says “good morning” like the smell of something sweet baking in the oven. Serve this up warm and watch sleepy faces turn into smiles around the table.
Weekend Baking Projects: Got a Saturday afternoon with no big plans? This recipe is perfect for rolling up your sleeves and baking with the kids. It’s simple enough for helpers of all ages but still feels like a little adventure in the kitchen.
School Lunchbox Treats: Slice it into neat squares and tuck them into lunchboxes for a surprise that’s way better than store-bought snacks. They hold up beautifully and give kids something to look forward to mid-day.
Coffee or Tea Time: Whether it’s your morning cup of coffee or a late-afternoon tea break, this treat pairs perfectly with a cozy mug. It’s that little pause in the day that feels like a hug.
Gifting a Homemade Baked Good: Forget the store-bought bakery box—wrap up a batch in parchment with a ribbon, and you’ve got a thoughtful, homemade gift for neighbors, friends, or teachers. It’s sweet, heartfelt, and guaranteed to make someone’s day.
Why You’ll Love This Recipe
There are a hundred reasons to fall in love with this bake, but let me give you the highlights that’ll win you over every single time:
Perfectly Moist and Tender Crumb: No one likes a dry, crumbly mess, and this recipe delivers the opposite. Each bite melts in your mouth with a soft, tender texture that feels like a cozy blanket for your taste buds.
Easy to Make with Pantry Staples: No fancy store trips or hard-to-pronounce ingredients required here. You’ll likely have everything you need right in your pantry. It’s a stress-free bake that’s as convenient as it is delicious.
Freezes Beautifully for Later Enjoyment: Make a big batch now, and thank yourself later. This recipe holds up like a champ in the freezer—just thaw and enjoy whenever your sweet tooth calls. It’s like having a hidden treasure waiting for you.
Flexible for Your Cravings: Feeling nutty? Toss in pecans or walnuts. Got a sweet tooth for chocolate? Add some chips. Want a fruity twist? Dried cranberries or raisins work like magic. This recipe bends and flexes with whatever mood you’re in.
A Cozy, Comforting Recipe That Feels Like Home: More than just a sweet treat, this bake brings warmth, comfort, and a dash of nostalgia. It’s the kind of recipe that makes your kitchen smell amazing, gathers people around, and turns any day into a special occasion.
Ingredients You’ll Need
Core Ingredients
- 3 to 4 very ripe bananas, mashed
- 1/2 cup unsalted butter, melted
- 3/4 cup granulated sugar
- 2 large eggs, beaten
- 1 teaspoon vanilla extract
- 1 teaspoon baking soda
- 1/2 teaspoon salt
- 1 1/2 cups all-purpose flour
Optional Add-ins
- 1/2 cup chopped walnuts or pecans
- 1/2 cup chocolate chips
- 1/2 teaspoon cinnamon
- 1/4 cup shredded coconut
Ingredient Highlights
- Ripe Bananas: The spottier, the better. They bring natural sweetness and moisture.
- Butter: Adds richness and flavor to balance the fruit.
- Eggs: Provide structure and bind everything together.
- Sugar: Sweetens and helps with the golden crust.
- Flour: The base that holds the loaf together.
Step-by-Step Instructions
- Preheat your oven to 350°F (175°C). Grease a 9×5-inch loaf pan or line it with parchment paper.
- In a large mixing bowl, mash the ripe bananas with a fork until smooth.
- Stir in the melted butter until fully combined.
- Mix in the sugar, beaten eggs, and vanilla extract.
- Sprinkle in the baking soda and salt, then gently fold in the flour until no streaks remain.
- Add any optional mix-ins like nuts or chocolate chips at this stage.
- Pour the batter into the prepared loaf pan.
- Bake for 55–65 minutes, or until a toothpick inserted into the center comes out clean.
- Allow the banana bread to cool in the pan for 10 minutes before transferring to a wire rack.
- Slice, serve, and enjoy!
Pro Tips
I’ve baked this recipe more times than I can count, and these little tricks are the secret sauce to getting bakery-style results right at home:
Always use overripe bananas for maximum flavor and moisture. You want bananas that are practically begging to be baked—deeply spotted, super soft, and extra sweet. The riper they are, the richer and more flavorful your bread will turn out.
Don’t overmix the batter—gentle hands make tender bread. The moment your wet and dry ingredients come together, stop stirring! Overmixing develops too much gluten, which makes the bread dense and tough. We’re aiming for fluffy and tender, not rubbery.
Line your loaf pan with parchment for easy removal. Ever tried prying a sticky loaf from a pan? Not fun. A parchment sling makes cleanup a breeze and guarantees your bread slides out picture-perfect every time.
Add a sprinkle of raw sugar on top before baking for a crunchy crust. This little finishing touch gives you that irresistible bakery-style crackle on top. It’s simple, but it makes the loaf feel extra special.
Store your bananas in the freezer if they’re overripe but you’re not ready to bake. Just peel, bag, and freeze them! When it’s baking time, thaw them out and mash—they actually get even sweeter and softer, which means more flavor for your bread.
Recipe Variations
One of the best things about banana bread is how flexible it is—you can dress it up, play with flavors, or bake it in different forms to suit any craving. Here are my favorite ways to switch things up:
Nutty Banana Bread: Stir in a generous handful of toasted walnuts, pecans, or even almonds for that irresistible crunch. The nuts balance the sweetness and give each bite a lovely texture. If you’re feeling adventurous, try hazelnuts for a rich, almost chocolatey depth.
Chocolate Lover’s Banana Bread: Chocolate and bananas are a match made in heaven! Toss in chocolate chips, chunks, or even a decadent swirl of Nutella through the batter. This version feels like dessert, but I promise it’s still completely acceptable for breakfast.
Spiced Banana Bread: Add a teaspoon of cinnamon, a pinch of nutmeg, or even a touch of cardamom to the dry ingredients. These warming spices make the loaf smell like cozy fall mornings and give the flavor an extra layer of comfort.
Banana Muffins: Use the same batter but portion it into a lined muffin tin. Bake for 18–22 minutes, and you’ve got perfectly portable treats. Muffins are ideal for school lunchboxes, quick breakfasts, or sharing at the office.
Tropical Twist: Mix in shredded coconut and a few chunks of dried pineapple for a sunny, island-inspired loaf. A sprinkle of coconut on top before baking makes it feel like a vacation in bread form.
Marble Banana Bread: Swirl part of your batter with cocoa powder, then layer it into the pan for a beautiful marbled look. It’s showy, fun, and always gets “oohs” and “ahhs” at the table.
Gluten-Free Version
Swap the all-purpose flour with a good gluten-free baking blend. Make sure it contains xanthan gum for structure. The result? A moist banana bread that’s every bit as fluffy and satisfying.Good news—banana bread doesn’t have to be off the table if you’re skipping gluten! With the right flour blend, you can enjoy a loaf that’s just as moist, fluffy, and comforting as the classic version.
The Flour Swap: Replace the all-purpose flour with a high-quality gluten-free baking blend. I always look for one that already includes xanthan gum (that little magic ingredient helps hold everything together and keeps the bread from crumbling). If your blend doesn’t include it, just add about ½ teaspoon per cup of flour.
Texture Tips: Gluten-free flours can sometimes bake a bit denser, so don’t be shy about really whipping those wet ingredients before folding in the dry ones. That extra air helps keep the loaf soft and tender.
Flavor Boosters: Since gluten-free flours can have a slightly different taste, I like to lean into the bananas’ natural sweetness and maybe even toss in a splash of vanilla extract or a sprinkle of cinnamon. These little touches make the bread taste cozy and familiar.
The Result: What comes out of the oven is everything you love about banana bread—moist, fragrant, golden, and so satisfying. Honestly, no one at the table will even guess it’s gluten-free!Swap the all-purpose flour with a good gluten-free baking blend. Make sure it contains xanthan gum for structure. The result? A moist banana bread that’s every bit as fluffy and satisfying.
Kid-Friendly Version
When it comes to baking for little ones, banana bread is already a winner—sweet, soft, and oh-so comforting. But with just a few tweaks, you can make it even more kid-approved.
Skip the Crunch: Leave out any nuts so the texture stays soft, moist, and easy to chew. This makes each bite smooth and fuss-free for picky eaters.
Add a Fun Twist: Kids love a little surprise in their food! Stir in mini chocolate chips or even colorful sprinkles to make the loaf extra special. Every slice will feel like a treat.
Mini Loaves or Muffins: Instead of one big loaf, try baking the batter in mini loaf pans or even muffin tins. They’re perfectly portioned for small hands, great for school lunchboxes, and—bonus—you don’t have to wait as long for them to bake.
Kid Involvement: Let the kids help! They can mash the bananas, stir the batter, or sprinkle the chocolate chips on top. Trust me, they’ll be so proud to eat something they helped make.
Result: A fun, soft, chocolatey (or sprinkle-filled!) banana bread that disappears fast. It’s snack-time gold in my house, and I bet your kids will gobble it up too.
Moist Banana Bread Recipe
Ingredients
Equipment
Method
- Preheat your oven to 350°F (175°C). Grease a 9×5-inch loaf pan or line it with parchment paper.
- In a large mixing bowl, mash the ripe bananas with a fork until smooth.
- Stir in the melted butter until fully combined.
- Mix in the sugar, beaten eggs, and vanilla extract.
- Sprinkle in the baking soda and salt, then gently fold in the flour until no streaks remain.
- Add any optional mix-ins like nuts or chocolate chips at this stage.
- Pour the batter into the prepared loaf pan.
- Bake for 55–65 minutes, or until a toothpick inserted into the center comes out clean.
- Allow the banana bread to cool in the pan for 10 minutes before transferring to a wire rack.
- Slice, serve, and enjoy!
Notes
Moist Banana Bread – Helpful Tips
Cooking Tips & TechniquesUse very ripe bananas with lots of brown spots — they’re sweeter and keep the bread moist.
Mash the bananas thoroughly for a smooth, even texture in the batter.
Don’t overmix the wet and dry ingredients; overmixing can make the bread dense and tough.
Use melted butter or a combination of butter and oil to retain moisture and add richness.
Check doneness with a toothpick inserted in the center — it should come out clean or with just a few moist crumbs. Serving Suggestions
Serve slices warm with a pat of butter or cream cheese.
Toast slices lightly for breakfast or snack, then drizzle with honey or nut butter.
Pair with coffee, tea, or a glass of cold milk for a comforting treat.
Add fresh fruit or a dollop of yogurt on the side for a refreshing contrast. Make-Ahead & Storage
Make-Ahead: Mash bananas and mix dry ingredients a day in advance — store separately until ready to combine.
Refrigerator: Store cooled banana bread in an airtight container for up to 5 days.
Freezer: Wrap tightly and freeze for up to 3 months. Slice before freezing for easy thawing.
Reheat: Warm slices in the oven at 325°F for 5–10 minutes or microwave for 15–20 seconds to restore softness. Tasty Variations to Try
Chocolate Chip Banana Bread: Fold in ½ cup chocolate chips for a kid-friendly twist.
Nutty Banana Bread: Add ½ cup chopped walnuts or pecans for crunch.
Cinnamon Swirl: Swirl a mixture of cinnamon and brown sugar into the batter before baking.
Peanut Butter Banana Bread: Mix ¼ cup peanut butter into the batter for a rich, nutty flavor.
Tropical Twist: Fold in ½ cup shredded coconut or chopped dried pineapple for extra flair.
Taste What’s Next
Frozen S’mores
Salted Honey Pie
Easy Turtle Bars
or you Can Dig Deeper Recipes by clicking this: Appetizer, Breakfast, Lunch, Dinner, and Desserts.
Storage & Reheating
One of the best things about banana bread is how beautifully it keeps—if your family doesn’t devour it all in one sitting, that is! Here’s how to make sure every slice stays just as tasty as the day you baked it.
Refrigerator: Wrap your loaf tightly in plastic wrap or aluminum foil, or tuck it into an airtight container. Stored this way, it will stay moist and fresh for up to 5 days. I love slicing it first so it’s ready to grab whenever snack time calls.
Freezer: Banana bread is a freezer’s best friend! For longer storage, slice the loaf and wrap each piece individually in plastic wrap, then place them in a freezer bag. This way, you can pull out just one slice (or three, if you’re like me) whenever the craving hits. It will keep beautifully for up to 3 months. Just thaw at room temperature, and you’re back in banana bread heaven.
Reheating: Want that “fresh from the oven” vibe again? Pop a slice in the microwave for 10–15 seconds for a quick warm-up, or toast it lightly for crispy edges and a soft middle. Pro tip: add a little smear of butter or peanut butter on top after warming—oh my goodness, it’s divine.
Equipment
- 9×5-inch loaf pan
- Mixing bowls
- Fork or potato masher
- Whisk or wooden spoon
- Wire cooling rack
FAQs
What makes banana bread moist?
Using very ripe bananas, melted butter, and not overbaking keeps the bread tender and moist.
Can I make banana bread without eggs?
Yes! You can substitute flax eggs, applesauce, or even yogurt for an egg-free version.
Why does my banana bread sink in the middle?
This usually happens if it’s underbaked or if too much liquid was added. Always check doneness with a toothpick.
How do I know when banana bread is done baking?
Insert a toothpick into the center. If it comes out clean or with just a few crumbs, it’s ready.
Can banana bread be frozen?
Absolutely. Slice and freeze it for easy grab-and-go snacks later.
External Resources
Conclusion
This moist banana bread recipe is more than just a way to use up ripe bananas—it’s a warm, homemade hug in loaf form. Every bite reminds me why it’s one of my family’s most requested bakes. It’s simple, delicious, and endlessly adaptable. Whether you enjoy it plain, dressed up with chocolate chips, or shared with friends, it’s always a winner. So go ahead—snap a photo and post it online! Don’t forget to tag me! I want to see your cooking success. Happy baking!