Introduction
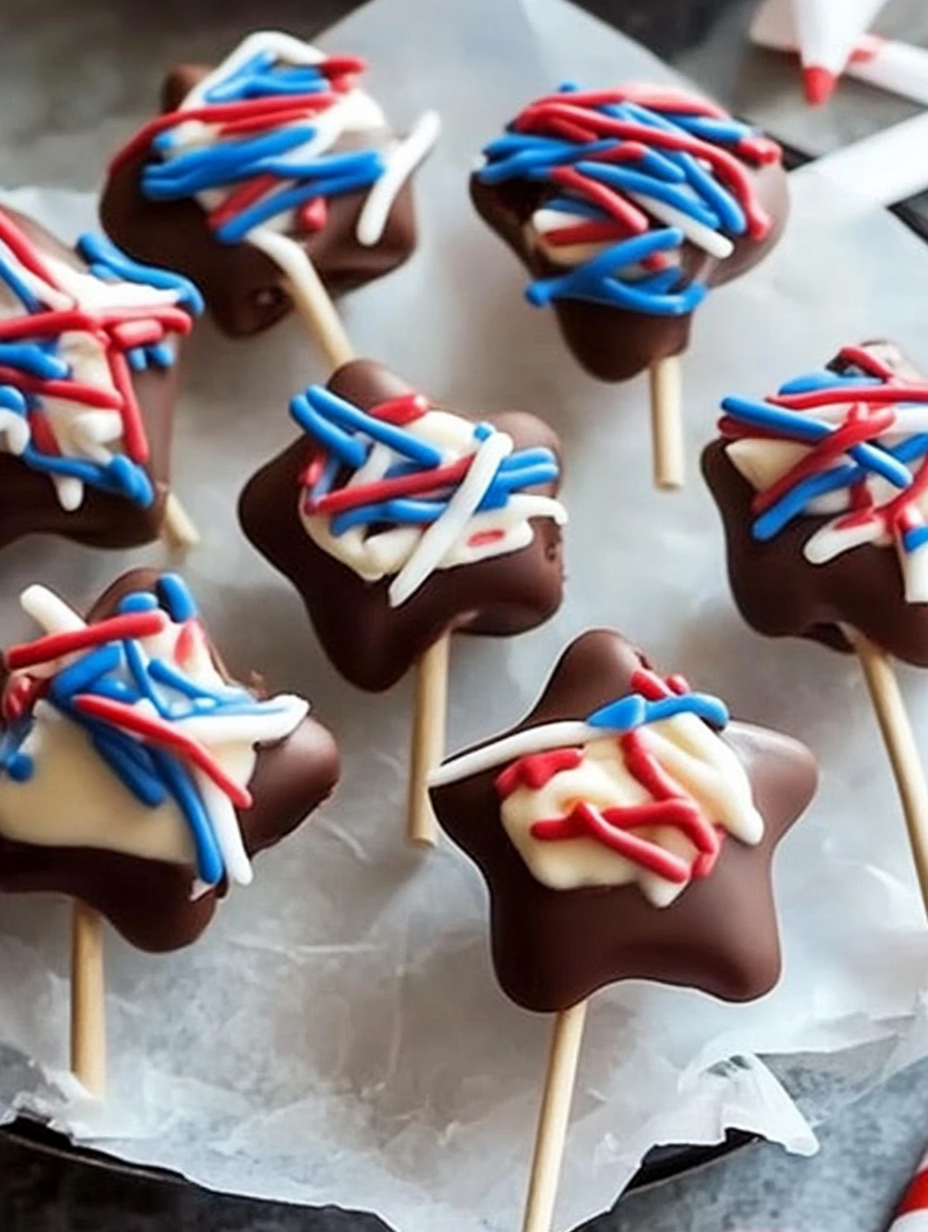
When it comes to festive, no-fuss summer desserts, nothing says celebration like these Fourth of July Cheesecake Pops (No-Bake). I created this Fourth of July Cheesecake Pops (No-Bake) for a backyard cookout a few years ago, and they’ve been a staple every Independence Day since. They’re everything you want in a party treat—cool, creamy, colorful, and easy enough to prep without breaking a sweat. Picture creamy cheesecake balls, dipped in candy melts, then rolled in patriotic sprinkles and served on a stick. They look like little firework bursts—and they taste even better.
These cheesecake pops are a huge hit because they’re portable, mess-free, and irresistibly indulgent. No oven required, which means you stay cool while getting dessert ready. Plus, they’re fun to decorate—kids and adults both love getting in on the action with the sprinkles and sticks. Whether you’re hosting a barbecue, heading to a potluck, or just want to treat your family to something special this 4th of July, these no-bake cheesecake pops bring big flavor and serious holiday flair.
I use a simple base made from cream cheese, crushed graham crackers, a little powdered sugar, and vanilla. It’s rich and tangy—just like classic cheesecake—but firm enough to roll into balls. Once chilled and dipped, they’re the perfect poppable dessert. Let’s get festive in the kitchen—these are guaranteed to steal the show.
Perfect For:
- Fourth of July parties or picnics
- Summer BBQs or cookouts
- Kid-friendly kitchen projects
- Patriotic holiday potlucks
- Quick, no-bake dessert options
Why You’ll Love This Recipe:
- No-Bake Simplicity: Keep your kitchen cool and your prep stress-free.
- Make-Ahead Friendly: Perfect for prepping a day or two before the party.
- Kid-Approved Fun: Easy for little hands to help with rolling and decorating.
- Customizable: Change the colors for any holiday or occasion.
- Festive & Fun: A beautiful red, white, and blue treat that looks as good as it tastes.
Preparation & Chilling Time:
- Prep Time: 30 minutes
- Chill Time: 1–2 hours
- Total Time: ~2.5 hours
- Servings: 24 pops
- Calories: ~140 per pop
Ingredients:
- 8 oz cream cheese, softened
- 1 cup powdered sugar
- 1 tsp vanilla extract
- 1 ½ cups graham cracker crumbs
- 10 oz white candy melts or white chocolate
- Red and blue candy melts (optional, for color accent)
- Patriotic sprinkles (red, white, and blue)
- 24 lollipop or cake pop sticks
Ingredient Highlights:
- Cream Cheese: Rich and creamy, it creates the perfect cheesecake base.
- Graham Cracker Crumbs: Classic flavor that mimics the crust of a cheesecake.
- Candy Melts: Smooth coating that hardens perfectly around each pop.
- Sprinkles: Brings the red, white, and blue celebration vibes to life.
Step-by-Step Instructions:
- Make the Cheesecake Base: In a mixing bowl, beat cream cheese until smooth. Add powdered sugar and vanilla, mixing until fully combined. Stir in graham cracker crumbs until evenly incorporated.
- Shape Into Balls: Roll the mixture into tablespoon-sized balls and place on a parchment-lined baking sheet. Insert a stick into each.
- Chill: Refrigerate for at least 1–2 hours, or freeze for 30 minutes until firm.
- Melt the Coating: Melt white candy melts (or chocolate) according to package directions. If using colored melts, melt them separately.
- Dip and Decorate: Dip each pop into the melted coating, let the excess drip off, then quickly add sprinkles or drizzle with colored candy melts.
- Set: Stand pops upright in a foam block or place flat on parchment to set. Chill until ready to serve.
Serving Suggestions:
- Serve Upright in a Festive Jar for a Fun Centerpiece
- Turn your cheesecake pops into edible decor! Arrange them upright in a mason jar or vase filled with red, white, and blue beans, rice, or candy-coated chocolates. It keeps the pops in place and doubles as a cheerful table centerpiece.
- Wrap Individually in Cellophane for Party Favors
- For a sweet send-off, wrap each pop in clear cellophane and tie with a ribbon in patriotic colors. It’s an easy and adorable way to give guests a treat to-go — ideal for picnics, parades, or backyard BBQs.
- Pair with Lemonade or Patriotic Mocktails
- Serve these chilled pops alongside a frosty glass of classic lemonade, berry spritzers, or layered red-white-blue mocktails for a refreshing, crowd-friendly pairing. The combo is both visually stunning and perfectly suited to summer celebrations.
- Add to a Red, White, and Blue Dessert Tray
- Place your cheesecake pops among other festive treats like flag-themed cookies, fruit skewers, and mini cupcakes to build a full Fourth of July dessert board. It’s a fun way to show off different textures and flavors in a colorful, grab-and-go format.
- Display with Sparklers or Mini Flags for Extra Flair
- Level up the presentation by inserting mini American flags or placing sparkler-style cake toppers behind or around the pops. The added sparkle and movement make your dessert table feel even more celebratory and Instagram-worthy.
Additional Tips:
- Use gel food coloring to tint white chocolate if needed.
- Chill mixture thoroughly before rolling to avoid sticky hands.
- Use high-quality candy melts for smooth coating.
- Store in a single layer to prevent pops from sticking together.
- Make a test dip to ensure the coating sets cleanly before doing the full batch.
Recipe Variations:
- Berry Burst Cheesecake Pops
- Mix in crushed freeze-dried strawberries, raspberries, or blueberries to the cheesecake base for a fruity explosion of flavor and color. The freeze-dried berries add natural sweetness, vibrant red-and-blue speckles, and a bit of texture — perfect for a patriotic twist.
- Gluten-Free Option
- Easily make these cheesecake pops gluten-free by using certified gluten-free graham crackers or cookies for the crust. Most dairy-based ingredients are naturally gluten-free, so just be sure to double-check your chocolate coating and toppings.
- Chocolate Swirl Cheesecake Pops
- For a rich, marbled effect, divide the cheesecake filling in half and mix 1–2 tablespoons of cocoa powder into one portion. Swirl the chocolate and vanilla mixtures together as you shape the pops. Dip in melted dark chocolate and top with mini chocolate chips for extra decadence.
- Dairy-Free Version
- Make these indulgent treats without the dairy by using plant-based cream cheese, coconut whipped topping, and a dairy-free chocolate coating (like dark chocolate chips or vegan chocolate bars). They’ll still be smooth, creamy, and crowd-pleasing — just friendly for lactose-intolerant or vegan guests.
- Lemon Zest Cheesecake Pops
- Brighten up the flavor with fresh lemon zest folded into the cheesecake base. It adds a subtle tangy lift that pairs beautifully with the richness of the cream cheese and the sweetness of the coating. Optional: roll the pops in crushed lemon cookies before chilling for extra zing.
Storage & Freezing:
Refrigerator
Once assembled and decorated, store your cheesecake pops in an airtight container in the refrigerator for up to 5 days. Keep them chilled until just before serving to maintain their shape and creamy texture. If serving at a party or outdoors, place them on a tray over ice or a chilled platter to help prevent melting or softening too quickly in warm weather.
- Pro Tip: To keep the decorations and chocolate coating looking their best, place parchment paper between layers or line the container to prevent smudging.
Freezer
Want to prep ahead? Cheesecake pops freeze wonderfully — just follow these steps for best results:
- Freeze Undecorated: After shaping the cheesecake balls and inserting sticks, freeze them on a parchment-lined baking sheet for about 1–2 hours or until firm.
- Store: Transfer the frozen pops into a freezer-safe zip-top bag or airtight container, separating layers with parchment. They’ll keep well for up to 2 months.
- Thaw & Finish: When ready to serve, thaw the pops overnight in the refrigerator. Once chilled but slightly softened, dip them in melted chocolate and decorate just before serving for the freshest look and best texture.
Reheat (If Needed)
Reheating is not necessary for cheesecake pops. These are best enjoyed chilled or at room temperature, where the texture remains smooth and creamy, and the chocolate shell stays firm and snappy.
Equipment Needed:
- Electric mixer
- Mixing bowls
- Parchment paper
- Baking sheet
- Microwave-safe bowls for melting
- Lollipop or cake pop sticks
- Cooling rack or foam block for setting
FAQs (People Also Ask):
Can I make cheesecake pops without a food processor?
Yes! Just crush graham crackers in a zip-top bag with a rolling pin or use store-bought crumbs.
Can I make these without candy melts?
Absolutely. You can use white chocolate chips, but make sure to add a bit of coconut oil or shortening for smoother dipping.
How far in advance can I make cheesecake pops?
These are perfect for making 1–2 days ahead. Just keep them refrigerated until ready to serve.
Do cheesecake pops need to be refrigerated?
Yes, since they contain cream cheese, they should be kept chilled to maintain texture and food safety.
What’s the best way to transport these to a party?
Place in a tall jar with foam or use a cupcake box with holes for the sticks. Keep them cool with ice packs if needed.
External Links:
Fourth of July Cheesecake Pops (No-Bake)
Ingredients
Method
- Make the Cheesecake Base: In a mixing bowl, beat cream cheese until smooth. Add powdered sugar and vanilla, mixing until fully combined. Stir in graham cracker crumbs until evenly incorporated.
- Shape Into Balls: Roll the mixture into tablespoon-sized balls and place on a parchment-lined baking sheet. Insert a stick into each.
- Chill: Refrigerate for at least 1–2 hours, or freeze for 30 minutes until firm.
- Melt the Coating: Melt white candy melts (or chocolate) according to package directions. If using colored melts, melt them separately.
- Dip and Decorate: Dip each pop into the melted coating, let the excess drip off, then quickly add sprinkles or drizzle with colored candy melts.
- Set: Stand pops upright in a foam block or place flat on parchment to set. Chill until ready to serve.
Notes
Fourth of July Cheesecake Pops (No-Bake) – Helpful Tips
Cooking Tips & TechniquesUse room-temperature cream cheese and beat until smooth before adding other ingredients—this keeps the filling creamy and lump-free.
Chill the mixture for at least 30 minutes before rolling into balls to make handling easier.
Dip the chilled cheesecake balls into melted white chocolate or candy coating for a firm shell that holds well.
Decorate quickly with patriotic sprinkles, crushed freeze-dried berries, or colored sugar before the coating sets.
Use lollipop sticks or small skewers for a fun, portable treat—perfect for party trays. Serving Suggestions
Display pops upright in a decorated foam block or chilled platter for festive presentation.
Arrange in mini cupcake liners and serve as part of a dessert board with fruit, brownies, and cookies.
Pair with lemonade, berry punch, or iced coffee for backyard celebrations.
Great for Fourth of July BBQs, picnics, and kids’ parties—no utensils needed!
Serve cold for the best texture and flavor, especially on hot summer days. Make-Ahead & Storage
Make-Ahead: Prepare and decorate up to 2 days in advance. Store chilled in an airtight container.
Refrigerator: Keep pops in the fridge for up to 5 days; place parchment between layers to avoid sticking.
Freezer: Freeze undecorated cheesecake balls up to 1 month. Thaw in the fridge, then dip and decorate before serving.
Reheat: No reheating needed—serve straight from the fridge or slightly chilled. Tasty Variations to Try
Berry Swirl Version: Swirl crushed strawberries or raspberries into the cheesecake base before chilling.
Chocolate Dipped: Use milk or dark chocolate instead of white for a richer twist.
Gluten-Free: Use gluten-free graham crackers or cookies for the crust portion.
Lemon Zest Boost: Add fresh lemon zest to the base for a tangy, citrusy pop.
Mini Cheesecake Truffles: Skip the stick and serve bite-sized balls in candy cups.
Conclusion
There’s just something special about seeing a tray of Fourth of July Cheesecake Pops (No-Bake) lighting up the dessert table with all that red, white, and blue. I love how easy they are to make—and even more, how much people enjoy them. The combo of creamy cheesecake, crisp candy coating, and festive sprinkles brings smiles every time.
Whether you’re hosting a backyard bash, hitting a fireworks show, or just making memories at home, this Fourth of July Cheesecake Pops (No-Bake) are a sweet way to celebrate. They’re kid-friendly, no-bake, and easy to customize—so you can let your creativity fly right alongside those fireworks.
So grab your sticks, your sprinkles, and a little bit of that holiday spirit, and let’s make this Fourth of July one to remember. And hey—if you share your festive creations online, include me in your post. I want to see those sparkler-worthy treats lighting up your celebration!