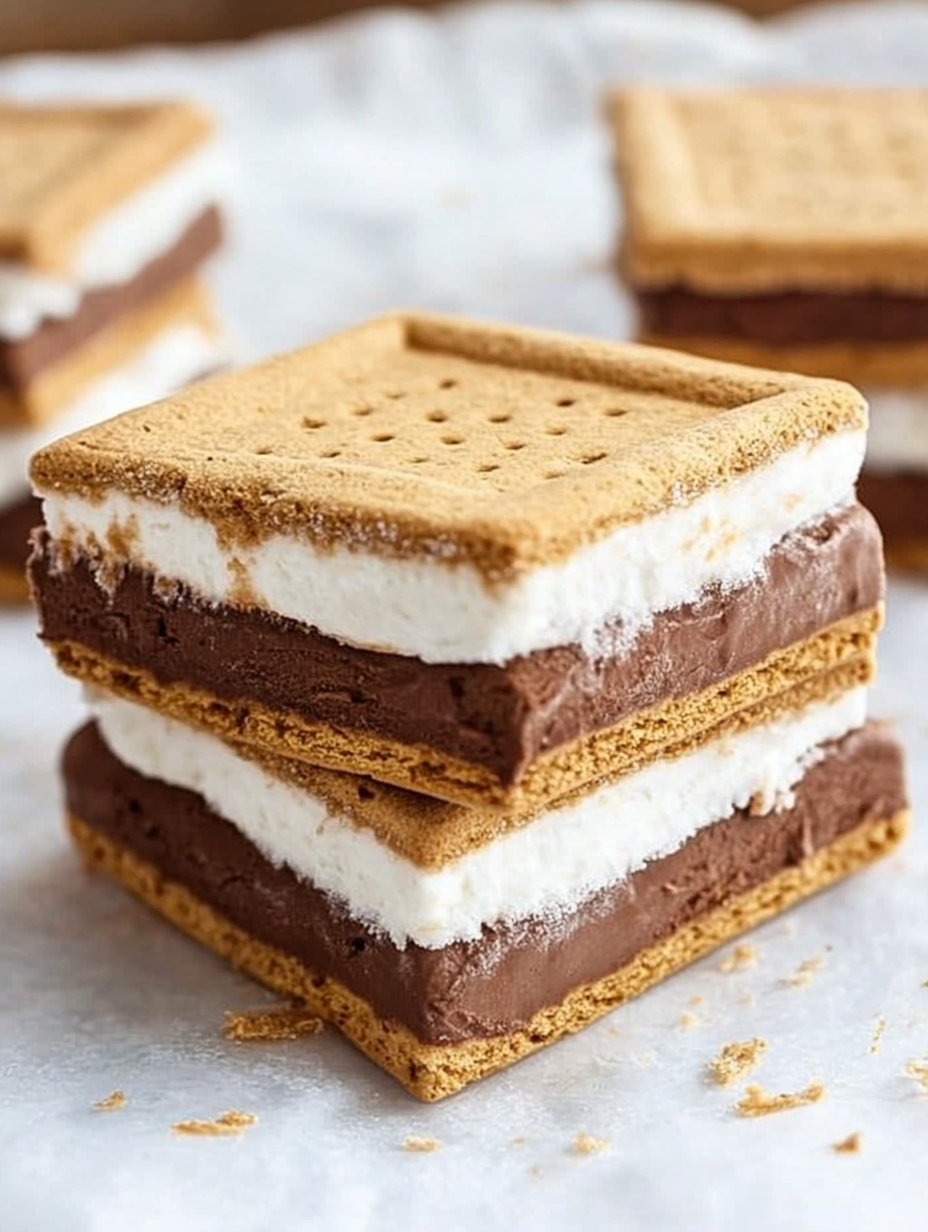
Whoever said s’mores are only for the campfire clearly hasn’t met a mom armed with a freezer and a craving for cold chocolate. My Frozen S’mores recipe is a dreamy, no-bake summer treat that takes all the gooey, chocolate-marshmallow nostalgia of traditional s’mores and turns it into a cool, creamy dessert sandwich. Think: layers of graham crackers, rich chocolate pudding, and fluffy marshmallow whipped topping — all frozen into a perfect grab-and-go bar. It’s like an ice cream sandwich and a campfire s’more had the sweetest baby ever. Whether it’s for an after-pool snack or a last-minute treat to impress at a backyard BBQ, this is one no-bake dessert you’ll make on repeat. And yes, kids and grown-ups alike go absolutely bonkers over these. Get ready to fall in love with the easiest, breeziest Frozen S’mores ever.
What’s on the Plate
Overview
- Cuisine: American
- Course: Dessert, Snack
- Prep Time: 15 minutes
- Chill Time: 4 hours
- Total Time: 4 hours 15 minutes
- Servings: 12 bars
What’s in Every Bite
- Calories: 280
- Carbs: 36g
- Fats: 13g
- Protein: 3g
- Fiber: 1g
- Sugar: 22g
- Sodium: 180mg
Total Recipe Cost
- Estimated Total Cost: $7.25
- Cost Per Serving: $0.60
- Main Cost Factors: Instant pudding mix, Cool Whip, graham crackers
The Story Behind the Flavor
The original s’mores date all the way back to a 1927 Girl Scouts cookbook. It was the ultimate fireside treat: graham crackers, a toasted marshmallow, and a square of melty chocolate. But Frozen S’mores? Oh, that’s a modern mom’s masterpiece. This twist came about in the early 2000s when no-bake desserts became all the rage. People wanted the flavor of s’mores but without the fire (and mosquito bites). Now, these frozen bars are a staple at summer potlucks, especially here in the South where we love anything chilled. And trust me, these dreamy bites hold their own against even the fanciest store-bought frozen treats.
Perfect For
These S’mores Cookie Bars aren’t just your average dessert — they’re the treat that brings the fun no matter when or where you serve them. With that golden graham crunch, gooey chocolate, and toasted marshmallow magic, these bars are built to impress and disappear fast. Here’s when they truly shine:
- Pool Parties & Summer Cookouts
- You know that moment when everyone’s relaxing outside and craving something sweet that doesn’t melt before it hits your mouth? These bars are your go-to. They channel all the campfire vibes without needing a single flame — just slice, stack, and pass around!
- Afternoon Snacks for the Kids
- Forget store-bought snacks — these are way more fun and just as easy to grab. Toss a square into the kids’ hands after school or during a weekend playdate, and watch their eyes light up. Bonus: they’re less messy than traditional s’mores, so your couch stays chocolate-free.
- Make-Ahead Dessert Trays for Guests
- Hosting a party or game night? These s’mores bars can be made ahead and served room temp — no last-minute prep needed. Layer them on a tray next to fruit, brownies, or cookies and you’ve got a dessert table that screams “eat me!”
- Freezer-Friendly Lunchbox Surprises
- These bars freeze beautifully, making them ideal for packing a sweet surprise in your kiddo’s lunchbox. Just pull one out in the morning and it’ll be perfectly thawed and soft by lunchtime. It’s the kind of treat that turns an ordinary Tuesday into something special.
- Celebrating National S’mores Day (August 10!)
- Yes, it’s a thing — and yes, you absolutely need to celebrate it. Skip the firepit and get baking instead. These bars are the modern twist on a nostalgic classic, and they’ll bring all the ooey-gooey joy with zero smoke in your eyes.
Why You’ll Love This Recipe
This no-bake s’mores dessert is what summer dreams (and snack-time miracles) are made of. Whether you’re chasing nostalgia or just dodging the oven heat, this recipe ticks every box and then some. Here’s why you’ll want to keep it on repeat:
- No Oven Required — Perfect for Hot Days
- Who wants to fire up the oven when the sun’s already blazing? Not me. This recipe keeps the heat low and the satisfaction high, giving you that campfire flavor without heating up your kitchen.
- Budget-Friendly and Made with Pantry Staples
- You probably already have everything you need! Graham crackers, chocolate, marshmallows, and a few kitchen basics come together to make a dessert that feels indulgent — without emptying your wallet.
- Quick 15-Minute Prep
- Yep, that’s it. Just 15 minutes of hands-on time, and the fridge does the rest. That means more time for you to kick back, sip lemonade, or wrangle the kiddos while dessert chills into deliciousness.
- Kid-Friendly and Freezer-Stable
- Kids go wild for these creamy, crunchy layers — and honestly, adults do too. Bonus? You can freeze them for later and pop out a square when the sugar craving hits. Great for lunchboxes, birthday parties, or just because.
- Creamy, Crunchy, Chocolatey Layers
- Every bite brings the best of all textures: soft, gooey marshmallow cream, rich chocolate, and that satisfying graham cracker snap. It’s like a hug in dessert form — no campfire needed.
- Easy to Double or Halve Based on Need
- Feeding a crowd? Double the recipe in a bigger dish. Just want a small-batch treat? Halve it and use a loaf pan. It’s totally flexible and always tasty, no matter the size.
Ingredients You’ll Need
Core Ingredients
- 1 (5.1 oz) box instant chocolate pudding mix
- 2 cups cold milk
- 1 (8 oz) tub Cool Whip, thawed
- 1 (7 oz) jar marshmallow fluff
- 24 graham cracker sheets (whole)
Optional Add-ins
- Mini chocolate chips (for crunch)
- Peanut butter (swirled into pudding)
- Crushed Oreos (for extra indulgence)
- Sea salt (sprinkle on top for contrast)
Ingredient Highlights
- Instant Chocolate Pudding: Fast-setting and gives that creamy richness we want without needing stovetop custards.
- Marshmallow Fluff + Cool Whip: When these two combine, you get the dreamiest whipped marshmallow layer ever. It spreads easily and firms up beautifully in the freezer.
- Graham Crackers: Classic s’mores flavor and they stay crisp even after freezing when layered correctly.
Step-by-Step Instructions
- Whip the Chocolate Layer: In a large mixing bowl, whisk the pudding mix with cold milk for 2 minutes until thick. Let it sit for 2 more minutes.
- Mix the Marshmallow Layer: In another bowl, stir together Cool Whip and marshmallow fluff until smooth.
- Line the Pan: Line a 9×13-inch pan with parchment paper. Arrange half the graham crackers in a flat layer, breaking pieces as needed.
- Spread Chocolate Layer: Spread the chocolate pudding evenly over the graham crackers.
- Add Marshmallow Layer: Gently spread the Cool Whip-marshmallow mix on top of the pudding layer.
- Top with Crackers: Add another layer of graham crackers on top to sandwich it.
- Freeze: Cover and freeze for at least 4 hours or until firm.
- Cut & Serve: Use a sharp knife to cut into bars. Serve frozen!
Pro Tips
Want to take your no-bake s’mores dessert from just good to absolutely irresistible? I’ve got you covered with these smart tricks that’ll help you nail the texture, flavor, and wow factor every time:
- Use a Warm Knife to Slice Cleanly Through the Frozen Layers
- Don’t wrestle with frozen dessert slabs! Run your knife under hot water, wipe it dry, and glide it through for those picture-perfect squares. Your bars will look bakery-level pro — and your guests will be impressed.
- Want a Firmer Texture? Freeze Overnight
- If you’re after that crisp, snappy bite, let it chill in the freezer overnight. The layers will set beautifully, making slicing (and stacking!) a breeze. Plus, they hold up better on dessert trays or in lunchboxes.
- Let Sit at Room Temp for 2–3 Minutes Before Eating for the Perfect Bite
- Straight from the freezer? These bars are solid! Let them sit out just a minute or two to soften slightly, and you’ll get that dreamy, creamy texture with a bit of crunch — the perfect bite, every time.
- Use Parchment Paper to Lift the Entire Slab Out Before Slicing
- Lining your pan with parchment is a total game changer. Once it’s frozen, just grab the edges and lift the whole thing out — no mess, no sticking. Bonus: way easier cleanup.
- Add a Drizzle of Melted Chocolate Before Freezing for That Extra Wow Factor
- Want to impress with zero effort? Swirl or drizzle melted chocolate over the top before the final freeze. It adds a glossy finish and an extra layer of chocolatey goodness that makes these bars look (and taste!) gourmet.
Recipe Variations
One of the best parts about this no-bake frozen s’mores recipe? It’s a total chameleon. You can swap, stir, or sprinkle your way to flavor combos that match your cravings or whatever’s in your pantry. Here are a few of my family’s favorite spins:
- Frozen S’mores with Peanut Butter
- Calling all peanut butter lovers! Stir ½ cup of creamy peanut butter right into your chocolate pudding layer before assembling. It adds a rich, nutty swirl that plays beautifully with the graham cracker base and whipped topping. For an extra PB punch, sprinkle in a few crushed peanut butter cups or chopped peanuts!
- Mint Chocolate Frozen S’mores
- Craving that cool mint-chocolate combo? Add ½ teaspoon of peppermint extract to your chocolate pudding, then fold in a handful of mini chocolate chips. It’s like a Thin Mint meets a campfire treat — totally refreshing and ultra indulgent. You could even top it with crushed mint candies before freezing for a holiday-ready twist.
- Frozen S’mores Ice Cream Sandwiches
- Want to make these bars even more decadent? Swap out the chocolate pudding entirely and use softened chocolate ice cream instead. Layer it the same way, freeze solid, then slice into dreamy ice cream sandwiches that scream summer fun. Bonus points for rolling the edges in mini marshmallows or chocolate chips!
Gluten-Free Version
You can totally make these frozen s’mores gluten-free without sacrificing flavor or texture. The key is choosing the right swaps so no one misses out on the gooey, creamy fun.
Start by using gluten-free graham crackers — several brands like Pamela’s, Schär, or Kinnikinnick make ones that taste just as buttery and crisp as the classic kind. You’ll want to crush them the same way for that golden graham crust.
Next up: double-check your chocolate pudding mix and marshmallow fluff. Most are naturally gluten-free, but some brands sneak in thickeners or flavorings with gluten, so be sure they’re certified if you’re cooking for someone highly sensitive or celiac.
Everything else — whipped topping, milk, butter — is already naturally gluten-free, so you’re in the clear there!
Kid-Friendly Version
These frozen s’mores are already a hit with the little ones — they’re basically a mashup of two of their favorite treats: ice cream bars and classic s’mores! But if you want to crank up the fun and make it even more hands-on (and memory-making), here’s how:
Let the kiddos build their own bars! Set up a frozen s’mores “station” where they can press graham layers, spread pudding, dollop fluff, and sprinkle toppings. It’s like a dessert craft project — with delicious results.
Use cookie cutters to make fun shapes like stars, hearts, or dinosaurs once the bars are frozen. They’ll get a kick out of choosing their favorite shape (and probably asking for seconds).
Toss in some rainbow sprinkles or mini chocolate chips into the marshmallow fluff layer before freezing. It adds a pop of color and makes every bite even more magical.
Frozen S’mores
Ingredients
Equipment
Method
- In a large mixing bowl, whisk the pudding mix with cold milk for 2 minutes until thick. Let it sit for 2 more minutes.
- In another bowl, stir together Cool Whip and marshmallow fluff until smooth.
- Line a 9×13-inch pan with parchment paper. Arrange half the graham crackers in a flat layer, breaking pieces as needed.
- Spread the chocolate pudding evenly over the graham crackers.
- Gently spread the Cool Whip-marshmallow mix on top of the pudding layer.
- Add another layer of graham crackers on top to sandwich it.
- Cover and freeze for at least 4 hours or until firm.
- Use a sharp knife to cut into bars. Serve frozen!
Notes
Frozen S’mores – Helpful Tips
Use a Sturdy Base- Graham crackers are the star here—pick a good quality, thicker graham so it doesn’t get soggy. You can also try chocolate graham crackers for double the fun!
- For that fluffy, dreamy filling, make sure your whipped topping is fully thawed before folding it into the cream cheese.
- Room temperature cream cheese is a must—no lumps allowed!
- Chill each layer for a few minutes before stacking to make those clean, beautiful layers (and make cutting easier later).
- Use an offset spatula to spread evenly, especially with that thick chocolate pudding layer.
- Freeze for at least 4–6 hours, but overnight is best for perfect firmness.
- Cover tightly with foil or plastic wrap to prevent freezer burn.
- Use a sharp knife dipped in hot water between cuts to slice smooth, bakery-style bars.
- Let the tray sit out for about 5–10 minutes before slicing so you don’t crack the graham crackers.
- Best served partially thawed—still firm but creamy. Too hard? Let sit out a few extra minutes.
- Store leftovers in an airtight container in the freezer for up to 2 weeks.
- Swap chocolate pudding for peanut butter, mocha, or cookies & cream pudding.
- Add a layer of mini marshmallows or crushed graham inside for extra crunch.
- Want even more indulgence? Drizzle with chocolate shell or caramel sauce before freezing!
Taste What’s Next
Brown Sugar Peach Cake
Coconut Magic Bars
Sweet Air Fryer Churro Bites
or you Can Dig Deeper Recipes by clicking this: Appetizer, Breakfast, Lunch, Dinner, and Desserts.
Storage & Reheating
Okay, let’s talk storage — because these frozen s’mores are perfect for making ahead and stashing for snack emergencies (yes, those are real).
- Storage: Keep your frozen s’mores layered neatly in an airtight container or wrap them individually in parchment or wax paper. Pop them in the freezer and they’ll stay fabulous for up to 2 weeks — if they even last that long. (Spoiler: they probably won’t.)
- Serving: When you’re ready to serve, just take one out and let it sit at room temp for 2–3 minutes. That little pause lets the layers soften slightly so you get that dreamy, creamy bite without breaking a tooth on a rock-hard s’more.
- Do Not Microwave: I know it’s tempting to zap things when you’re impatient, but these are meant to be cold, creamy, and melty — not warm and gooey. Microwaving will ruin the texture and make a marshmallow mess. Trust me — freezer to mouth is the way to go.
Equipment
- 9×13-inch baking dish
- Mixing bowls
- Whisk
- Spatula
- Parchment paper
FAQs
What are Frozen S’mores made of?
Frozen S’mores are made with layers of graham crackers, chocolate pudding, and a mix of Cool Whip and marshmallow fluff. They’re chilled until firm and served cold.
Can I make Frozen S’mores ahead of time?
Absolutely! These are a perfect make-ahead dessert. Freeze up to 2 weeks in advance.
How do you keep Frozen S’mores from getting soggy?
Use firm graham crackers and make sure each layer is evenly spread. Freezing quickly helps the graham crackers hold their texture.
Can I use homemade pudding instead of instant?
Yes, just make sure it’s fully cooled and thick before layering.
Are Frozen S’mores good for summer parties?
They’re ideal! These no-bake treats are cool, mess-free, and easy to portion.
External Resources
Conclusion
Frozen S’mores are what happens when childhood nostalgia meets mom-level practicality. No campfire? No problem. These creamy, chocolatey, frozen bars deliver all the flavors we love in s’mores — but in a no-bake, freezer-friendly form that fits our busy lives. Whether you’re planning a summer bash or just want to surprise the kids after school, this recipe has you covered. It’s easy, it’s fun, and it’s downright delicious. So go ahead — snap a photo and post it online! Don’t forget to tag me! I want to see your cooking success. Happy cooking!