Introduction
There’s just something undeniably special about red velvet. It’s rich, it’s dramatic, and it walks that perfect line between chocolatey and tangy. But if you’re like me, you want that flavor in a form that’s bold, dense, and unapologetically indulgent — not light and cakey. That’s why I created The Best Fudgy Red Velvet Brownies Recipe. This is my go-to dessert when I want to impress without the fuss — the kind of treat that makes people stop mid-bite and ask for the recipe.
These brownies are everything I love about red velvet, but dialed up with a fudgy texture that sinks in the center and that signature shiny, crackly top that’s practically a baker’s badge of honor. I use a mix of butter and oil to keep things moist, and brown sugar for extra chew. No shortcuts, no cake mix, just real ingredients and bold flavor. Whether it’s Valentine’s Day, a cozy weekend bake, or just a Wednesday night when you’re craving something special, this is the recipe that always delivers.
And best of all? It’s easy. No complicated steps, no fancy tools — just a whisk, a bowl, and a serious love of red velvet. Let’s bake.
Perfect For
- Valentine’s Day, anniversaries, or romantic dinners
- Bake sales or holiday trays that need a pop of color
- Gifting something homemade (and better than store-bought!)
- Parties where you want to serve bite-sized, bold-flavored sweets
- When your chocolate craving meets your love of classic red velvet
Why You’ll Love This Recipe
- Unbeatable Fudgy Texture: These are the kind of brownies that bend when you break them — soft, dense, and rich, not dry or crumbly.
- Classic Red Velvet Flavor: That tangy cocoa taste we all know and love, made from scratch with no shortcuts.
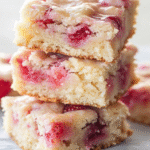
- Bakery-Level Look & Taste: Crinkly tops, deep red centers, and a gorgeous sliced edge that looks like it came from a professional kitchen.
- Simple Ingredients, Big Flavor: No cake mix here. Everything is homemade with pantry staples and a few special tweaks.
- Versatile Enough for Any Occasion: Dress them up with frosting or a drizzle, or serve as-is — they shine either way.
Preparation & Cooking Time
- Prep Time: 15 minutes
- Cook Time: 30 minutes
- Total Time: 45 minutes
- Servings: 16 squares
- Calories: ~250 per serving
Ingredients
- 1/2 cup unsalted butter, melted
- 1 tablespoon vegetable oil
- 1 cup granulated sugar
- 1/4 cup packed brown sugar
- 2 large eggs
- 1 teaspoon vanilla extract
- 1 1/2 teaspoons red gel food coloring
- 1/4 teaspoon distilled white vinegar
- 1/2 cup all-purpose flour
- 1/4 cup unsweetened cocoa powder (natural, not Dutch-processed)
- 1/4 teaspoon salt
- Optional: 1/2 cup white chocolate chips or chunks
Ingredient Highlights
- Butter + Oil Combo: Butter for flavor, oil for moisture and that ultra-fudgy bite.
- Brown Sugar: Adds depth and chew to every bite.
- Red Gel Food Coloring: Delivers vibrant color without watering down your batter.
- Vinegar: A nod to classic red velvet — it balances the sweetness and activates the cocoa.
- Unsweetened Cocoa Powder: Keeps things rich and chocolatey without overwhelming the red velvet profile.
Step-by-Step Instructions
- Preheat oven to 350°F (175°C). Line an 8×8-inch baking pan with parchment paper and lightly grease the sides.
- Mix wet ingredients: In a large bowl, whisk together the melted butter, oil, granulated sugar, and brown sugar until glossy.
- Add eggs and flavoring: Beat in the eggs one at a time. Stir in vanilla, food coloring, and vinegar.
- Sift dry ingredients: In a separate bowl, sift together flour, cocoa powder, and salt.
- Combine: Gently fold the dry ingredients into the wet mixture just until combined. Do not overmix.
- Optional add-ins: If using white chocolate chips or chunks, fold them in now.
- Bake: Pour batter into prepared pan and spread evenly. Bake for 28–32 minutes or until the center is just set and a toothpick comes out with a few moist crumbs.
- Cool completely before slicing into squares. The texture improves as they rest!
Serving Suggestions
- With Cream Cheese Frosting: Classic red velvet pairing.
- Topped with Vanilla Ice Cream: Warm brownie + cold scoop = heaven.
- Drizzled with White Chocolate: A simple visual upgrade.
- Sprinkled with Crushed Peppermint: Perfect for winter holidays.
- Cut into Hearts or Shapes: Use cookie cutters for themed events or gifts.
Additional Tips
- Use Gel, Not Liquid Coloring: For strong red color without altering consistency.
- Don’t Overbake: The center should still be slightly soft when you pull them.
- Chill Before Cutting: Refrigerate for clean edges and a dense fudgy finish.
- Swap Pan Sizes Carefully: A 9×9 pan will yield thinner brownies — reduce bake time slightly.
- Store Airtight: These stay fudgy at room temp for days.
Recipe Variations
- Red Velvet Brownies with Cream Cheese Swirl
- Take things up a notch by swirling softened cream cheese right into the batter. Drop spoonfuls of sweetened cream cheese (softened cream cheese mixed with a bit of sugar and vanilla) over the top of your brownie batter, then use a knife to swirl gently before baking. You’ll get tangy ribbons of creamy goodness in every bite.
- Gluten-Free Version
- Make these brownies safe for gluten-free guests by swapping in a 1:1 gluten-free flour blend. Look for one with xanthan gum for best results, and be sure to check your cocoa powder and baking products for gluten-free certification, just to be safe.
- Dairy-Free Adaptation
- Need to skip the dairy? No problem. Use a high-quality vegan butter substitute and opt for plant-based white chocolate chips or chunks (many brands now offer them!). The texture stays fudgy and rich, with no compromise on flavor.
- Extra Chocolate Version
- For die-hard chocoholics, stir in 1/2 cup of dark chocolate chunks before baking, or drizzle the cooled brownies with a glossy layer of chocolate ganache. The contrast of dark chocolate against the red velvet is pure indulgence.
- Red Velvet Without Food Coloring
- Looking for a more natural approach? Skip the red dye and use 1–2 teaspoons of beet powder instead. It adds a deep ruby color with a subtle earthy undertone that pairs beautifully with the cocoa and vanilla.
Freezing & Storage
Refrigerator:
Once cooled, store your brownies in an airtight container in the fridge for up to 5 days. In fact, they get even fudgier and more decadent by day two—the texture tightens slightly and the flavors deepen. For best results, place parchment paper between layers to prevent sticking.
Freezer:
To freeze, wrap each cooled brownie individually in parchment paper, then seal them in a freezer-safe zip-top bag or airtight container. This helps prevent freezer burn and keeps the texture just right. Brownies can be frozen for up to 3 months. Label with the date so you don’t forget they’re there (though they probably won’t last that long!).
Reheat:
Want that fresh-baked warmth again? Just pop a brownie in the microwave for 10–15 seconds—it’ll get soft, melty, and irresistibly gooey. You can also thaw overnight in the fridge or let it sit at room temperature for about an hour. Pro tip: top with a scoop of ice cream after reheating for an unbeatable treat.
Equipment Needed
- 8×8-inch baking pan
- Mixing bowls (one large, one medium)
- Whisk and rubber spatula
- Measuring cups and spoons
- Parchment paper
FAQs (From People Also Ask)
What makes red velvet brownies fudgy?
The mix of butter, oil, and brown sugar creates an incredibly moist and chewy texture. And baking just until the center is set — not dry — locks in that fudgy goodness. That’s the secret behind this best fudgy red velvet brownies recipe.
Can I make red velvet brownies without cake mix?
Yes, and you should! This homemade red velvet brownie recipe uses pantry ingredients and no shortcuts, resulting in a deeper flavor and much better texture than cake mix versions.
How do I get a shiny top on brownies?
Thoroughly whisking the sugar into the warm butter helps create that crackly, glossy finish. It’s a small technique that makes a big difference in homemade red velvet brownies.
What’s the purpose of vinegar in red velvet brownies?
A bit of white vinegar balances the sweetness and enhances the cocoa notes. It also reacts with baking agents (when used) to give red velvet its signature lift and flavor profile.
Can I make red velvet brownies with white chocolate chips?
Absolutely. Folding white chocolate chips into the batter adds creamy pops of sweetness that contrast perfectly with the tangy cocoa base.
External Resources (Non-Recipe Links)
- USDA Food Safety Storage Guide — for proper brownie storage.
- Harvard T.H. Chan: The Truth About Cocoa — learn more about the health and flavor benefits of cocoa.
- Food Coloring Guide — see safe usage info on food dyes.
The Best Fudgy Red Velvet Brownies Recipe
Ingredients
Method
- Preheat oven to 350°F (175°C). Line an 8×8-inch baking pan with parchment paper and lightly grease the sides.
- Mix wet ingredients: In a large bowl, whisk together the melted butter, oil, granulated sugar, and brown sugar until glossy.
- Add eggs and flavoring: Beat in the eggs one at a time. Stir in vanilla, food coloring, and vinegar.
- Sift dry ingredients: In a separate bowl, sift together flour, cocoa powder, and salt.
- Combine: Gently fold the dry ingredients into the wet mixture just until combined. Do not overmix.
- Optional add-ins: If using white chocolate chips or chunks, fold them in now.
- Bake: Pour batter into prepared pan and spread evenly. Bake for 28–32 minutes or until the center is just set and a toothpick comes out with a few moist crumbs.
- Cool completely before slicing into squares. The texture improves as they rest!
Notes
The Best Fudgy Red Velvet Brownies Recipe – Helpful Tips
Cooking Tips & TechniquesUse high-quality cocoa powder for deep chocolate flavor—natural or Dutch-process both work well.
Be careful not to overmix the batter after adding the flour; this keeps the brownies dense and fudgy, not cakey.
Use room temperature eggs to help the batter emulsify smoothly and create that shiny top.
A splash of vinegar gives red velvet its signature tang and helps brighten the red color.
Bake until the edges are set but the center is slightly soft—test with a toothpick that comes out with moist crumbs (not clean!). Serving Suggestions
Top with a swirl of cream cheese frosting for a classic red velvet finish.
Dust with powdered sugar or drizzle with melted chocolate for extra flair.
Serve chilled for extra chewiness or slightly warm with a scoop of vanilla ice cream.
Perfect for Valentine’s Day, holiday platters, or anytime you’re craving a rich, vibrant treat.
Pair with coffee, milk, or even a bold red wine for an elegant dessert moment. Make-Ahead & Storage
Make-Ahead: Bake up to 1 day ahead—brownies taste even better after resting overnight.
Refrigerator: Store frosted or unfrosted brownies in an airtight container for up to 5 days.
Freezer: Freeze unfrosted brownies (whole or cut) for up to 2 months. Thaw at room temperature.
Reheat: Warm individual slices in the microwave for 10–15 seconds to revive fudginess. Tasty Variations to Try
Cheesecake Swirl: Add dollops of sweetened cream cheese to the top before baking and swirl for a marbled look.
Nutty Crunch: Fold in chopped pecans or walnuts for texture.
Extra Chocolatey: Add chocolate chips or chunks to the batter for gooey chocolate pockets.
Gluten-Free Option: Use a 1:1 gluten-free flour blend—these brownies are rich enough to hold up beautifully.
Heart-Shaped Brownies: Cut cooled brownies into heart shapes with a cookie cutter for special occasions.
Conclusion
These aren’t your average brownies — they’re The Best Fudgy Red Velvet Brownies Recipe, and they pack every bite with rich, chewy indulgence. I’ve tested and tweaked this one over the years to get that perfect balance of dense texture, deep cocoa flavor, and eye-catching red velvet color. Whether you’re baking them for someone special or just treating yourself, The Best Fudgy Red Velvet Brownies Recipe hit the sweet spot every single time.
So grab your whisk and bring out that 8×8 pan — it’s time to bake something unforgettable. And once you cut into that first fudgy square? Don’t forget to include me in your post if you share it online. I want to see your masterpiece!