When it comes to breakfast, I’m all about bold flavors, quick wins, and a little twist of fun—and this Hawaiian Roll French Toast is exactly that. Imagine warm, golden-brown rolls soaked in a cinnamon-vanilla custard, then pan-fried until the outside is crisp while the inside stays soft and fluffy. But wait, we’re not stopping there. These sweet, buttery rolls are practically begging to be layered with whipped cream, drizzled in syrup, and topped with fruit, nuts, or even a little chocolate if you’re feeling fancy. It’s like regular French toast went on a tropical vacation—and brought breakfast joy back with it!
What I love most about this Hawaiian Roll French Toast is how kid-friendly and crowd-pleasing it is. Whether I’m prepping a cozy weekend brunch or surprising my family with a weekday breakfast-for-dinner, this dish is a total hit every time. With minimal prep and maximum flavor, this one’s a keeper for anyone who likes breakfast done right. Ready to take a sweet ride to the islands from the comfort of your kitchen? Let’s go.
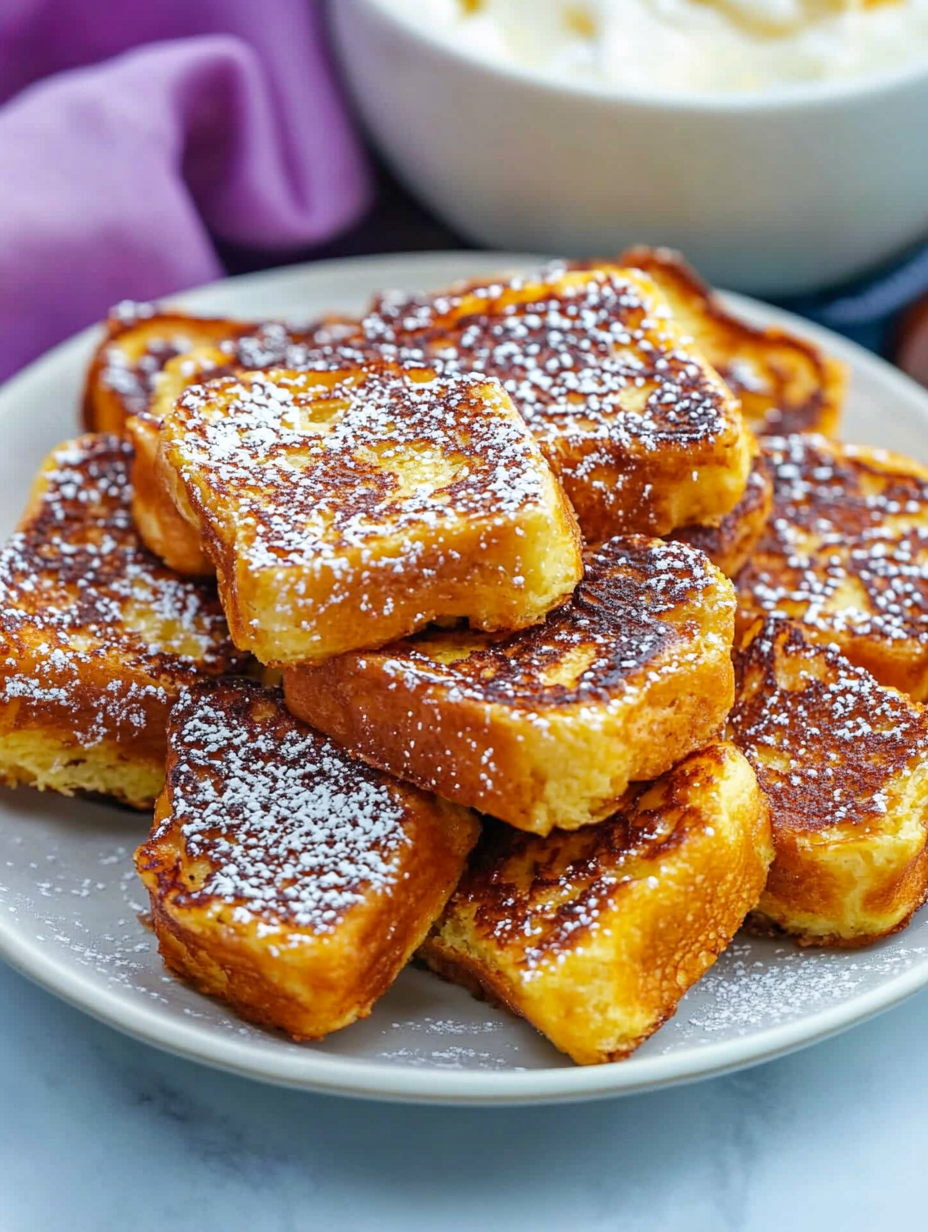
What’s on the Plate
Overview
- Cuisine: American, with tropical fusion flair
- Course: Breakfast, Brunch, or Sweet Treat
- Prep Time: 10 minutes
- Cook Time: 15 minutes
- Total Time: 25 minutes
- Servings: 6
What’s in Every Bite
- Calories: 340
- Carbs: 38g
- Fats: 17g
- Protein: 9g
- Fiber: 2g
- Sugar: 14g
- Sodium: 310mg
Total Recipe Cost
- Estimated Total Cost: $7.50
- Cost Per Serving: $1.25
- Main Cost Factors: Hawaiian rolls, eggs, milk, toppings (fruit, syrup, etc.)
The Story Behind the Flavor
French toast goes way back—like 5th-century Europe back. Known originally as “pain perdu” or “lost bread,” it was a clever way to use up stale loaves. Fast forward to modern-day brunch tables, and we’ve taken that same thrifty idea and turned it into a breakfast celebration. When Hawaiian rolls entered the picture in the 1980s, thanks to King’s Hawaiian bakery’s massive popularity, they brought sweetness and richness that completely transformed the idea of what French toast could be.
This Hawaiian Roll French Toast blends classic techniques with tropical sweetness. It’s become a viral favorite for busy moms, home cooks, and brunch lovers. Traditionally, French toast is made with baguette or brioche, but I promise—these soft rolls with a hint of honey elevate it to cloud-level deliciousness.
Perfect For
This Crescent Roll Breakfast Casserole is the breakfast hero you didn’t know you needed. It’s the kind of dish that fits into just about any occasion with grace, flavor, and that golden, flaky crescent crust that makes everyone swoon. Here’s when it’s guaranteed to shine:
- Sunday brunch with friends: Whether you’re hosting or bringing a dish to share, this casserole steals the spotlight. It’s hearty, comforting, and makes you look like a brunch boss — with hardly any effort.
- Kids’ sleepovers and weekend breakfasts: When the house is full of sleepy kids and grumbling tummies, this is your easy solution. The layers of eggs, cheese, and sausage tucked into a crescent crust? Total crowd-pleaser.
- Mother’s Day or special holiday mornings: Fancy without being fussy. This casserole feels elevated enough for special occasions — but is simple enough that the kids can help make it while you sip your coffee.
- A cozy breakfast-for-dinner idea: Don’t underestimate the power of brinner. Pair this with some fruit or a simple green salad and boom — comfort food magic that works any time of day.
- Any time you want to impress with minimum effort: Last-minute guests? Holiday mornings? Just want to treat yourself on a Tuesday? This casserole delivers buttery, cheesy satisfaction without breaking a sweat.
Why You’ll Love This Recipe
Let me count the sweet, custardy, buttery ways! This Hawaiian Roll French Toast Bake isn’t just breakfast—it’s a cozy morning hug in a casserole dish. Whether you’re making it for a lazy weekend or a holiday brunch, here’s why you’ll fall head over spatula for this recipe:
- Soft and sweet: Hawaiian rolls bring that pillowy texture and subtle sweetness that sets this bake apart from ordinary bread puddings. Every bite practically melts in your mouth and feels like a little dessert-for-breakfast indulgence.
- Quick and easy: No need to soak overnight or babysit the stove. This beauty comes together in about 25 minutes start to finish, which means more time sipping coffee and less time flipping slices on a skillet.
- Flexible for toppings: Go traditional with maple syrup and powdered sugar, or get adventurous—think caramel drizzle, sliced bananas, a sprinkle of cinnamon sugar, or even a whipped cream dollop if you’re feeling extra. It’s a choose-your-own-topping adventure.
- Family favorite: There’s something about buttery Hawaiian rolls that wins over kids and grown-ups alike. It’s that sweet-and-savory balance that makes everyone go back for seconds (and okay, maybe thirds).
- Make-ahead friendly: Want to make your mornings smoother? Prep the custard and slice the rolls the night before. In the morning, just pour, bake, and enjoy the heavenly smell wafting through your kitchen while the coffee brews.
Ingredients You’ll Need
Core Ingredients
- 1 pack of Hawaiian sweet rolls (12-count)
- 4 large eggs
- ¾ cup whole milk (or any milk of choice)
- 1 tsp vanilla extract
- 1 tsp ground cinnamon
- 1 tbsp sugar (optional)
- Butter for frying
Optional Add-ins
- Maple syrup or honey for serving
- Fresh fruit (bananas, strawberries, blueberries)
- Powdered sugar
- Nutella or peanut butter
- Whipped cream
- Chopped pecans or almonds
Ingredient Highlights
- Hawaiian Rolls: Slightly sweet and super fluffy, they soak up custard like a dream without falling apart.
- Eggs + Milk: The classic French toast custard combo for a creamy texture and golden crust.
- Vanilla + Cinnamon: Brings warmth and familiar French toast flavor.
- Butter: Helps achieve that crispy, golden finish on the outside.
Step-by-Step Instructions
- Prep the rolls: Slice Hawaiian rolls in half horizontally (like sandwich buns). Set aside.
- Make the custard: In a medium bowl, whisk eggs, milk, vanilla, cinnamon, and sugar (if using) until smooth.
- Soak the bread: Dip each half of the roll briefly into the custard—don’t oversoak, just enough to coat.
- Heat the pan: Melt butter over medium heat in a large nonstick skillet or griddle.
- Cook the rolls: Place soaked rolls cut-side down and cook 2–3 minutes until golden, flip and cook the tops for another 2 minutes.
- Serve: Plate warm, drizzle with syrup, dust with powdered sugar, or pile on toppings of choice!
Pro Tips
This Hawaiian Roll French Toast Bake may be easy, but these little pro tips will make you feel like the breakfast wizard you were born to be. Trust me, the extra touches matter!
- Use day-old Hawaiian rolls for better structure.
- If you can resist eating the whole pack fresh out of the bag (I get it!), day-old rolls hold their shape better when soaked in custard. Slightly stale bread = perfect texture, not mushy.
- Don’t soak too long—Hawaiian rolls are soft and absorb fast.
- These fluffy little clouds drink up custard like a sponge! Just a gentle toss or quick dip is enough. Soaking too long will make them fall apart like a soggy love story.
- Cook in batches so the pan doesn’t crowd.
- If you’re pan-frying individual pieces instead of baking the whole tray, give them room to breathe! Overcrowding lowers the heat and leads to pale, limp toast instead of that golden, crisp outside.
- Keep cooked French toast warm in a low oven (around 200°F) while finishing the rest.
- Serving a crowd? Pop the first batch in the oven while you finish the others. No more cold slices for the early birds!
- Add orange zest to the custard for a citrusy kick.
- This one’s optional—but a little fresh orange zest in the egg mixture adds a bright, sunny pop of flavor that pairs beautifully with the sweet rolls. It’s like brunch on a tropical island.
Recipe Variations
This recipe is already a breakfast rockstar, but don’t be afraid to jazz it up and put your own spin on things. Whether you’re feeling sweet, savory, or extra indulgent, there’s a variation here with your name on it!
- Stuffed Version
- Want to take things totally over-the-top? Slice each Hawaiian roll in half and spread a little softened cream cheese, Nutella, or even peanut butter inside before soaking them in the custard. The filling melts into gooey goodness while cooking—think of it as a surprise center that brings major brunch energy.
- Savory Switch
- Not in the mood for sweet? Skip the cinnamon and sugar in the custard, add a pinch of salt, a little garlic powder or herbs, and turn this into a savory French toast dream. Serve it with crispy bacon, sunny-side-up eggs, or a little avocado on the side for a breakfast twist on grilled cheese vibes.
- Baked Casserole Style
- Want something more hands-off? After soaking, arrange the rolls snugly in a buttered baking dish, pour any extra custard over the top, and bake at 350°F for 25–30 minutes. It puffs up golden and perfect—ideal for feeding a crowd with minimal effort. Bonus points if you top it with powdered sugar or a maple glaze.
- Berry Delight Version
- Toss a handful of fresh berries (blueberries, raspberries, or sliced strawberries) between the rolls or on top before baking. They burst into little pockets of juicy flavor and add a pretty pop of color too!
- Caramel Apple Edition
- Add thin slices of apple sautéed in a bit of butter, brown sugar, and cinnamon between the layers for a warm fall-friendly version. It’s like apple pie met French toast and said, “Let’s brunch.”
Gluten-Free Version
No one should have to miss out on this golden, fluffy French toast—especially not my gluten-free friends! With just a couple of smart swaps, you can enjoy every bite without worry.
Start by grabbing certified gluten-free Hawaiian-style rolls—yes, they exist, and some brands make them surprisingly close to the real deal in both taste and texture. If you can’t find Hawaiian-specific buns, opt for soft gluten-free sweet rolls or brioche-style buns that hold up well when soaked.
Next, check your vanilla extract and ground cinnamon. While they seem safe, some store-bought versions may include additives or be processed in facilities that handle wheat. Look for the gluten-free certified label to be on the safe side.
And one last thing: always double-check your milk and butter brands if you’re ultra-sensitive, since even the tiniest cross-contamination can be a dealbreaker.
Kid-Friendly Version
This recipe is already a hit with the little ones thanks to its soft, sweet, and buttery magic—but let’s dial up the fun!
Start by cutting the Hawaiian rolls into smaller triangles, sticks, or even bite-sized nuggets. Kids love food that feels like it was made just for their hands, and finger food turns breakfast into a fun, hands-on adventure.
Set up a dipping station with little bowls of maple syrup, strawberry puree, honey, or even chocolate sauce—because dipping makes everything more exciting (and hey, it buys you a few quiet minutes while they play chef).
Want to sneak in some fruit? Top their plate with banana slices, berries, or apple wedges. You can even let them add their own toppings like sprinkles, mini chocolate chips, or a dusting of powdered sugar.
And here’s a little weekend tip: Make it a DIY French toast bar! Set out the toppings and let them build their own plate. It’s fun, interactive, and gives them ownership of what they eat—making them way more likely to gobble it up.
Hawaiian Roll French Toast
Ingredients
Equipment
Method
- Slice Hawaiian rolls in half horizontally (like sandwich buns). Set aside.
- In a medium bowl, whisk eggs, milk, vanilla, cinnamon, and sugar (if using) until smooth.
- Dip each half of the roll briefly into the custard—don’t oversoak, just enough to coat.
- Melt butter over medium heat in a large nonstick skillet or griddle.
- Place soaked rolls cut-side down and cook 2–3 minutes until golden, flip and cook the tops for another 2 minutes.
- Plate warm, drizzle with syrup, dust with powdered sugar, or pile on toppings of choice!
Notes
Hawaiian Roll French Toast – Helpful Tips
Choose the Right Rolls- Use original King’s Hawaiian rolls for their pillowy texture and hint of sweetness.
- Don’t separate them before dipping—they’re easier to handle and flip as a whole slab.
- Slightly stale rolls soak up the custard without getting mushy. Let them sit out overnight or pop them in a low oven (250°F for 10–12 minutes) to dry out a bit.
- Blend your eggs, milk, vanilla, and cinnamon until smooth and frothy—this gives you that dreamy, custardy soak.
- For extra richness, use half-and-half or heavy cream instead of just milk.
- Don’t drown the rolls! A 15–20 second soak per side is enough to soak without turning soggy.
- Cook on medium-low heat so the inside cooks through before the outside browns too much.
- Use butter and a little oil in your pan to prevent sticking and get a golden, crisp finish.
- Add orange zest, nutmeg, or almond extract for a flavor twist.
- Sprinkle cinnamon sugar on the rolls before cooking for a caramelized crust.
- Fresh berries, powdered sugar, whipped cream, or maple syrup—don’t be shy!
- Turn it into a brunch showstopper with caramelized bananas, crushed nuts, or cream cheese glaze.
- Serve immediately for best texture. Leftovers? Store in the fridge up to 3 days and reheat in a toaster oven or skillet to bring back the crisp.
- These also freeze well—wrap in foil and store up to 1 month. Reheat straight from frozen!
Taste What’s Next
Hawaiian Roll Breakfast Sliders with Sausage Egg & Cheese
Cheesy One Pot Beef and Potatoes
Mexican Street Corn Chicken Tacos
or you Can Dig Deeper Recipes by clicking this: Appetizer, Breakfast, Lunch, Dinner, and Desserts.
Storage & Reheating
Don’t worry if you’ve made a double batch—this French toast stores like a dream and tastes just as good the next day (or next week)!
- Fridge: Got leftovers? Pop them into an airtight container or wrap tightly in foil, and they’ll stay fresh in the fridge for up to 3 days. Perfect for quick weekday breakfasts—just grab, warm, and go!
- Freeze: Want to save some for another morning? Flash freeze the cooked French toast pieces by laying them on a baking sheet for about an hour until firm. Then transfer them into a zip-top freezer bag (label it, trust me!), and freeze for up to 2 months. Stack ’em flat to save space!
- Reheat:
- For the best texture, reheat in the oven at 350°F for 8–10 minutes. It brings back that toasty outside while keeping the inside soft and fluffy.
- In a rush? Microwave in 30-second bursts, flipping halfway through. It won’t be crispy, but it’ll still taste delish.
- Want a golden finish? Pop them in a toaster oven or skillet for a quick sear.
- Bonus: If you’ve frozen them, no need to thaw—just reheat straight from frozen. Breakfast is back on the table in no time!
Equipment
- Nonstick skillet or griddle
- Mixing bowl and whisk
- Bread knife
- Spatula
FAQs
Can you make Hawaiian Roll French Toast ahead of time?
Yes! You can prep the custard the night before and even soak the rolls a few hours ahead. Just store them covered in the fridge.
What’s the best way to reheat Hawaiian Roll French Toast?
Reheat in a 350°F oven until warm (about 10 minutes) or use a toaster oven to restore crispness.
Can I bake Hawaiian Roll French Toast instead of pan-frying?
Absolutely! Lay the soaked rolls in a greased baking dish and bake at 350°F for 25–30 minutes.
Can I use non-dairy milk in the custard?
Yes. Almond, oat, or soy milk works great as a dairy-free option.
What toppings go best with Hawaiian Roll French Toast?
Fresh berries, whipped cream, powdered sugar, maple syrup, or even caramel drizzle.
Is Hawaiian Roll French Toast good for a brunch buffet?
It’s perfect for buffets. Keep warm in a chafing dish and offer a variety of toppings.
External Resources
Conclusion
There’s something magical about transforming a humble pack of Hawaiian rolls into something so luxurious and crave-worthy. This Hawaiian Roll French Toast is everything I love about breakfast: comforting, sweet, and incredibly easy to whip up. Whether you’re making it for a sleepy Sunday, a holiday treat, or just because the mood strikes—you’re in for a tropical twist on a cozy classic.
So go ahead — snap a photo and post it online! Don’t forget to tag me! I want to see your cooking success. Happy cooking!