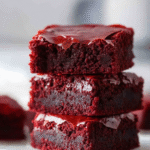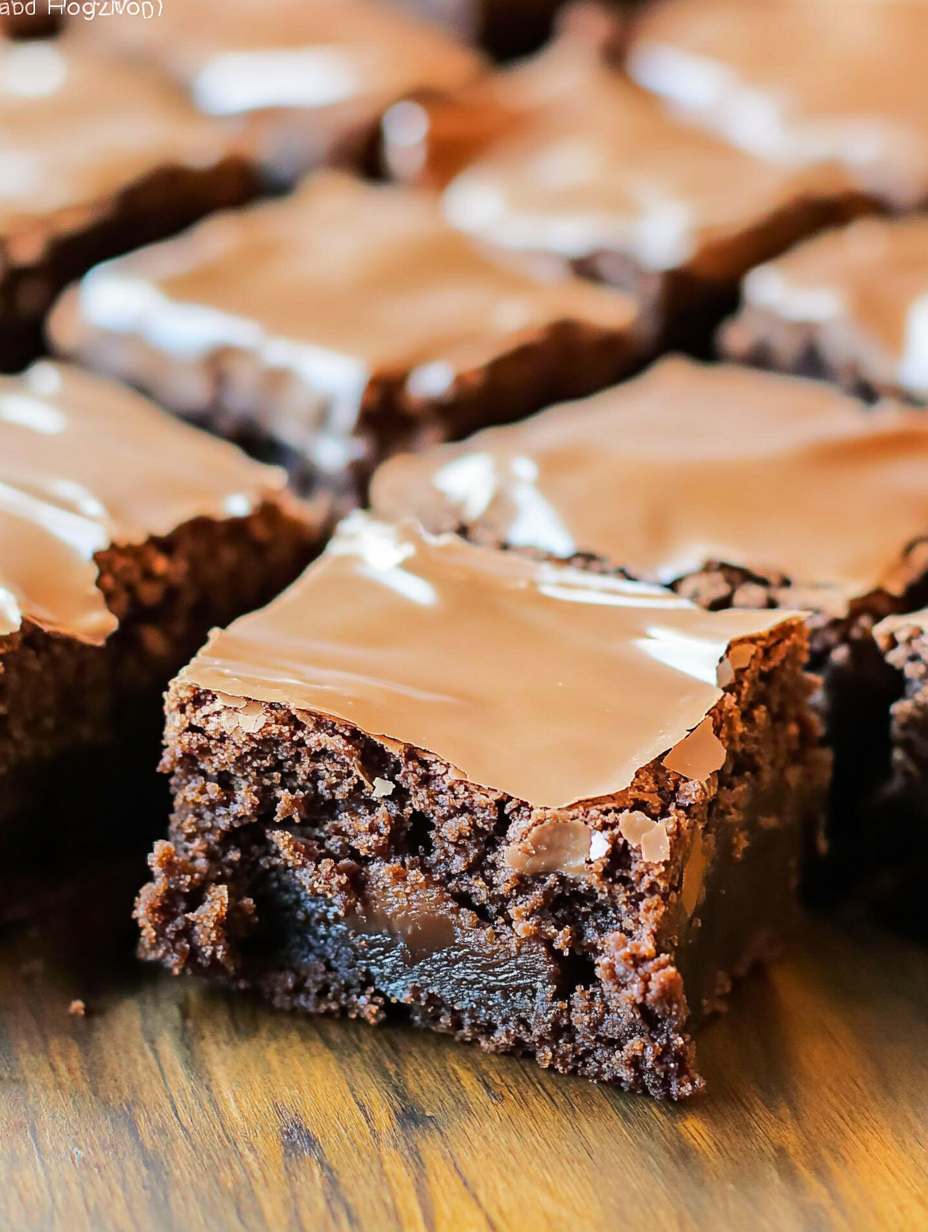
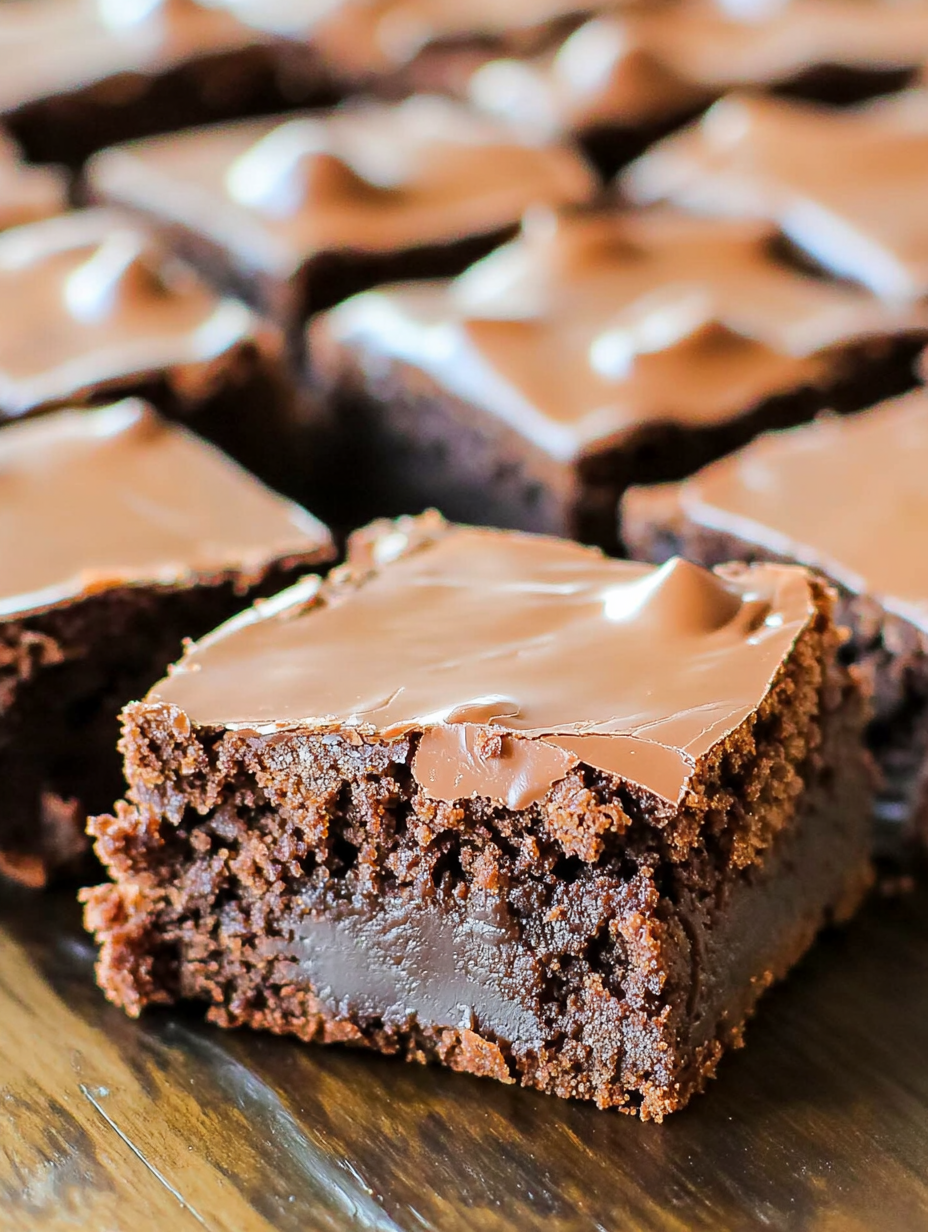
If there’s one dessert that instantly whisks me back to the good old school cafeteria days, it’s Lunch Lady Brownies! You know the ones I’m talking about—the fudgy, dense, chocolatey bars slathered with a thick, glossy layer of homemade chocolate frosting. Every bite is pure nostalgia! These classic chocolate sheet brownies are the ultimate treat when you’re craving a comforting, old-fashioned dessert that’s as simple as it is delicious.
What I love most about this Lunch Lady Brownies recipe is how easy it is to whip up with pantry staples. No fancy techniques, no special equipment—just good old mixing, baking, and frosting like the lunch ladies used to do. It’s a one-bowl wonder that results in chewy, gooey brownies topped with a sweet cocoa glaze that sets to a perfect fudge-like finish. Trust me, your family will go wild for them!
What’s on the Plate
Overview
- Cuisine: American Classic
- Course: Dessert, Snack
- Prep Time: 15 minutes
- Cook Time: 25 minutes
- Total Time: 40 minutes
- Servings: 16 squares
What’s in Every Bite
- Calories: 320
- Carbs: 40g
- Fats: 15g
- Protein: 3g
- Fiber: 2g
- Sugar: 28g
- Sodium: 180mg
Total Recipe Cost
- Estimated Total Cost: $8.50
- Cost Per Serving: $0.53
- Main Cost Factors: Cocoa powder, butter, powdered sugar
The Story Behind the Flavor
Lunch Lady Brownies first made their appearance in American school cafeterias back in the 1960s. These decadent chocolate bars became a beloved staple on dessert trays, thanks to lunch ladies across the country who lovingly baked them from scratch in massive sheet pans. Their secret? Simple ingredients, no shortcuts, and that iconic thick layer of chocolate frosting that made these brownies stand out from the rest.
The recipe was born out of the need for an easy, affordable dessert that could satisfy hundreds of hungry students. Over the years, Lunch Lady Brownies became a symbol of comfort food in school lunchrooms, and now, they’re making a comeback in home kitchens where busy moms (like us!) recreate that nostalgic treat for their own families. The brownies are traditionally baked in a sheet pan, frosted while still warm, and served in generous squares that make you feel like a kid again.
Perfect For
These Lunch Lady Brownies aren’t just your average chocolate treat—they’re a little slice of nostalgic heaven that fits right into so many sweet moments. Whether you’re baking for a crowd or just yourself (no judgment!), here’s when this recipe will shine:
- Bake Sales and Potlucks
- These brownies were practically made for community bake sales and potluck dessert tables. They’re easy to cut into perfect squares, travel well, and always get snapped up in minutes. That glossy chocolate frosting and rich, fudgy texture? Irresistible to kids and adults alike.
- After-School Treats for the Kiddos
- Need a sweet surprise for when the school day’s done? These brownies are a homemade after-school hero. Whip up a batch on Sunday, and you’ve got a week’s worth of lunchbox desserts or after-school pick-me-ups that beat anything store-bought.
- Nostalgic Family Desserts
- Remember those cafeteria brownies from your school days? This recipe brings back all those memories—only better. It’s the perfect throwback dessert to share with family, sparking stories about lunch lines, paper cartons of milk, and who always got the biggest piece.
- Weekend Baking Projects
- Looking for a fun, low-stress weekend baking activity? These brownies are simple enough for beginners and fun enough for seasoned bakers who want a quick chocolate fix without pulling out every tool in the kitchen. Plus, it’s a great recipe to bake with the kiddos—especially when it’s frosting time!
- When You Need a Quick and Easy Chocolate Fix
- Sometimes you just need chocolate. Like, now. This recipe is your emergency chocolate craving solution. Basic pantry ingredients, minimal prep, and a rich, fudgy payoff in under an hour. Because life’s too short to settle for mediocre brownies.
Why You’ll Love This Recipe
These Lunch Lady Brownies aren’t just brownies — they’re the ultimate throwback treat that brings fudgy nostalgia right into your kitchen. Simple, satisfying, and totally indulgent, here’s why you’ll be reaching for this recipe every time a chocolate craving hits:
- One-Bowl Batter: Less Cleanup, More Chocolatey Goodness
- This is a true one-bowl wonder. No mixers, no fancy tools — just a trusty whisk, a big bowl, and you’re good to go. Fewer dishes to wash means you get to focus on the best part: licking the spoon (I mean, baking… but also licking the spoon).
- Super Fudgy Texture: Dense, Chewy, and Perfectly Moist
- If you love your brownies dense, chewy, and unapologetically fudgy, this recipe is your dream come true. The perfect balance of butter, sugar, and cocoa creates that melt-in-your-mouth texture that feels like it came straight from a cafeteria tray—only better.
- Thick Homemade Frosting: Sweet, Glossy, and Spreads Like a Dream
- That glossy chocolate frosting is what truly sets these brownies apart. It’s smooth, sweet, and thick enough to slather on while the brownies are still warm, soaking in just a little bit for that gooey, sticky top layer. Forget store-bought frosting — this homemade version is where it’s at.
- Pantry Staples Only: No Fancy Ingredients Required
- No need to make a special trip to the store. This recipe uses basic pantry ingredients you probably already have on hand—flour, cocoa powder, butter, sugar, eggs, and a splash of milk. Simple, classic, and always ready when the brownie mood strikes.
- Ready in Under 40 Minutes: Perfect for Last-Minute Dessert Cravings
- Got a last-minute dessert emergency? No problem. From mixing bowl to frosted brownie, you’re looking at about 35-40 minutes total time. Perfect for unexpected guests, spontaneous bake sales, or when you simply need a chocolate fix, stat.
Ingredients You’ll Need
Core Ingredients
- 1 cup unsalted butter, melted
- 1/2 cup unsweetened cocoa powder
- 2 cups granulated sugar
- 4 large eggs
- 1 tablespoon vanilla extract
- 1 1/4 cups all-purpose flour
- 1/2 teaspoon salt
For the Frosting
- 1/4 cup unsalted butter, softened
- 1/4 cup milk
- 1/4 cup unsweetened cocoa powder
- 3 cups powdered sugar
- 1 teaspoon vanilla extract
Optional Add-ins
- Chopped walnuts or pecans for crunch
- Mini chocolate chips for extra gooeyness
- A pinch of espresso powder for depth
Ingredient Highlights
- Butter & Cocoa Powder: The backbone of any good brownie—rich, bold, and buttery.
- Granulated Sugar: Gives these brownies their signature chewy texture.
- Eggs & Vanilla: Adds structure and enhances the chocolate flavor.
- Homemade Frosting: A luscious cocoa glaze that hardens into a fudgy layer.
Step-by-Step Instructions
- Preheat & Prep: Preheat your oven to 350°F (175°C). Grease a 9×13-inch baking dish or line it with parchment paper.
- Mix the Batter: In a large mixing bowl, whisk together melted butter and cocoa powder until smooth. Stir in the sugar, then add eggs and vanilla, mixing until well combined.
- Add Dry Ingredients: Fold in flour and salt until just combined. Do not overmix!
- Bake: Pour the batter into the prepared pan and spread evenly. Bake for 25-28 minutes, or until a toothpick inserted comes out with a few moist crumbs.
- Make the Frosting: While the brownies are baking, whisk together softened butter, milk, cocoa powder, powdered sugar, and vanilla until smooth and spreadable.
- Frost While Warm: As soon as the brownies come out of the oven, spread the frosting over the warm brownies. It will melt slightly, creating a glossy, fudgy topping.
- Cool & Slice: Allow brownies to cool before slicing into 16 squares.
Pro Tips
Want to bake brownies that taste like they came straight from the cafeteria lady’s secret recipe stash (but better)? These tried-and-true tips will make sure your Lunch Lady Brownies turn out perfectly fudgy, glossy, and downright irresistible every time:
- Don’t Overbake! Slightly Underbaking Keeps Them Super Fudgy
- The #1 brownie rule: pull them out when the edges are set but the center is still a little soft. They’ll continue to cook as they cool, resulting in that signature dense, chewy texture. Overbaking dries them out and turns fudgy heaven into cakey sadness. For ultimate gooeyness, aim for a toothpick with a few moist crumbs, not a clean stick.
- Frost While the Brownies Are Still Warm for That Perfect Melty Glaze
- The magic of these brownies is in the frosting—specifically how it melts slightly into the warm top layer. As soon as you pull the pan out of the oven, wait about 5 minutes, then spread the frosting while the brownies are still warm (not hot!). This creates that classic glossy, slightly crackly glaze that makes them look bakery-worthy.
- Add a Dash of Espresso Powder to Intensify the Chocolate Flavor
- Want to level up the chocolate richness without making the brownies taste like coffee? Add 1 teaspoon of instant espresso powder to the batter. It deepens the cocoa flavor, making these brownies taste even more luxurious and indulgent.
- Let Them Cool Completely Before Slicing for Clean Edges
- As tempting as it is to dive right in, let the brownies cool completely before slicing. This helps the frosting set and gives you neat, bakery-style squares. For extra clean cuts, use a sharp knife dipped in warm water and wiped clean between each slice.
- Line Your Pan with Parchment for Easy Removal
- Line your baking pan with parchment paper, leaving an overhang on the sides. This makes lifting out the entire slab a breeze, so you can slice on a cutting board for perfect, uniform squares.
Recipe Variations
While the classic Lunch Lady Brownies are pure chocolate perfection, you can easily tweak this recipe to suit your mood, the season, or just to shake things up. Here are some delicious ways to remix these brownies into fun, irresistible variations:
- Nutty Brownies: Add a Crunchy Surprise
- For a classic, old-school vibe, stir in 1/2 to 1 cup of chopped walnuts or pecans into the brownie batter before baking. The nuts add a lovely crunch that balances out the fudgy texture and gives that nostalgic “grandma’s recipe” feel. Toast the nuts beforehand for an even richer, nuttier flavor.
- Chocolate Overload: Because More Chocolate is Always a Good Idea
- Take these brownies from fudgy to ultra-decadent by sprinkling mini chocolate chips on top of the frosting while it’s still soft. As they slightly melt into the glaze, you’ll get extra bursts of chocolate in every bite. You can also fold a handful of chocolate chunks right into the batter for pockets of gooey chocolate goodness.
- Mint Chocolate Twist: Perfect for Holidays or a Refreshing Change-Up
- For a cool, refreshing spin, add 1/2 teaspoon of peppermint extract to the frosting. This gives the brownies a minty-chocolate flavor that’s perfect for Christmas, St. Patrick’s Day, or anytime you crave that classic combo. Top with crushed candy canes or Andes mint bits for an extra festive touch.
- Peanut Butter Swirl: A Sweet-Salty Duo
- Before baking, drop spoonfuls of peanut butter onto the brownie batter and swirl it in with a knife for ribbons of nutty, creamy goodness throughout. You can also drizzle melted peanut butter over the frosted brownies for an extra hit of that sweet-salty magic.
- Salted Caramel Drizzle: For the Ultimate Indulgence
- Want to wow your taste buds? After frosting, drizzle warm salted caramel sauce over the top and sprinkle with a pinch of flaky sea salt. The combination of rich chocolate, sweet caramel, and a hit of salt is pure dessert heaven.
Gluten-Free Version
Good news, my gluten-free friends — you don’t have to miss out on these nostalgic, fudgy Lunch Lady Brownies! With just one simple swap, you can enjoy every chewy, chocolatey bite without worrying about gluten.
Use a Gluten-Free 1:1 Baking Flour Blend
Swap the regular all-purpose flour with a gluten-free 1:1 baking flour blend (sometimes labeled as “measure-for-measure” flour). These blends are designed to mimic the texture and structure of wheat flour, so your brownies will still bake up perfectly fudgy and chewy—no weird grittiness or dry texture here.
Check Your Cocoa Powder & Baking Ingredients
Most unsweetened cocoa powders are naturally gluten-free, but it’s always smart to double-check the label for any “processed in facilities with wheat” warnings if you’re sensitive. The same goes for baking powder or any add-ins like chocolate chips—just give those labels a quick glance to be safe.
The Frosting is Naturally Gluten-Free
The glossy, sweet chocolate frosting in this recipe is naturally gluten-free as it’s made with simple pantry ingredients like powdered sugar, cocoa powder, milk, and butter.
Tip: Let Gluten-Free Brownies Rest After Baking
Gluten-free brownies benefit from a little rest time after baking. Let them cool completely in the pan so they set up properly before frosting and slicing. This helps maintain that rich, chewy texture that makes Lunch Lady Brownies so beloved.
Kid-Friendly Version
Lunch Lady Brownies are already a big hit with kids thanks to their soft, fudgy texture and sweet, chocolatey frosting. But with a few creative tweaks, you can turn them into an interactive, hands-on treat that kids will love making and eating.
Cut Fun Shapes with Cookie Cutters
Once the brownies are fully cooled and the frosting has set, let the kids use cookie cutters to cut out fun shapes—think stars, hearts, dinosaurs, or even letters to spell out their names! This turns snack time into a fun little activity and makes dessert feel extra special.
Top with Colorful Sprinkles or Mini Candies
Before the frosting fully sets, hand the kids a bowl of colorful sprinkles, mini M&Ms, or candy confetti and let them decorate their brownie creations. It’s a simple, no-mess way to get the kiddos involved, and they’ll love seeing their personalized brownies come to life.
Make Mini Brownie Bites for Little Hands
Instead of cutting big squares, slice the brownies into bite-sized cubes or rounds. They’re perfect for smaller hands and make for great party tray treats or lunchbox surprises.
Get Creative with Toppings
Set up a simple “brownie bar” and let the kids pick from fun toppings like crushed Oreos, mini marshmallows, shredded coconut, or a drizzle of caramel sauce. They’ll have a blast building their ultimate brownie creation.
Mild & Sweet—No Bitter Dark Chocolate Here
These brownies are rich and fudgy but not overly bitter, making them perfectly suited to younger palates. The sweet, creamy frosting balances the cocoa perfectly, so even picky eaters will be asking for seconds.
Lunch Lady Brownies
Ingredients
Equipment
Method
- Preheat your oven to 350°F (175°C). Grease a 9×13-inch baking dish or line it with parchment paper.
- In a large mixing bowl, whisk together melted butter and cocoa powder until smooth. Stir in the sugar, then add eggs and vanilla, mixing until well combined.
- Fold in flour and salt until just combined. Do not overmix!
- Pour the batter into the prepared pan and spread evenly. Bake for 25-28 minutes, or until a toothpick inserted comes out with a few moist crumbs.
- While the brownies are baking, whisk together softened butter, milk, cocoa powder, powdered sugar, and vanilla until smooth and spreadable.
- As soon as the brownies come out of the oven, spread the frosting over the warm brownies. It will melt slightly, creating a glossy, fudgy topping.
- Allow brownies to cool before slicing into 16 squares.
Notes
Lunch Lady Brownies – Helpful Tips
Mixing for Fudgy Perfection- For those dense, fudgy vibes, don’t overmix after adding the flour—just stir until combined. Overmixing introduces air and makes cakier brownies.
- Use melted butter, not softened—it gives that old-school cafeteria gooeyness we all crave.
- Unsweetened natural cocoa powder keeps it classic, but you can try Dutch-processed cocoa for a deeper, richer chocolate flavor.
- Sift the cocoa powder to avoid any lumps sneaking into the batter.
- The secret? Frost the brownies while they’re still slightly warm so the frosting melts into a glossy, crackly top layer.
- Make a simple frosting with butter, milk, cocoa powder, and powdered sugar, whisked until silky smooth.
- Want a flavor twist? Add a dash of vanilla or a pinch of espresso powder to the frosting to enhance the chocolate.
- Line your pan with parchment paper with overhangs—this makes lifting out the brownies super easy for clean cuts.
- Bake until a toothpick comes out with a few moist crumbs (not wet batter). Fudgy is the goal, not dry!
- For perfect squares, let brownies cool completely and use a hot knife (wipe between cuts) for those clean cafeteria lines.
- If you’re in a rush, pop them in the fridge for 20–30 minutes to speed up the cooling.
- These brownies stay moist for up to 4 days at room temp in an airtight container.
- They freeze beautifully—wrap individual squares in plastic wrap and freeze up to 2 months. Thaw at room temp and enjoy.
- Stir in a handful of chocolate chips or chopped nuts for extra texture.
- Drizzle with peanut butter or caramel sauce over the frosting for an indulgent twist.
- Sprinkle with rainbow sprinkles or mini marshmallows if you’re feeling extra nostalgic.
Taste What’s Next
Frozen S’mores
Coconut Magic Bars
Sweet Air Fryer Churro Bites
or you Can Dig Deeper Recipes by clicking this: Appetizer, Breakfast, Lunch, Dinner, and Desserts.
Storage & Reheating
One of the best things about these Lunch Lady Brownies? They’re just as delicious the next day (and the day after that). Here’s how to store them properly so you can enjoy fudgy goodness all week long—or stash some away for future chocolate emergencies.
- Room Temperature Storage (Up to 4 Days)
- For short-term snacking, store the brownies in an airtight container at room temperature. They’ll stay soft, fudgy, and moist for up to 4 days. Just make sure to keep them in a cool, dry spot away from direct sunlight to prevent the frosting from melting or getting too soft.
- Refrigerate to Extend Freshness (Up to 1 Week)
- If you want to extend their shelf life a little longer, pop the container into the fridge. This will keep the brownies fresh for up to a week. The frosting will firm up a bit in the cold, but a quick 10-15 second zap in the microwave will bring back that soft, gooey texture.
- Freezing for Long-Term Storage (Up to 2 Months)
- Want to save some brownies for later? These freeze beautifully! Here’s how:
- Slice the brownies into individual squares once cooled and frosted.
- Wrap each square tightly in plastic wrap, then place them in a large zip-top freezer bag or airtight container.
- Store in the freezer for up to 2 months.
- Thawing & Reheating
- When the chocolate craving strikes, thaw brownies at room temperature for about 1 hour or microwave on low power in 10-15 second intervals until soft and gooey. You can also enjoy them straight from the fridge if you like a firmer, fudge-like texture.
- Pro Tip: Freeze Unfrosted for Best Texture
- For the absolute best results, consider freezing the brownies unfrosted. When you’re ready to enjoy them, thaw and slather on fresh frosting for that just-made taste.
Equipment
- Large mixing bowl
- Whisk or electric mixer
- 9×13-inch baking dish
- Offset spatula for frosting
FAQs
Can I make Lunch Lady Brownies without frosting?
Yes, but the frosting is what makes these brownies iconic! However, you can skip it if you prefer a less sweet version.
Why are my brownies dry?
Overbaking is the usual culprit. Keep a close eye and check for moist crumbs on your toothpick.
Can I double the recipe for a crowd?
Absolutely! Just use a larger sheet pan and adjust baking time accordingly.
What’s the difference between Lunch Lady Brownies and regular brownies?
Lunch Lady Brownies are known for their extra fudgy texture and the thick layer of homemade chocolate frosting that sets them apart.
Can I use a box mix?
You can, but making them from scratch is what gives these brownies their nostalgic homemade charm!
External Resources
Conclusion
These Lunch Lady Brownies aren’t just a dessert; they’re a trip down memory lane. Simple, sweet, and oh-so-fudgy, they capture everything we loved about school lunchroom treats. And the best part? You can whip them up in no time right in your own kitchen with ingredients you already have.
So go ahead — snap a photo and post it online! Don’t forget to tag me! I want to see your cooking success. Happy baking!