Introduction
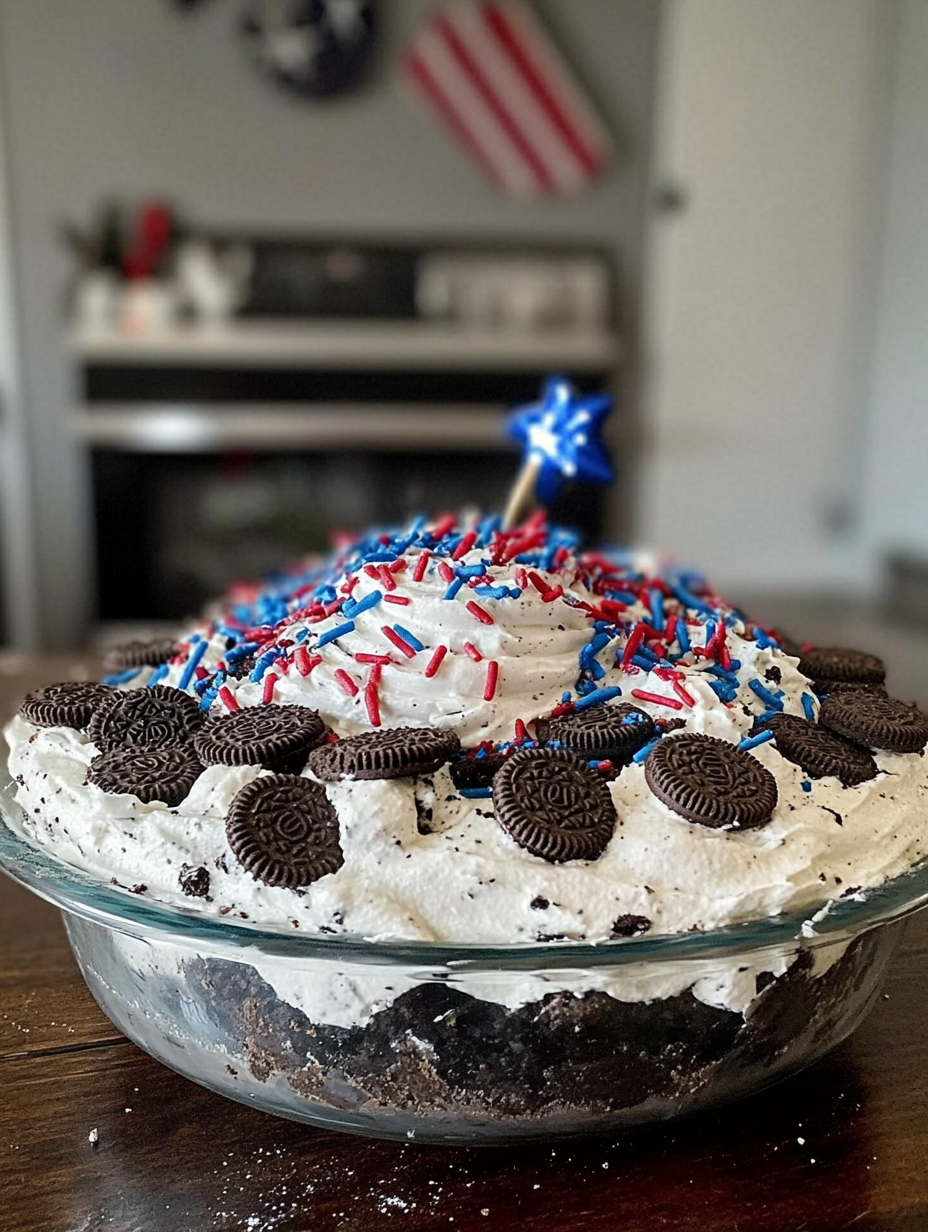
When summer celebrations roll around—whether it’s the Fourth of July, Memorial Day, or just a backyard cookout with friends—I love bringing out a dessert that looks like a party and tastes even better. That’s where my No Bake Fireworks Oreo Cheesecake comes in. It’s festive, colorful, creamy, and built for the hot months when nobody wants to turn on the oven. This no-bake cheesecake features a classic Oreo crust, a rich and fluffy cream cheese filling, and a patriotic pop of color with crushed red, white, and blue Oreo cookies mixed right in. It’s the ultimate star-spangled treat.
I came up with No Bake Fireworks Oreo Cheesecake for a Fourth of July picnic years ago, and it’s been a hit at every summer event since. It layers the nostalgic flavor of cookies and cream with a show-stopping presentation—no water baths, no cracking tops, and no need to worry about oven space. Just mix, chill, and wow your guests. Whether you’re feeding a crowd or prepping a make-ahead dessert that travels well, this cheesecake delivers.
If you’re looking for an easy dessert that feels like a celebration on a plate, this No Bake Fireworks Oreo Cheesecake is the move. It’s cool, creamy, and loaded with texture and crunch—and the colors make it perfect for summer holidays. Let’s make dessert magic without breaking a sweat.
Perfect For:
- Fourth of July, Memorial Day, or Labor Day parties
- Make-ahead summer desserts
- No-bake cheesecake lovers
- Patriotic potlucks and picnics
- Festive birthday or BBQ celebrations
Why You’ll Love This Recipe:
- No Oven Needed: Perfect for summer when you want to keep things cool in the kitchen.
- Super Festive: Red, white, and blue Oreos give it that firework-worthy pop of color.
- Creamy and Crunchy: Silky cheesecake filling meets crunchy Oreo bits and cookie crust.
- Kid and Adult Approved: A crowd-pleaser across all ages, and fun to decorate.
- Make-Ahead Friendly: Prep it the day before and chill overnight—zero stress.
Prep & Chill Time:
- Prep Time: 20 minutes
- Chill Time: 4 hours minimum
- Total Time: 4 hours 20 minutes
- Servings: 8–10
- Calories: ~410 per serving
Ingredients:
What you need for the Crust:
- 24 Fireworks Oreo cookies (or regular Oreos), finely crushed
- 5 tbsp unsalted butter, melted
For the Cheesecake Filling:
- 16 oz cream cheese, softened
- 1 cup powdered sugar
- 1 tsp vanilla extract
- 1 cup heavy whipping cream
- 12 Fireworks Oreo cookies, coarsely chopped (or red, white & blue cookies)
For Topping (Optional):
- Extra crushed Oreos
- Red, white & blue sprinkles
- Whipped cream
Ingredient Highlights:
- Fireworks Oreos: These limited-edition cookies come with popping candy inside, adding a subtle pop and festive color. Regular Oreos or any seasonal variety work too.
- Heavy Whipping Cream: Adds fluff and richness when whipped into the filling.
- Powdered Sugar: Dissolves easily into the cream cheese without grittiness.
- Vanilla Extract: Adds warmth and enhances the cookie flavor.
Step-by-Step Instructions:
- Make the crust: In a bowl, mix crushed Oreos with melted butter until well combined. Press into the bottom of a 9-inch springform pan. Chill while you make the filling.
- Whip the cream: In a separate bowl, beat the heavy whipping cream to stiff peaks. Set aside.
- Make the filling: In a large bowl, beat the cream cheese until smooth. Add powdered sugar and vanilla and beat again until creamy.
- Fold and mix: Gently fold the whipped cream into the cream cheese mixture until combined. Stir in chopped Oreos.
- Fill the crust: Spread the filling evenly into the chilled crust. Smooth the top with a spatula.
- Chill: Cover and refrigerate for at least 4 hours, preferably overnight.
- Decorate and serve: Top with more Oreos, sprinkles, and whipped cream before serving.
Serving Suggestions:
- Add a sparkler or festive topper for visual flair.
- Serve with a scoop of vanilla ice cream for extra indulgence.
- Use patriotic paper plates and napkins for a themed display.
- Pair with fresh berries like strawberries or blueberries.
- Offer it alongside other red, white, and blue treats for a full dessert table.
Additional Tips:
- Make sure your cream cheese is fully softened before mixing to avoid lumps.
- For easy slicing, freeze the cheesecake for 30 minutes before cutting.
- Line the pan with parchment paper for easier removal.
- Use a warm knife (run under hot water and dried) to slice cleanly.
- Chill overnight for best texture and flavor development.
Recipe Variations:
- Chocolate Explosion Version
- If you’re a chocoholic, go all in with a decadent chocolate upgrade! Fold in a handful of mini chocolate chips right into the filling, then finish each slice with a generous drizzle of hot fudge or chocolate syrup. Want extra crunch? Sprinkle crushed chocolate sandwich cookies on top for a dramatic finish.
- Berry Cheesecake Twist
- Add a fruity burst of freshness by folding in fresh or frozen blueberries, chopped strawberries, or even raspberries. Their tart sweetness balances the creamy filling beautifully. For extra flavor, swirl in a spoonful of berry jam before chilling for a gorgeous marbled effect.
- Mini Cheesecakes
- Hosting a party or need a grab-and-go dessert? Press the crust mixture into a lined muffin tin or silicone cups to create individual cheesecakes. They’re perfect for serving, easy to portion, and super cute! Chill and top each with a dollop of whipped cream or a fresh berry for a polished presentation.
- Oreo Crust Swap
- Give your crust a creative spin! Try using Golden Oreos for a lighter, vanilla-forward flavor, or mix them with Firework Oreos for a fun pop of color and crunch. You can even experiment with seasonal Oreo flavors — think mint, toffee crunch, or red velvet — to match the mood or occasion.
- Gluten-Free Option
- Making this recipe gluten-free is a breeze. Just swap in gluten-free sandwich cookies (there are great versions on the market now) for the crust, and make sure your whipped topping and pudding mix are certified gluten-free. You’ll still get all the rich, creamy satisfaction — no gluten required!
Storage & Freezing:
Refrigerator
This no-bake cheesecake dessert holds up beautifully in the fridge, making it a great make-ahead treat. Store it covered tightly with plastic wrap or in an airtight container for up to 5 days.
For the best texture and flavor, keep the dessert chilled until just before serving. This helps it stay firm and sliceable while keeping the whipped topping light and fluffy. If you’ve garnished the top with fresh fruit or chocolate drizzle, wait to add those just before serving to keep everything looking picture-perfect.
Freezer
Need to store it longer? No problem! This dessert is freezer-friendly. Wrap the entire dish or individual slices tightly in plastic wrap, followed by a layer of foil to prevent freezer burn. Place in a flat spot in your freezer and it will keep for up to 2 months.
When you’re ready to serve, thaw overnight in the refrigerator. The texture will remain creamy and delicious, making this a great option for prepping ahead for holidays or gatherings.
Reheat
No reheating needed here — this is a chilled dessert that’s best enjoyed cold straight from the fridge. If anything, you’ll want to make sure it’s fully set and nicely chilled before slicing and serving.
Equipment Needed:
- 9-inch springform pan
- Electric mixer (hand or stand)
- Mixing bowls and spatula
- Measuring cups and spoons
- Offset spatula or butter knife for smoothing
FAQs (From People Also Ask):
Can you freeze no-bake cheesecake? Yes, you can freeze no-bake cheesecake. Wrap it tightly and store in the freezer for up to 2 months. Thaw in the refrigerator overnight before serving.
What makes a no-bake cheesecake firm? The firmness comes from whipped cream folded into the cream cheese, then chilled thoroughly. The cold sets the fat content, helping it hold shape.
Can I make no-bake cheesecake in advance? Absolutely! This dessert is perfect for making a day ahead. In fact, chilling overnight gives it better flavor and texture.
What’s the difference between baked and no-bake cheesecake? Baked cheesecake uses eggs and requires baking in a water bath. No-bake versions rely on whipped cream or gelatin to set in the fridge without baking.
Can I use regular Oreos instead of Fireworks Oreos? Yes! Fireworks Oreos are fun for the theme, but regular Oreos, Golden Oreos, or any flavor will work beautifully.
External Links:
- USDA – Safe Handling of Dairy Ingredients
- Harvard T.H. Chan – Sugar and Health
- Cleveland Clinic – Health Benefits of Cream Cheese
No Bake Fireworks Oreo Cheesecake
Ingredients
Method
- Make the crust: In a bowl, mix crushed Oreos with melted butter until well combined. Press into the bottom of a 9-inch springform pan. Chill while you make the filling.
- Whip the cream: In a separate bowl, beat the heavy whipping cream to stiff peaks. Set aside.
- Make the filling: In a large bowl, beat the cream cheese until smooth. Add powdered sugar and vanilla and beat again until creamy.
- Fold and mix: Gently fold the whipped cream into the cream cheese mixture until combined. Stir in chopped Oreos.
- Fill the crust: Spread the filling evenly into the chilled crust. Smooth the top with a spatula.
- Chill: Cover and refrigerate for at least 4 hours, preferably overnight.
- Decorate and serve: Top with more Oreos, sprinkles, and whipped cream before serving.
Notes
No Bake Fireworks Oreo Cheesecake – Helpful Tips
Cooking Tips & TechniquesUse Firework Oreos (with popping candy) for the signature crackle—break them up gently so you still get big, crunchy bites.
For a firm, sliceable base, pack the Oreo crust tightly using the bottom of a glass or measuring cup.
Soften the cream cheese fully before mixing to avoid lumps and ensure a smooth filling.
Whip the heavy cream separately until stiff peaks form, then fold it gently into the cheesecake base to keep it airy.
Chill the cheesecake for at least 6 hours (preferably overnight) so it sets properly and slices cleanly. Serving Suggestions
Top with whipped cream, extra Oreo crumbles, and patriotic sprinkles for a festive finish.
Add fresh strawberries, blueberries, or raspberries on top for color and tart balance.
Serve it frozen for a cool summer treat—just let it sit out for 10 minutes before slicing.
Perfect centerpiece for Fourth of July, Memorial Day, or any summer barbecue or party.
Pair with lemonade, iced coffee, or even a fruity sangria for a celebratory vibe. Make-Ahead & Storage
Make-Ahead: This dessert is ideal for making 1–2 days in advance—just keep it chilled and covered.
Refrigerator: Store in the fridge, tightly covered, for up to 5 days.
Freezer: Freeze the whole cheesecake or individual slices. Wrap well and store up to 2 months. Thaw in the fridge overnight before serving.
Reheat: No reheating needed! Serve chilled or slightly thawed from frozen. Tasty Variations to Try
Mint Oreo Version: Use Mint Oreos and a few drops of mint extract for a cool twist.
Chocolate Explosion: Mix in mini chocolate chips and drizzle with fudge sauce before serving.
Berry Swirl: Swirl in a bit of raspberry or strawberry jam into the filling before chilling.
Gluten-Free: Use gluten-free chocolate sandwich cookies and ensure your popping candy is GF-certified.
Individual Servings: Make in mason jars or cupcake liners for cute, portable party portions.
Conclusion
This No Bake Fireworks Oreo Cheesecake is everything a celebration dessert should be: simple, bold, cool, colorful, and guaranteed to make people smile. Whether you’re bringing it to a cookout, potluck, or just treating yourself, it hits the sweet spot between nostalgia and festivity with every bite.
What I love most about this dessert is that it’s totally approachable—no baking, no stress, and totally customizable. From the crunchy Oreo crust to the creamy filling and festive toppings, this cheesecake doesn’t just taste like a dream—it looks like one too.
So go ahead, chill out, and celebrate with a slice (or two). And when you make it, don’t forget to include me in your post—I’d love to see your fireworks-worthy dessert take center stage!