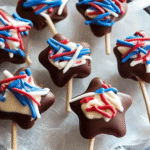
You know those dreamy, pink-dipped treats behind the Starbucks glass case? The ones with the sweet vanilla center and a candy coating that makes kids and grown-ups light up the same way? Yep, those are the famous Starbucks Copycat Birthday Cake Pops, and today—I’m giving you the full inside scoop on how to recreate them at home. I’ve been making these for birthdays, baby showers, and even just random Tuesdays when I need a little extra sparkle in my day. These homemade cake pops are everything you love about the Starbucks version but even better (yep, I said it!). Moist vanilla cake meets creamy frosting and gets dipped in that iconic pink candy shell, all topped with sprinkles, of course.
What’s magical about this recipe is how fun it is to make. It’s a hands-on, roll-up-your-sleeves kind of dessert that kids can help with and adults will rave about. Whether you’re throwing a party or just need an afternoon treat, this one’s got your name all over it. And guess what? You’ll save money, avoid mystery ingredients, and get to say, “I made these!” with full-on pride.
So, let’s whip up some Starbucks-style birthday joy—right from your kitchen!
What’s on the Plate
Overview
- Cuisine: American
- Course: Dessert, Snack
- Prep Time: 30 minutes (plus chilling)
- Cook Time: 30 minutes
- Total Time: 1 hour + chilling
- Servings: 24 cake pops
What’s in Every Bite
- Calories: 160
- Carbs: 18g
- Fats: 8g
- Protein: 2g
- Fiber: 0.5g
- Sugar: 14g
- Sodium: 85mg
Total Recipe Cost
- Estimated Total Cost: $6.80
- Cost Per Serving: $0.28
- Main Cost Factors: Candy melts, cake mix, lollipop sticks
The Story Behind the Flavor
These iconic cake pops made their Starbucks debut in 2011, launching with a lineup of dessert bites called “Petites.” The Birthday Cake Pop instantly stole the spotlight with its nostalgic flavor and eye-catching pink coating. Starbucks tapped into childhood memories and party vibes with this sweet mini treat, and it’s remained a staple ever since.
What makes this dessert so special is its universal appeal—it’s bite-sized, hand-held, and irresistibly cute. Plus, it takes the classic birthday cake flavor and turns it into an everyday indulgence. I took one bite years ago and knew I had to crack the code. Spoiler alert: It’s actually super easy, and you don’t need any fancy equipment to do it.
Perfect For
Oh, this recipe is the life of the party — literally. Whether you’re planning a bash or just want to sprinkle a little extra sweetness into your day, this treat is the ultimate go-to for almost any occasion. Here’s where it truly shines:
- Birthday Parties (duh!)
- Colorful, crowd-pleasing, and easy to serve? That’s a triple win for birthdays! Make a big batch, set them on a cake stand or platter, and watch them disappear faster than you can sing “Happy Birthday.”
- Baby Showers & Gender Reveals
- Dress them up in pink, blue, or pastel sprinkles for a baby shower charmer that looks just as good as it tastes. Want to get cute? Color the inside for a surprise-it’s-a-boy-or-girl reveal moment!
- Holidays & Themed Celebrations
- Deck them out in seasonal colors — red and green for Christmas, pastels for Easter, black and orange for Halloween. These treats are like edible decorations, ready to match your party vibes.
- DIY Dessert Tables
- Add them to your snack spread or dessert charcuterie board. They’re the perfect pick-up treat that guests can grab without a mess. Bonus: they stack beautifully and hold their shape, so no soggy surprises.
- After-School Treats
- Got hungry little hands walking in the door at 3 PM? Surprise them with these sweet bites and become the afternoon hero. Pair with a glass of milk and boom — snack magic.
- Coffee Shop-Style Snacks at Home
- They’re soft, chewy, and perfectly sweet — basically everything you love from your favorite coffee shop bakery case, but made with love in your own kitchen. Brew a fresh cup, grab a few, and call it self-care.
Why You’ll Love This Recipe
This one’s got all the fun of your favorite bakery treat — without the drive-thru prices or long lines. I’m talking chewy, sweet, sprinkle-studded bites of joy that practically beg to be shared. Here’s exactly why you’re going to fall head over spatula for this recipe:
- It’s a Spot-On Starbucks Copycat Recipe
- Yep, it nails that chewy texture, vanilla-laced flavor, and signature birthday cake vibe. You’ll take one bite and swear you’re sitting in your local coffee shop (but in fuzzy socks and PJs — way better).
- Kid-Friendly, Adult-Approved
- Everyone — and I mean everyone — loves these. Kids go wild for the bright colors and sweet taste, while adults appreciate the nostalgic fun (and the fact that you made them from scratch!).
- Customizable for Colors and Sprinkles
- Feeling festive? Add themed sprinkles for birthdays, holidays, school colors — the works. You can even tint the dough to match your party palette or surprise someone special with their favorite hues.
- Freezer-Friendly for Make-Ahead Magic
- Bake a batch, freeze half, and thank yourself later. They thaw like a dream and taste just as fresh. That means party prep just got way easier — or you’ve got a personal stash for midnight munchies.
- Super Fun to Make with Kids or Friends
- Get the whole gang involved — from mixing the dough to rolling out little bites and dunking them in colorful coatings. It’s part recipe, part craft project, and 100% good vibes.
- Way More Affordable Than Buying at Starbucks
- Let’s be real: Those bakery case treats add up fast. With this recipe, you get the same delicious payoff for a fraction of the cost — and you can make a whole tray instead of buying one overpriced pop.
Ingredients You’ll Need
Core Ingredients
- 1 box vanilla cake mix (plus ingredients listed on box)
- 1/2 cup vanilla frosting (store-bought or homemade)
- 12 oz pink candy melts
- 2 tsp vegetable oil (for smoother dipping)
- 24 lollipop sticks
- Rainbow sprinkles
Optional Add-ins
- White chocolate drizzle
- Food coloring (for themed pops)
- Gel coloring for the cake (inside surprise!)
Ingredient Highlights
- Cake Mix: A boxed vanilla cake mix keeps things easy but delivers a soft, moist base.
- Vanilla Frosting: Just enough to bind everything together without making it mushy.
- Candy Melts: These give that signature Starbucks-style shell. Use pink for birthday pop flair.
- Lollipop Sticks: Don’t skip these—they make cake pops portable and fun.
- Sprinkles: The sparkle on top. Use rainbow for the classic look or match your event theme.
Step-by-Step Instructions
- Bake the Cake: Follow the box directions for a 9×13 pan. Let it cool completely.
- Crumble It: Once the cake is cool, crumble it into fine crumbs in a large bowl.
- Mix with Frosting: Add frosting a spoonful at a time, mixing until the texture holds together like playdough.
- Roll into Balls: Use a cookie scoop to portion, then roll into smooth 1-inch balls. Chill for 30 minutes.
- Insert Sticks: Melt a few candy melts, dip the tip of each stick into the melted candy, then insert into the cake balls. Chill again for 10 minutes.
- Dip & Decorate: Melt remaining candy melts with oil until smooth. Dip each pop and gently tap off excess. Immediately add sprinkles.
- Let Set: Stick the pops upright in a foam block or stand. Let them set fully at room temp or pop them in the fridge.
Pro Tips
- Crumb Texture Matters
- When crumbling your cake, aim for fine, uniform crumbs — think sand, not gravel. Big chunks make it harder to form smooth balls and can cause cracks or gaps. Give it a good crumble with your hands or a food processor if needed. No lumps allowed in this sprinkle party!
- Don’t Over-Frost
- A little frosting goes a long way. You want just enough to bind the crumbs, not drown them. Too much and your cake pops will be soggy, heavy, or even fall off the sticks (the horror!). Start small and mix until the dough holds its shape like play-dough.
- Dip Fast
- Once you coat your cake pops in candy melts or white chocolate, move quickly — sprinkles need to go on immediately before that shell starts to harden. No time for second-guessing — sprinkle like your snack life depends on it!
- Use a Foam Block
- After dipping, stick your cake pops into a foam block or upside-down colander to dry upright. This keeps them from getting flat spots or messy tops. Plus, they look extra cute standing at attention like a dessert army.
- Chill Between Steps
- Refrigerate the cake balls before dipping — this helps them stay firm and prevents tragic slippage into the chocolate bowl. Cold cake pops = clean coating, fewer cracks, and a way more satisfying final bite.
- Bonus Tip: Dip the Stick First!
- Before inserting your lollipop stick, dip the tip in melted coating and then push it into the cake ball. Chill briefly to “glue” it in place. This helps keep the stick secure while dipping and biting. No pop drop disasters here.
Recipe Variations
- Chocolate Version
- Calling all chocoholics! Swap out vanilla or funfetti cake for rich chocolate cake, and coat in melted dark, milk, or white chocolate for the ultimate cocoa dream. Want to go over the top? Add mini chocolate chips into the mix or drizzle with chocolate ganache once they’re set.
- Red Velvet
- There’s something magical about red velvet cake paired with tangy cream cheese frosting. It’s rich, elegant, and super popular at weddings and holiday events. Dip these in white chocolate for a bold red-and-white look that always earns compliments.
- Holiday Pops
- Theme your cake pops for every holiday! Try:
- Christmas: Green and red cake or candy coating with festive sprinkles.
- Halloween: Orange-and-black swirls or drizzle, with candy eyeballs or spooky faces.
- Valentine’s Day: Pink cake pops with heart sprinkles or white chocolate drizzle.
- Easter: Pastel colors, edible glitter, or bunny-themed designs.
- They’re adorable on a dessert table or as edible party favors wrapped in cellophane.
- Filled Pops
- Want to blow some minds? Hide a surprise inside each cake pop! Think mini M&Ms, caramel bits, peanut butter, or a dab of flavored frosting in the center. It’s like a hidden treasure — fun to bite into and perfect for impressing guests.
- Lemon Burst
- Use lemon cake with vanilla or lemon frosting, then coat in white chocolate and sprinkle with lemon zest. Super fresh and zippy for spring or brunch parties!
- Birthday Cake Remix
- Amp up the funfetti vibes by adding extra rainbow sprinkles into the cake and frosting mix. Top with sparkly sugar or edible glitter to really bring the birthday magic.
- Cookies & Cream
- Crumble chocolate sandwich cookies into a vanilla cake + frosting mixture, then coat with white chocolate and more cookie crumbs on top. It’s like Oreo heaven on a stick.
Gluten-Free Version
Good news: making these Starbucks-style cake pops gluten-free is totally doable — and totally delicious! Here’s how to do it without sacrificing flavor or fun:
Use a Gluten-Free Cake Mix
Start by swapping in your favorite gluten-free vanilla or funfetti cake mix. There are some awesome options out there — I personally love ones from King Arthur Baking or Betty Crocker’s gluten-free line. Just follow the box instructions or your usual method for baking the cake base.
Check Your Frosting
Most canned frostings are gluten-free, but it’s always smart to double-check the label for sneaky gluten-containing ingredients or cross-contamination warnings. You can also make a homemade frosting if you prefer — that way, you know exactly what’s going in.
Candy Coating Caution
Candy melts and chocolate coatings can contain gluten or be processed in facilities that handle wheat. Look for certified gluten-free brands (like Enjoy Life or Sweetapolita’s GF lines) so your coating is totally safe and worry-free.
Everything Else? Already Gluten-Free!
The cake pop sticks, sprinkles (just double-check), and shaping method are all naturally gluten-free. That means your gluten-free cake pop adventure doesn’t require any fancy substitutions — just a few thoughtful swaps and label checks.
Kid-Friendly Version
This recipe already has major kid appeal — I mean, cake on a stick? Yes, please! But if you want to turn these cake pops into a full-on kid-approved kitchen adventure, here’s how to make it even more playful:
Let Them Roll with It
Kids love getting their hands messy, and this is the perfect recipe to let them do just that. Set up a “rolling station” where they can form the cake balls themselves. It might get a little messy, but that’s half the fun — and they’ll feel so proud of their handmade pops!
Dip and Decorate
Set up a dipping and sprinkle bar with different candy melt colors, drizzles, and toppings. Let them dunk and swirl their cake pops and go wild with unicorn dust, dinosaur sprinkles, rainbow jimmies, edible glitter — the works! (Bonus: This doubles as a fun party activity.)
Mini Pops for Tiny Hands
Make smaller cake balls for tiny hands to grab easily — they’re easier to eat, less messy, and totally adorable. You can even use lollipop sticks cut in half or serve them on toothpicks for a mini treat that’s just their size.
Theme It Up
Want to match a birthday party or holiday? Go themed! Use pink melts and heart sprinkles for Valentine’s Day, spooky green and purple for Halloween, or blue-and-white for a Frozen party. Let your imagination — and your kiddos — run wild.
Starbucks Copycat Birthday Cake Pops
Ingredients
Equipment
Method
- Follow the box directions for a 9×13 pan. Let it cool completely.
- Once the cake is cool, crumble it into fine crumbs in a large bowl.
- Add frosting a spoonful at a time, mixing until the texture holds together like playdough.
- Use a cookie scoop to portion, then roll into smooth 1-inch balls. Chill for 30 minutes.
- Melt a few candy melts, dip the tip of each stick into the melted candy, then insert into the cake balls. Chill again for 10 minutes.
- Melt remaining candy melts with oil until smooth. Dip each pop and gently tap off excess. Immediately add sprinkles.
- Stick the pops upright in a foam block or stand. Let them set fully at room temp or pop them in the fridge.
Notes
Birthday Cake Pops – Helpful Tips
Use Boxed Cake Mix for Ease- Don’t stress over baking from scratch—box cake mix works beautifully and keeps it simple! Just make sure it’s fully cooled before crumbling.
- Too much frosting makes mushy cake pops that slide off sticks. You want just enough to bind the crumbs, about 2–3 tablespoons for the whole cake.
- Once shaped, refrigerate the cake balls for at least 1 hour or freeze them for 20–30 minutes. This helps them hold their shape when dipped.
- Use low heat or short microwave bursts with stirring in between. Add a bit of coconut oil or shortening to thin the coating for easier dipping.
- Dip each stick about ½ inch into the melted coating before inserting into the cake ball—this helps “glue” it in place so it won’t fall off later.
- After dipping, gently tap off excess coating by rotating and lightly tapping your wrist, not the stick itself. This keeps the pop from falling off.
- Add your sprinkles immediately after dipping, while the coating is still wet. Once it sets, nothing will stick!
- Stand the pops upright in a styrofoam block or cake pop stand to dry without smudging the coating.
- Let them fully set, then store in an airtight container at room temp for up to 4 days. Don’t refrigerate or they’ll sweat and get sticky.
Taste What’s Next
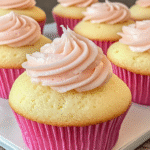
Strawberry Cream Puffs
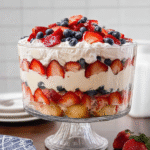
No Bake Lemon Blueberry Dessert
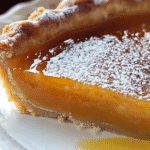
Coconut Magic Bars
Looking for more colorful, party-perfect ideas? or you Can Dig Deeper Recipes by clicking this: Appetizer, Breakfast, Lunch, Dinner, and Desserts.
Storage & Reheating
So you made a batch (or three) of cake pops — now what? Whether you’re saving some for later or prepping ahead for a party, here’s how to keep them fresh, tasty, and totally photo-ready.
- Fridge Life:
- Store fully dipped and decorated cake pops in an airtight container in the refrigerator for up to 1 week. If you’re stacking them, pop a sheet of parchment or wax paper between layers to prevent smudging. The candy coating locks in moisture, so the cake stays nice and soft without going soggy.
- Freezer Friendly:
- Yup, cake pops are freezer champs! Place them on a baking sheet to freeze individually first (so they don’t stick together), then transfer to a zip-top freezer bag or airtight container. They’ll stay delicious for up to 6 weeks. Just thaw them overnight in the fridge or let them sit at room temp for about 30 minutes before serving. No one will ever know they were frozen!
- Reheating? Not Today!
- These sweet bites are meant to be served cold or at room temperature, no reheating required. In fact, heating them up could melt that pretty candy coating — and we’re not about to ruin that Insta-worthy finish.
- Party Pro Tip:
- If you’re making cake pops ahead of time for a big event, store them in a cake pop stand or stick them in foam blocks after decorating. That way, they stay upright, gorgeous, and ready to steal the dessert table spotlight.
Equipment
- Mixing bowls
- Baking pan
- Cookie scoop
- Lollipop sticks
- Microwave-safe bowl
- Styrofoam block or cake pop stand
FAQs (from Google People Also Ask)
What are Starbucks birthday cake pops made of?
They’re made of crumbled vanilla cake mixed with frosting, rolled into balls, and coated in a pink candy shell with sprinkles—exactly what we’re making here!
How do you make cake pops stay on the stick?
Chill the cake balls and dip the sticks in melted candy before inserting. This helps secure them so they don’t fall off during dipping.
Can I make cake pops without a cake pop maker?
Yes! This recipe doesn’t need any fancy equipment—just bake, crumble, roll, and dip. That’s it.
What kind of candy melts does Starbucks use?
Starbucks uses commercial-grade pink candy coating. You can get the same effect using Wilton pink candy melts or any brand from craft stores.
How far in advance can I make birthday cake pops?
You can make them up to a week ahead and store them in the fridge—or freeze for longer!
External Resources
Conclusion
I’ll be honest—these Starbucks Copycat Birthday Cake Pops are pure joy on a stick. There’s something about that creamy cake center, sweet candy shell, and a shower of sprinkles that makes everyone smile. And now that you know how easy (and fun!) they are to make, there’s no need to spend extra bucks at the coffee shop.
I’ve made these for everything from class parties to bridal showers and they never last more than five minutes. Plus, the kids go wild helping dip and sprinkle their own. Homemade always wins—especially when it’s dipped in pink!
So go ahead — snap a photo and post it online! Don’t forget to tag me! I want to see your cooking success. Happy cooking!