There’s something about cream puffs that makes people stop mid-bite, smile, and look up as if they’ve been let in on a delicious secret. And when you add strawberries to the mix? Game over. That’s why I’m head over heels for these Strawberry Cream Puffs—a light, crisp choux pastry filled with creamy, berry-kissed filling that practically melts in your mouth.
These little beauties combine everything I love about dessert: contrast in texture, fresh fruit flavor, and a presentation that screams “I know my way around a piping bag.” Whether you’re impressing your brunch guests or treating yourself to a post-dinner bite of joy, strawberry cream puffs never fail to deliver.
I’ve whipped these up for baby showers, Sunday brunches, and even “just because” baking sprees. They come together faster than you’d think, and every time I serve them, I get that satisfying hush in the room—when people take their first bite and go, “Wait. You made these?!”
So grab your whisk, preheat your oven, and let’s make some magic. These Strawberry Cream Puffs are the kind of dessert that turns an ordinary afternoon into a celebration.
What’s on the Plate
Overview
Cuisine: French-inspired pastry
Course: Dessert, Brunch Treat
Prep Time: 25 minutes
Cook Time: 20 minutes
Total Time: 45 minutes
Servings: 12 puffs
What’s in Every Bite (Per Puff, Approximate)
Calories: 180 kcal
Carbs: 20g
Protein: 3g
Fat: 10g
Sugar: 8g
Fiber: 1g
Sodium: 85mg
Total Recipe Cost (Approximate)
Total Cost: ~$8.00
Cost Per Serving: ~$0.67
Main Cost Drivers: Fresh strawberries, butter, eggs, cream
The Story Behind the Flavor
The strawberry cream puff is a glorious evolution of the classic French choux pastry, which first hit the culinary scene in the 1500s. The dough, originally known as pâte à choux, was developed by Pantarelli, a pastry chef to Catherine de Medici. His light, hollow puffs became the foundation for countless French desserts—most famously profiteroles and éclairs.
Fast-forward a few centuries, and fruit-filled versions like strawberry cream puffs began popping up in patisseries across Europe and North America. The goal? Pair delicate pastry with the brightness of seasonal fruit and the richness of cream. The contrast is divine: crisp meets smooth, sweet meets tart, and the result is a pastry that feels both indulgent and refreshing.
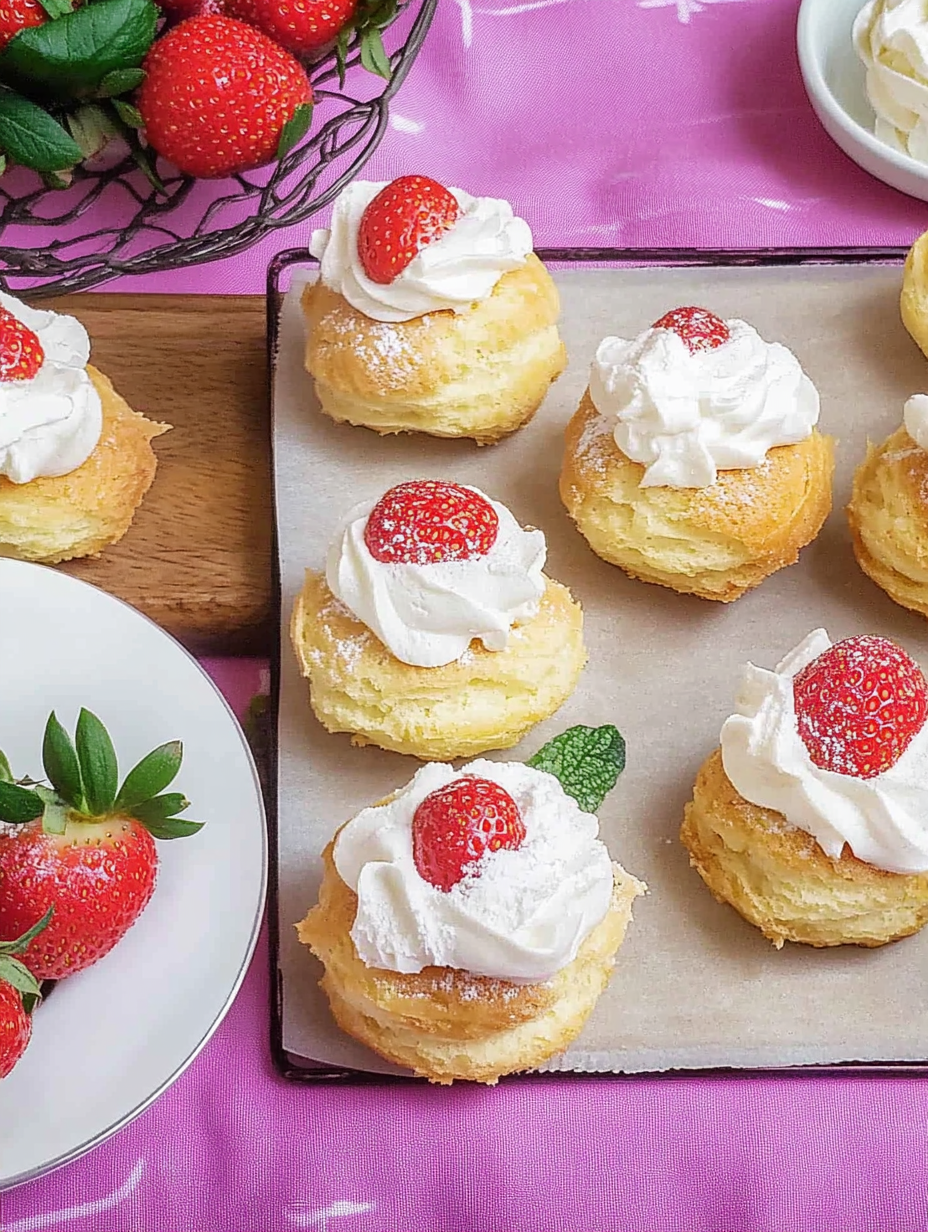
I started making these puffs after a trip to Montreal, where I had a strawberry choux dessert so good I nearly cried into my espresso. I came home, started experimenting, and landed on this recipe—a fluffy pastry shell, filled with vanilla custard folded with sweet chopped strawberries, and topped with a snowy sprinkle of powdered sugar.
The result? Pure joy in edible form.
Perfect For
- Bridal or Baby Showers:
- These strawberry lemon blondies were practically made for pastel napkins and champagne flutes. They’re delicate, fruity, and just fancy enough to say, “Yes, I bake — and yes, it’s fabulous.” Cut them into neat squares, add a sprinkle of powdered sugar or a lemon twist, and watch them disappear between laughs and gift bows.
- Fancy Brunch Spreads:
- Move over muffins — there’s a new brunch MVP in town. These blondies strike the perfect balance between sweet treat and elegant pastry. Serve them next to fruit salad, mini quiches, and sparkling mimosas for a brunch that screams sophistication with zero stress.
- Afternoon Tea Parties:
- Pinkies up, people! These bright, buttery bars are made for delicate plates, floral teacups, and a little midday indulgence. The tart lemon and juicy strawberry combo pairs beautifully with black tea, chamomile, or a cool glass of lemonade on a warm afternoon.
- Spring or Summer Dessert Tables:
- When berries are ripe and sunshine is strong, these blondies shine their brightest. Their fresh flavor and soft, tender crumb make them a hit at picnics, garden parties, BBQs, or potlucks. Just stack them on a cake stand, and let the seasonal colors do all the work.
- Impressing Your In-Laws (or Your Date):
- You know those desserts that look like they came from a boutique bakery but are secretly easy to make? Yeah, this is one of those. Whether you’re meeting the parents or trying to seal your status as “the one who bakes,” these blondies deliver. They’re elegant, rich, and just different enough to feel special.
Why You’ll Love This Recipe
- Surprisingly Easy — Even If You’re New to Pastry:
- You don’t need a culinary degree or fancy equipment to pull this one off. With a few simple ingredients and clear steps, this recipe guides you to a stunning result without the stress. It’s the kind of dessert that looks bakery-level, but is totally manageable even on your first try. You’ll feel like a pastry pro by the time it’s cooling on the counter.
- Light, Airy Texture That Doesn’t Feel Too Heavy:
- This isn’t one of those overly dense, sugar-bomb bars. The texture is soft, fluffy, and delicately tender, so each bite feels like it melts in your mouth without leaving you weighed down. It’s sweet satisfaction without the post-dessert slump.
- Fresh Fruit Adds Natural Sweetness and Color:
- Strawberries and lemon are a match made in dessert heaven — tart, juicy, and full of bright flavor. The natural sweetness of the fruit cuts through the richness, while the vibrant color makes every square pop on the plate. It’s as easy on the eyes as it is on the taste buds.
- Customizable with Whipped Cream or Custard:
- Want to turn up the fancy? Top each slice with a dollop of whipped cream, a spoonful of vanilla custard, or even a scoop of lemon sorbet for an elevated twist. These blondies are the perfect base to dress up however your sweet tooth sees fit.
- Perfect Balance of Crispy and Creamy:
- You get golden, slightly crisp edges for that satisfying bite, paired with a soft, melt-in-your-mouth center that keeps things luxurious. It’s a texture contrast that hits all the right notes — like biting into a sunshine-soaked cloud with a lightly caramelized crust.
Ingredients You’ll Need
Core Ingredients
- 1 cup water
- ½ cup unsalted butter
- ½ tsp sugar
- ¾ cup all-purpose flour
- 3 large eggs
- 1 cup chopped fresh strawberries
- ½ cup heavy cream
- 1 cup whole milk
- 2 egg yolks
- 2 tbsp sugar
- 1 tbsp cornstarch
- 1 tsp vanilla extract
Optional Add-Ins
- Powdered sugar (for dusting)
- Lemon zest (for brightness)
- Mini chocolate chips or melted white chocolate
- A drop of almond extract for added depth
Ingredient Highlights
Choux Pastry Dough: The golden, hollow shell that puffs up with steam.
Fresh Strawberries: Sweet and juicy, perfect for folding into cream or custard.
Vanilla Custard or Whipped Cream: Adds that luscious, silky center.
Butter & Eggs: Key to the puff’s structure and flavor.
Step-by-Step Instructions
- Preheat the Oven: 425°F (220°C). Line your baking tray with parchment.
- Make Choux Dough:
- In a saucepan, heat water, butter, and sugar until boiling.
- Remove from heat and stir in flour. Return to heat and stir until it forms a smooth ball.
- Cool slightly, then beat in eggs one at a time until glossy.
- Pipe & Bake:
- Pipe 12 small mounds onto the baking tray.
- Bake for 10 minutes, reduce heat to 350°F, and bake another 10 minutes.
- Let cool completely.
- Make Strawberry Custard Filling:
- Heat milk until steaming. In a bowl, whisk egg yolks, sugar, and cornstarch.
- Temper yolks with hot milk, then return to heat until thick.
- Add vanilla and cool fully.
- Fold in whipped cream and chopped strawberries.
- Assemble:
- Slice each puff in half horizontally.
- Pipe or spoon in filling.
- Dust with powdered sugar and serve.
Pro Tips
- Don’t Open the Oven While Baking — Steam Is Your Friend!
- I get it — it’s tempting to peek. But resist the urge! Choux pastry (which gives these beauties their signature puff) relies on steam to rise and form that hollow, golden shell. Opening the oven too early lets that steam escape and can cause the pastries to collapse. So hands off the oven door until they’re golden brown and firm to the touch.
- Cool Pastry Completely Before Filling to Avoid Sogginess
- Hot pastry + creamy filling = soggy sadness. Always allow your baked puffs to cool fully on a wire rack before you add any custard, whipped cream, or fruit. If you’re in a hurry, pop them into the fridge for 10–15 minutes to speed things up. A cool shell ensures the inside stays crisp and the filling stays rich and velvety.
- Use a Star Tip for Piping Dramatic Bakery-Style Puffs
- Want to give your pastries that extra “wow” factor? Load your choux dough into a piping bag fitted with a large star tip. It doesn’t just look fancy — it also helps create more even airflow, which means taller, more dramatic puffs with beautifully ridged sides that brown up like a dream.
- Make Custard a Few Hours Ahead So It’s Fully Chilled
- Warm custard will melt right into your pastry and leave you with a runny mess. For best results, make your custard at least 3–4 hours ahead of time (or the night before!) and let it chill completely. This makes it easier to pipe or spoon in, holds its shape beautifully, and lets all those vanilla or citrus notes mellow and shine.
- Want Extra Shine? Brush Tops with Egg Wash Before Baking
- That golden glow on bakery pastries? It’s not magic — it’s egg wash. Just before baking, lightly brush the tops with a beaten egg (or egg yolk mixed with a splash of water) to get that rich, glossy finish. It makes your pastries look polished and professional with almost zero extra effort.
Recipe Variations
- Mini Strawberry Cream Puffs (Party-Perfect):
- Downsize the puffs for bite-sized beauties that are perfect for dessert platters, buffets, and baby showers. Just pipe smaller rounds of dough (think walnut-sized), bake a few minutes less, and fill as usual. They’re adorable, poppable, and ideal when you want your guests to say, “Did you really make these yourself?!”
- Chocolate Drizzle (Because… Chocolate):
- Once filled and cooled, drizzle melted dark, milk, or white chocolate over the tops for that elegant pâtisserie finish. You can use a spoon for casual flair or a piping bag for a cleaner look. Bonus: chocolate and strawberry together? A total flavor power couple.
- Strawberry Whipped Cream (Light & Airy Alternative):
- Not in the mood for custard? No problem. Whip up a sweet strawberry whipped cream by blending chilled heavy cream with fresh mashed strawberries and powdered sugar. It’s light, fruity, and feels like eating a cloud kissed by berries — perfect for warm-weather gatherings or a lighter dessert option.
- Puff Pastry Shortcut (When Time Is Tight):
- Short on time or just not feeling the pastry bag? Grab store-bought frozen puff pastry sheets instead of making choux. Cut into squares or circles, bake until golden and puffed, and then slice and fill like usual. It’s a slightly different texture but still flaky, fabulous, and totally crowd-pleasing.
- Lemon-Strawberry Cream Puffs (Bright & Zingy):
- Add a citrusy kick by folding fresh lemon zest into your custard or whipped cream filling. The lemon brings out the strawberries’ sweetness and adds that little pop of brightness that makes each bite extra refreshing — perfect for spring or summer dessert tables.
Gluten-Free Version
Great news for my gluten-free bakers: you can make light, airy, crisp-on-the-outside choux pastry without a speck of wheat — and it works shockingly well. In fact, choux dough is one of the few classic pastries that holds up beautifully with a gluten-free swap when you know what you’re doing. And lucky for you… I do.
Start by using a 1:1 gluten-free flour blend specifically designed for baking, like Cup4Cup, King Arthur Measure for Measure, or Bob’s Red Mill Gluten Free 1-to-1. These blends are carefully crafted with starches and binders (like xanthan gum) that mimic gluten’s elasticity, so your puffs rise like champs and don’t collapse the moment you turn your back.
Here’s the trick: weigh your flour instead of scooping. Even a little too much can throw off the delicate moisture balance in choux dough. And yes, gluten-free flour behaves a little differently — the dough may feel slightly looser or more sticky than traditional, but that’s normal. Just stick to the method and trust the process.
The rest of the recipe — eggs, butter, water, and filling — is already naturally gluten-free. Just double-check any add-ins like chocolate or flavor extracts for hidden gluten or cross-contamination, and you’re golden.
Pro tip: once baked, keep those cream puffs uncovered at room temperature until you’re ready to fill. This keeps the shells crisp instead of softening too quickly.
Kid-Friendly Version
Want to turn these elegant little cream puffs into a dessert that’ll have kids wide-eyed and begging for seconds? It’s super easy — just swap the fancy filling for something light, sweet, and totally fun.
Start with the Filling:
Ditch the custard (delicious, but not always kid-approved) and go with a strawberry-flavored whipped cream that’s soft, fluffy, and fruity-sweet. Just whip cold heavy cream until it starts to hold soft peaks, then fold in finely mashed strawberries or a spoonful of strawberry jam along with a bit of powdered sugar. It turns the cream into a blush-pink, berry-kissed dream that’s light and totally slurpable.
Get Creative with Toppings:
This is where the fun really starts. After filling, give each puff a little drizzle of melted chocolate or white chocolate, or dust them with powdered sugar. Or go all-out kid mode and add colorful sprinkles, mini chocolate chips, or crushed freeze-dried strawberries. Let the kids decorate their own — it turns dessert into an edible art project (and you’ll definitely win the “cool adult” award).
Mini Size = Maximum Fun:
For smaller hands and easier bites, pipe the dough into mini puffs. They bake faster, are perfectly snackable, and make a great treat for lunchboxes, parties, or after-school rewards.
Make it a DIY Station:
Hosting a birthday party or playdate? Set up a “fill-your-own puff” bar with bowls of flavored whipped cream, different toppings, and tongs. Kids get to build their own creations — and you get a dessert that doubles as an activity.
Strawberry Cream Puffs
Ingredients
Method
- Preheat the Oven: 425°F (220°C). Line your baking tray with parchment.
- In a saucepan, heat water, butter, and sugar until boiling.
- Remove from heat and stir in flour. Return to heat and stir until it forms a smooth ball.
- Cool slightly, then beat in eggs one at a time until glossy.
- Pipe 12 small mounds onto the baking tray.
- Bake for 10 minutes, reduce heat to 350°F, and bake another 10 minutes.
- Let cool completely.
- Heat milk until steaming. In a bowl, whisk egg yolks, sugar, and cornstarch.
- Temper yolks with hot milk, then return to heat until thick.
- Add vanilla and cool fully.
- Fold in whipped cream and chopped strawberries.
- Slice each puff in half horizontally.
- Pipe or spoon in filling.
- Dust with powdered sugar and serve.
Notes
Strawberry Cream Puffs – Helpful Tips
Cooking Tips & TechniquesUse a classic choux pastry (pâte à choux) base—bring water, butter, and flour to a boil, then beat in eggs one at a time until smooth and glossy.
Pipe or spoon onto a parchment-lined baking sheet, spacing evenly. Bake at 400°F until puffed, then reduce heat to 350°F to finish cooking without collapsing.
Don’t open the oven door early! Let the shells set fully before removing—this keeps them crisp and airy.
For the filling, whip heavy cream until stiff peaks form, then fold in powdered sugar, vanilla, and finely chopped fresh strawberries or strawberry jam for sweetness and color.
Cool the shells completely before slicing and filling to prevent melting or sogginess. Serving Suggestions
Dust with powdered sugar or drizzle with melted white chocolate for an elegant finish.
Serve chilled for a cool, creamy bite—especially refreshing in spring or summer.
Perfect for bridal showers, afternoon tea, brunch buffets, or fancy desserts.
Add a mint leaf or slice of fresh strawberry on top for presentation points.
Pair with hot coffee, Earl Grey tea, or a sparkling rosé for a touch of class. Make-Ahead & Storage
Make-Ahead: Bake the cream puff shells 1–2 days ahead and store in an airtight container at room temp.
Refrigerator: Once filled, store cream puffs in the fridge for up to 2 days—best eaten within 24 hours.
Freezer: Freeze unfilled puffs for up to 2 months; re-crisp in a 300°F oven for 5 minutes before using.
Reheat: Not recommended for filled puffs. Serve chilled for best results. Tasty Variations to Try
Chocolate Lover’s: Add cocoa powder to the whipped cream and drizzle with ganache.
Lemon Berry: Fold in lemon zest and curd to the filling with fresh berries.
Nutella Swirl: Pipe a ribbon of Nutella or chocolate hazelnut spread inside before the cream.
Mini Puffs: Make bite-sized versions perfect for parties or dessert platters.
Almond Crunch: Top unbaked puffs with sliced almonds and sugar for a bakery-style crunch.
Taste What’s Next
Strawberry Lemon Blondies
Lemon Blueberry Yogurt Loaf
Lemon Raspberry Cookies
or you Can Dig Deeper Recipes by clicking this: Appetizer, Breakfast, Lunch, Dinner, and Desserts.
Storage & Reheating
Unfilled Shells:
If you’re prepping ahead — smart move — bake your choux pastry and let the shells cool completely before storing. Then place them in an airtight container at room temperature, and they’ll stay crisp and fresh for up to 2 days. Avoid the fridge for unfilled shells — moisture is the enemy of that beautiful crunch!
Want to go long-term? You can even freeze the baked, unfilled shells. Once cooled, pop them into a zip-top freezer bag, squeezing out as much air as possible. They’ll keep for up to 1 month. Just thaw at room temp and re-crisp in the oven before using (details below).
Filled Cream Puffs:
Once filled with custard, whipped cream, or anything deliciously soft, it’s game on. These are best enjoyed the same day for maximum texture and flavor. But if you’ve got leftovers, no worries — just store them in the fridge, loosely covered, for up to 24 hours. After that, the shells start to soften from the filling and lose their magic.
Reheating Shells (For That Fresh-Baked Crisp):
Need to bring the crunch back to life? Easy. Place the unfilled pastry shells on a baking sheet and heat in a 300°F oven for about 5 minutes. This reactivates the crispiness and gets rid of any humidity from storage. Just let them cool again before filling.
Pro Tip: If you’re serving cream puffs for a special event, bake the shells the day before, re-crisp them in the oven that morning, let them cool, and then fill right before serving. That way, you get the best of both worlds: no morning scramble and bakery-level texture.
Equipment
- Medium saucepan
- Mixing bowls
- Whisk
- Piping bag with round or star tip
- Baking tray with parchment
- Mesh strainer (optional for dusting sugar)
FAQs
How do you make strawberry cream puffs at home?
To make strawberry cream puffs from scratch, prepare choux pastry dough, bake until puffed and golden, then fill with fresh strawberry custard or whipped cream.
Can I use puff pastry to make strawberry cream puffs?
Yes! While choux pastry is traditional, using puff pastry is a shortcut. Just bake squares or rounds and fill them once cooled.
How long can cream puffs stay fresh with strawberry filling?
Strawberry cream puffs are best the same day, but you can store them in the fridge for up to 24 hours. Fill just before serving for optimal texture.
Can I make cream puffs ahead of time?
Absolutely. Bake and store shells ahead of time in an airtight container. Make the filling a few hours in advance and assemble right before serving.
What is the best filling for strawberry cream puffs?
Strawberry pastry cream, whipped cream with mashed berries, or even mascarpone-based filling works beautifully. Use ripe, sweet strawberries for best flavor.
External Resources
Conclusion
Making Strawberry Cream Puffs at home is one of those joyful kitchen experiences—part science experiment, part artistic expression, and 100% delicious reward. Whether you’re hosting a special occasion or just baking for fun, these puffs are guaranteed to make you feel like a French pastry chef in your own kitchen.
When you make your batch, tag me or mention me in your post—I’d love to see how your strawberry cream puffs turned out and what creative spins you put on them.
Now go make something magical. You’ve got this!