Introduction
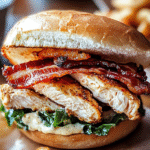
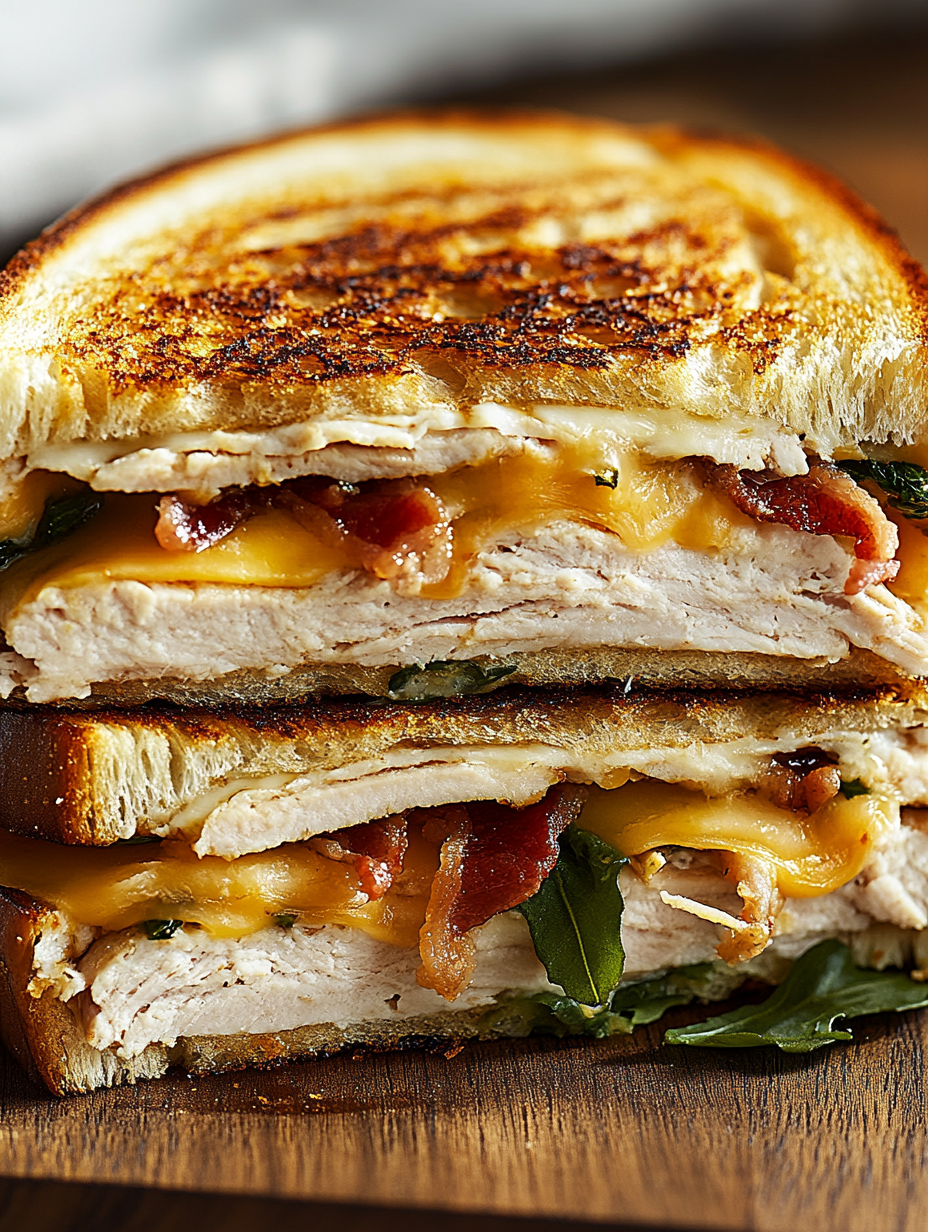
Cheddar and Bacon Turkey Melt is a deliciously satisfying sandwich that brings together smoky bacon, sharp cheddar, and tender turkey in a perfectly toasted melt. Crispy bread holds together layers of melted cheese, savory turkey slices, and crisp bacon, creating a harmony of textures and flavors that makes every bite memorable. Whether it’s a quick lunch, a comforting dinner, or a hearty snack, this melt always hits the spot.
I build this sandwich by layering thick slices of turkey and sharp cheddar onto rustic bread, then add sizzling bacon that crackles with every bite. As the sandwich grills, the cheese melts slowly, oozing between the layers while the bread crisps to a golden brown. The aroma of smoky bacon and melted cheddar fills the kitchen, making it impossible to wait. When I take the first bite, the perfect blend of savory, smoky, and cheesy flavors unfolds with every chew.
What I love most about this Cheddar and Bacon Turkey Melt is how easy it is to customize. Add tomatoes, a swipe of tangy mustard, or even some caramelized onions to make it your own. This melt isn’t just a sandwich—it’s a warm, satisfying experience that comforts and delights with every bite.
Cheddar and Bacon Turkey Melt is Perfect for:
- Quick lunches
- Comfort food dinners
- Game day snacks
- Easy meal prep
Why You will Love The Cheddar and Bacon Turkey Melt
- Fast and Simple:
- When hunger strikes, this recipe answers the call—ready in under 20 minutes with just a handful of ingredients. No complicated steps or long prep times, just straightforward, speedy cooking that gets dinner on the table fast. Perfect for busy weeknights or when you want a tasty meal without the hassle.
- Savory & Satisfying:
- The classic combo of turkey and crispy bacon is pure comfort food magic. The smoky, salty bacon perfectly complements the mild, tender turkey, while melted cheddar cheese ties everything together with rich, gooey goodness. It’s a flavor combo that hits all the right notes and leaves you feeling completely satisfied.
- Crunch Meets Gooey:
- Toasted bread adds that irresistible crunch that contrasts beautifully with the molten cheese inside. Every bite delivers a perfect balance of textures—the crisp, golden exterior gives way to a warm, cheesy center that’s downright addictive. It’s the kind of sandwich you’ll want to savor slowly.
- Versatile:
- This recipe is a flexible foundation for your cravings. Toss in fresh veggies for a pop of color and crunch, swap out the bread for your favorite type—sourdough, rye, or even a wrap—or add spices and herbs to customize the flavor. It’s easy to make it your own, no matter your taste.
- Great for Leftovers:
- Got leftover turkey from last night’s dinner? This sandwich is a genius way to transform those leftovers into a no-fuss, delicious meal. Just assemble, toast, and enjoy—no extra cooking required. It’s a smart, tasty way to reduce waste and save time.
Preparation and Cooking Time
- Total Time: 20 minutes
- Prep Time: 5 minutes
- Cook Time: 15 minutes
- Servings: 2 sandwiches
- Calories: ~450 per sandwich
- Key Nutrients: Protein: 35g, Fat: 25g, Carbs: 30g
Ingredients
Main Ingredients:
- 4 slices sandwich bread (sourdough, whole wheat, or your favorite)
- 6 oz sliced cooked turkey breast
- 4 slices bacon
- 4 slices sharp cheddar cheese
- 2 tbsp butter, softened
- Optional: lettuce, tomato slices, mayo, or mustard
Steps on making Cheddar and Bacon Turkey Melt
Cook the Bacon:
- Cook the bacon in a skillet over medium heat until crispy, about 6–8 minutes.
- Transfer bacon to a paper towel-lined plate to drain excess fat.
Prepare the Sandwich:
- Butter one side of each bread slice generously.
- On the unbuttered side of two slices, layer turkey, crispy bacon, and cheddar cheese.
- Top with the remaining bread slices, buttered side facing out.
Grill the Sandwich:
- Heat the skillet over medium heat.
- Place sandwiches in the skillet and cook for 3–4 minutes per side, pressing gently with a spatula.
- Flip carefully, cooking until bread is golden brown and cheese has melted.
Serve:
- Remove sandwiches from skillet and let cool slightly.
- Slice in half and serve warm, adding optional toppings if desired.
How to Serve the Cheddar and Bacon Turkey Melt
Enhance your Cheddar and Bacon Turkey Melt with:
- A side of crispy fries or chips
- Fresh pickle spears
- A crisp green salad
- Tomato soup for dipping
- Your favorite cold beverage
Additional Tips for Cheddar and Bacon Turkey Melt
- Use thick-cut bread for a heartier sandwich
- For extra crunch, add fresh lettuce and tomato inside before grilling
- Substitute turkey with chicken breast if preferred
- Experiment with different cheeses like Swiss or pepper jack
- Avoid pressing too hard to keep the sandwich fluffy inside
Recipe Variations for Cheddar and Bacon Turkey Melt
- Avocado Boost:
Take your sandwich to the next level of comfort by adding slices of ripe avocado. The natural creaminess of avocado melts right into the warm fillings, bringing a buttery richness that enhances every bite. It’s a subtle upgrade that makes the whole sandwich feel more indulgent—without going overboard. Sprinkle with a pinch of salt and a squeeze of lemon juice to brighten things up and keep the avocado fresh and vibrant. - Spicy Kick:
Craving a little heat? Spread on a thin layer of chipotle mayo, sriracha, or even jalapeño cream cheese for a bold flavor boost. The smoky spice pairs beautifully with the savory turkey and sharp cheddar, giving your sandwich a fiery edge that cuts through the richness in the best way. If you’re a heat-seeker, toss in a few pickled jalapeño slices or crushed red pepper flakes for extra intensity. - Italian Style:
Channel deli-counter favorites by swapping out the turkey for thin-sliced prosciutto, ham, or even salami. Spread a spoonful of pesto on the bread and layer with mozzarella or provolone for an herby, garlicky, melty masterpiece. A few roasted red peppers or sun-dried tomatoes tucked inside add a sweet, tangy bite that rounds out the Italian-inspired flavor profile. Finish with a sprinkle of fresh basil if you’re feeling fancy. - Open-Faced Version:
Lighten things up or just switch up the presentation with an open-faced variation. Start by toasting your bread until golden and sturdy, then pile on the fillings—cheese on top—and broil until everything’s hot and bubbly. The result? A crisp, melty, knife-and-fork sandwich that still delivers all the classic comfort but with a bistro-style twist. It’s also a great way to stretch ingredients a bit further.
Freezing and Storage
- Best Enjoyed Fresh:
This sandwich is truly at its peak the moment it comes off the stove—bread golden and toasty, cheese perfectly melted, and the savory filling warm and full of flavor. But let’s be real—leftovers happen. If you find yourself with an extra sandwich or two, don’t worry. Wrap them snugly in foil or parchment and store in an airtight container in the fridge. They’ll stay delicious for up to two days, making for a fast, satisfying meal when time is short and hunger strikes. - Reheat in a Skillet or Toaster Oven to Retain Crispness:
Microwaves may be convenient, but they’re not your sandwich’s best friend. To preserve the original crisp edges and melty center, reheat gently in a skillet over medium-low heat. Press it lightly with a spatula for even warming and a fresh-off-the-griddle finish. Alternatively, use a toaster oven—about 10 minutes at 350°F will do the trick. The result? Toasted bread, gooey cheese, and warmed-through filling that tastes just as comforting and satisfying as the first time. - Not Recommended for Freezing Assembled Sandwiches:
While it’s tempting to freeze sandwiches for easy future meals, this one isn’t built for the deep freeze. The bread can turn soggy, chewy, or dry after thawing, and the texture of the filling just doesn’t hold up the same. If you want to prep ahead, it’s better to freeze just the cooked filling—meat, cheese, even sautéed veggies—on their own. Store them in a freezer-safe bag or container. Then when you’re ready to eat, thaw, reheat the filling, and use freshly toasted bread to assemble. That way, you still get the crisp, gooey, flavorful experience that makes this sandwich so crave-worthy.
Special Equipment
- Nonstick skillet or griddle
- Spatula for flipping
- Knife and cutting board
FAQ Section
Can I use deli turkey?
Yes, pre-sliced deli turkey works great for convenience.
What bread works best?
Sourdough, whole wheat, or any sturdy bread with a firm crust.
Can I make this vegetarian?
Skip the turkey and bacon; add grilled veggies and cheese instead.
How do I prevent soggy bread?
Use butter on the outside of the bread and cook over medium heat to crisp it well.
Cheddar and Bacon Turkey Melt
Ingredients
Method
- Cook the bacon in a skillet over medium heat until crispy, about 6–8 minutes.
- Transfer bacon to a paper towel-lined plate to drain excess fat.
- Butter one side of each bread slice generously.
- On the unbuttered side of two slices, layer turkey, crispy bacon, and cheddar cheese.
- Top with the remaining bread slices, buttered side facing out.
- Heat the skillet over medium heat.
- Place sandwiches in the skillet and cook for 3–4 minutes per side, pressing gently with a spatula.
- Flip carefully, cooking until bread is golden brown and cheese has melted.
- Remove sandwiches from skillet and let cool slightly.
- Slice in half and serve warm, adding optional toppings if desired.
Notes
Conclusion
Whip up the Cheddar and Bacon Turkey Melt and enjoy a hearty and satisfying meal that perfectly balances savory flavors and comforting textures. Layered with smoky bacon, melted cheddar, and tender turkey, this melt is a versatile choice for lunch, dinner, or a cozy snack. Delight your taste buds with its crispy edges and gooey center—it’s a must-have addition to your recipe lineup.
Get creative by adding your favorite greens, a touch of tangy mustard, or a slice of ripe tomato to elevate the flavor even more. Enjoy it on its own or paired with a fresh side salad for a complete meal.
Make one today, fill your kitchen with the irresistible aroma of melted cheese and bacon, and savor every bite. Snap a photo of your creation and share it on Instagram—tag me so we can celebrate your delicious success. Happy cooking!