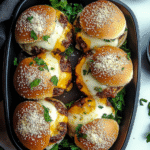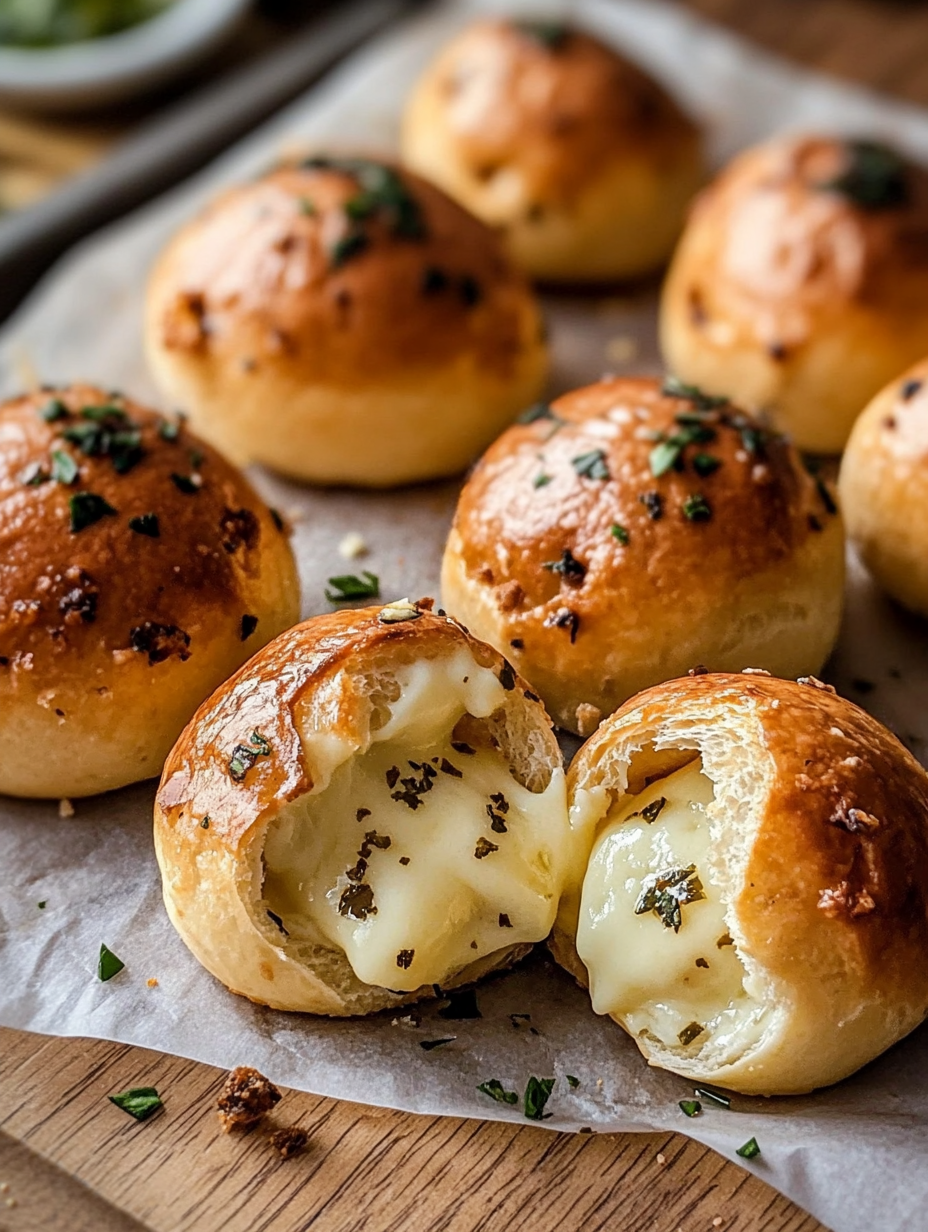
If there’s one thing I can never resist, it’s warm, cheesy bread fresh out of the oven. The smell alone is enough to pull the whole family into the kitchen before I even call them. That’s why today I’m sharing my Garlic Butter Cheese Bombs Recipe — a golden, pull-apart appetizer that melts in your mouth with every bite. I promise, these little cheesy pockets of joy will disappear faster than you can bake them. They’re gooey, buttery, garlicky, and absolutely irresistible. This is one of those recipes that makes me feel like the fun mom who always has something delicious to pull out of the oven at the right time.
I love how this Garlic Butter Cheese Bombs Recipe comes together with simple ingredients you probably already have in your fridge or pantry. It’s a recipe that feels indulgent, but it’s also approachable. Whether you’re serving them up as a party appetizer, a fun side dish for pasta night, or a snack to keep hungry kids happy, these cheese bombs fit the bill. And because the recipe is versatile, you can switch up the fillings, make them spicy, or even prep them ahead. Oh, and did I mention how easy they are? The hardest part is waiting for them to cool just enough so you don’t burn your tongue with that melty cheese center!
With this Garlic Butter Cheese Bombs Recipe, I get to combine my two favorite comfort foods: buttery garlic bread and gooey melted cheese. You really can’t go wrong when those flavors come together. Trust me, once you bake a batch, your family (and even the neighbors) will start requesting them regularly. So go ahead — let’s make these golden bites of happiness together.
What’s on the Plate
Overview
- Cuisine: American, Italian-inspired
- Course: Appetizer, Snack, Side Dish
- Prep Time: 15 minutes
- Cook Time: 15 minutes
- Total Time: 30 minutes
- Servings: 12 cheese bombs
What’s in Every Bite
- Calories: 180
- Carbs: 16g
- Fats: 9g
- Protein: 6g
- Fiber: 1g
- Sugar: 2g
- Sodium: 320mg
Total Recipe Cost
- Estimated Total Cost: $7.50
- Cost Per Serving: $0.63
- Main Cost Factors: Cheese, butter, refrigerated dough
The Story Behind the Flavor
Garlic bread has been stealing hearts for centuries, dating back to ancient Rome where garlic and olive oil were rubbed onto bread to enhance flavor. Fast forward to Italy in the Middle Ages, and garlic-infused bread became a household staple. By the time Italian immigrants brought it to America in the late 19th century, garlic bread was already iconic. Over the years, creative twists started popping up — one of them being stuffed breads filled with gooey cheese. Our Garlic Butter Cheese Bombs Recipe is a fun modern evolution of those traditions: part Italian comfort, part American appetizer, and fully delicious. Traditionally, Italians would use fresh mozzarella tucked into handmade dough, brushed with olive oil and garlic. Today, we can take a shortcut with refrigerated biscuit dough, keeping all the magic with half the effort.
Perfect For
- Game day parties: Forget the store-bought snacks—these little bites of cheesy, garlicky goodness are the true MVP of the snack table. Imagine a platter piled high with golden, buttery cheese bombs disappearing before the kickoff is even over. They’re bite-sized, addictive, and guaranteed to keep the crowd cheering.
- After-school snacks: Hungry kids don’t stand a chance against the irresistible smell of garlic butter wafting from the kitchen. These bombs are quick to bake, perfectly filling, and just the right size for little hands. Bonus: kids love pulling them apart and finding the gooey cheese center—it’s like a surprise every time.
- Pasta night side dish: Want to level up spaghetti night? Forget plain breadsticks—serve these alongside a big bowl of spaghetti, lasagna, or creamy fettuccine Alfredo, and you’ve instantly taken dinner from weeknight simple to trattoria-worthy. The buttery garlic flavor soaks up all those extra pasta sauces like a dream.
- Potluck tables: You know how there’s always that one dish everyone rushes to at a potluck? Yep—this is it. Garlic butter cheese bombs are a guaranteed crowd-pleaser. They travel easily, reheat beautifully, and vanish before dessert even hits the table. Bring these once, and you’ll forever be “the cheese bomb person.”
- Family movie nights: Skip the popcorn this time and bake a tray of these warm, pull-apart cheese bombs instead. They’re soft, cheesy, and perfect for dipping in marinara or ranch while snuggled under a cozy blanket. Trust me, nothing says family bonding like fighting over the last cheesy bite during the big movie scene.
Why You’ll Love This Recipe
- Gooey cheese center in every bite: Let’s be honest—there’s nothing quite as magical as breaking into a warm roll and watching melted cheese stretch from one side to the other. Every single bite of these garlic butter cheese bombs delivers that gooey, pull-apart satisfaction that makes you close your eyes and smile.
- Golden brown buttery exterior: These aren’t just any rolls; they’re brushed with garlicky, herby butter before baking, so they come out of the oven with that irresistible golden shine and crispy edges. The outside is buttery and slightly crunchy, while the inside stays soft, fluffy, and tender. Basically, bread heaven.
- Quick and easy — only 30 minutes total: No need to be a professional baker here. With store-bought crescent roll dough and just a handful of simple ingredients, you’ll have these cheesy delights ready in half an hour. They’re the kind of recipe you can whip up on a whim, whether you’re feeding surprise guests or just craving something warm and comforting.
- Customizable with different cheeses or add-ins: Mozzarella is the classic go-to, but you can swap in cheddar for sharpness, pepper jack for spice, or even brie if you’re feeling fancy. Toss in cooked bacon bits, caramelized onions, or jalapeños for a flavor twist that keeps things exciting. These bombs are your blank canvas for creativity.
- Perfect finger food for kids and adults alike: No forks, no knives—just grab and bite. These bombs are the kind of snack that brings people together around the table, from picky kids to cheese-loving adults. Whether you’re serving them at a party, packing them in a lunchbox, or just treating yourself, they always hit the spot.
Ingredients You’ll Need
Core Ingredients
- 1 can refrigerated biscuit dough (8-count)
- 8 mozzarella cheese sticks, cut into 3 pieces each
- 4 tbsp unsalted butter, melted
- 3 cloves garlic, minced
- 1 tsp Italian seasoning
- 2 tbsp fresh parsley, chopped
- ¼ cup grated Parmesan cheese
Optional Add-ins
- Red pepper flakes for a spicy kick
- Cooked and crumbled bacon bits
- Jalapeño slices for heat
- Fresh basil or oregano for garnish
Ingredient Highlights
- Refrigerated biscuit dough – A lifesaver for busy moms! Soft, fluffy, and easy to work with.
- Mozzarella cheese sticks – The gooey center that makes these cheese bombs irresistible.
- Garlic butter – Melted butter with minced garlic infuses rich flavor into every bite.
- Parmesan – Adds a nutty, salty finish that balances the richness of mozzarella.
- Fresh herbs – Parsley (or basil/oregano if you like) adds a pop of freshness.
Step-by-Step Instructions
- Preheat oven to 375°F (190°C). Line a baking sheet with parchment paper.
- Open the can of biscuit dough and separate into 8 pieces. Cut each piece in half to make 16.
- Place one piece of mozzarella in the center of each dough half. Wrap dough around cheese and pinch edges tightly to seal.
- Arrange cheese bombs seam-side down on the baking sheet.
- In a small bowl, mix melted butter, minced garlic, Italian seasoning, and parsley.
- Brush each dough ball generously with garlic butter mixture.
- Sprinkle grated Parmesan over the top.
- Bake for 12–15 minutes or until golden brown and bubbly.
- Serve warm and watch them disappear!
Pro Tips
- Seal dough tightly to prevent cheese leakage: Nothing’s worse than watching all that glorious cheese ooze out onto the baking sheet instead of staying tucked inside your roll. Make sure you pinch and press the dough seams really well—almost like you’re tucking in a cozy little blanket around the cheese. A snug seal keeps that gooey goodness where it belongs.
- Chill mozzarella sticks before wrapping: Pop your cheese sticks in the freezer or fridge for about 10 minutes before wrapping them in dough. This slows down the melting process so the cheese stays put inside while the outside gets perfectly golden. No cheese rivers spilling out—just molten centers when you bite in.
- Add a sprinkle of sea salt on top: That final dusting of flaky sea salt before baking takes these from “yum” to “oh-my-goodness WOW.” It balances the richness of the butter and cheese, giving you that extra hit of flavor with every bite. If you really want to level it up, try a pinch of garlic salt or parmesan dusting, too.
- Double the recipe for parties: These little bites disappear faster than you can say “cheese bomb.” Seriously—make double (or even triple) if you’re serving them at game day gatherings, potlucks, or family nights. They’re the kind of appetizer people hover around the tray for, so you’ll thank yourself for the extra batch.
- Bake on parchment for easy cleanup: Save yourself the hassle of scrubbing melted cheese off your baking sheet by using parchment paper. It keeps everything neat and helps the bottoms of the rolls get that even, golden crisp.
- Serve them warm, straight from the oven: These cheese bombs are best enjoyed fresh while the centers are still melty. If you’re making them ahead, just give them a quick reheat in the oven to bring back that perfect gooeyness.
Recipe Variations
- Spicy Cheese Bombs – If you like a little kick, tuck a pinch of red pepper flakes right inside the dough with the cheese, or slip in a thin slice of jalapeño. The heat cuts through the richness of the butter and cheese, giving you that addictive spicy-creamy combo. Perfect for anyone who says, “Make it hot!”
- Pizza Cheese Bombs – Take your favorite Friday night flavors and shrink them into bite-sized happiness. Just slide in a few mini pepperoni slices along with the mozzarella, then brush the tops with garlic butter mixed with a pinch of oregano. Dip them in warm marinara, and you’ve basically got pizza in a roll—kids and adults both flip for these.
- Herb Lovers’ Cheese Bombs – Fresh herbs can change the whole flavor game. Stir chopped basil, thyme, or rosemary right into your melted garlic butter before brushing it on. The herbs infuse every bite with garden-fresh aroma, making these bombs feel a little more grown-up and gourmet.
- Bacon Cheddar Bombs – Want to make these extra indulgent? Swap out the mozzarella for sharp cheddar, then tuck in crispy bacon bits. The smoky-salty bacon paired with melty cheddar is pure comfort food wrapped in golden dough. These are the ones that disappear first at potlucks—I’m just warning you now.
- Buffalo Ranch Cheese Bombs – Drizzle the inside with a touch of buffalo sauce, then serve with cool ranch for dipping. It’s a game day win—spicy, tangy, and creamy all in one bite.
- Everything Bagel Cheese Bombs – Before baking, sprinkle the tops with everything bagel seasoning. When they come out of the oven, you’ve got that iconic garlicky, oniony crunch paired with gooey cheese inside. Breakfast vibes meet snack time bliss.
Gluten-Free Version
Going gluten-free doesn’t mean you have to miss out on these golden, cheesy bites of joy! The good news is that the filling—gooey mozzarella, buttery garlic, and any add-ins you like—is naturally gluten-free. The only swap you need to make is the dough. Instead of refrigerated biscuit dough, grab a gluten-free crescent roll dough from the store or whip up a simple homemade gluten-free bread dough if you’re feeling ambitious.
The texture will still bake up fluffy and light, especially if you brush on that rich garlic butter before and after baking. And here’s the best part: no one will even notice they’re gluten-free! They’ll still tear open to reveal that stretchy, melty cheese center, and you’ll still get that crisp golden exterior that makes cheese bombs so addictive.
If you want to level them up, sprinkle a little Parmesan and dried parsley on top before baking. They’ll look bakery-fancy and taste absolutely irresistible. Gluten-free or not, everyone’s diving in for seconds.
Kid-Friendly Version
This recipe was practically made for little hands and big smiles. To keep it extra kid-friendly, simply tone down the seasonings—stick with a gentle brush of garlic butter and maybe just a pinch of parsley for color. Skip the spicy flakes or herbs if your kiddos aren’t into bold flavors yet.
Here’s the fun part: let the kids help with the wrapping! Hand them small pieces of dough and cheese sticks, and watch their creativity shine. To them, it feels like rolling out playdough or sealing up little treasure chests, but the best part is that their “craft project” turns into warm, cheesy snacks they can actually eat.
Cooking together also encourages them to try new foods, and trust me—when they’ve made their own cheese bombs, they’ll be eager to take that first cheesy bite. Serve them up with kid-approved dips like marinara, ranch, or even a little honey mustard for extra fun at the table. It’s a win for both mom and kids—easy, tasty, and interactive.
Garlic Butter Cheese Bombs Recipe
Ingredients
Equipment
Method
- Preheat oven to 375°F (190°C). Line a baking sheet with parchment paper.
- Open the can of biscuit dough and separate into 8 pieces. Cut each piece in half to make 16.
- Place one piece of mozzarella in the center of each dough half. Wrap dough around cheese and pinch edges tightly to seal.
- Arrange cheese bombs seam-side down on the baking sheet.
- In a small bowl, mix melted butter, minced garlic, Italian seasoning, and parsley.
- Brush each dough ball generously with garlic butter mixture.
- Sprinkle grated Parmesan over the top.
- Bake for 12–15 minutes or until golden brown and bubbly.
- Serve warm and watch them disappear!
Notes
Garlic Butter Cheese Bombs – Helpful Tips
Cooking Tips & Techniques- Use refrigerated biscuit dough for a quick shortcut, but if you’ve got time, homemade pizza dough makes these bombs extra pillowy.
- When wrapping the cheese, pinch the seams tightly so it doesn’t ooze out during baking.
- Use a cast-iron skillet or parchment-lined baking sheet for even browning.
- For maximum flavor, brush with garlic butter both before and after baking. The second brush adds that glossy finish and rich buttery punch.
- Bake until golden brown (12–15 minutes) and avoid overbaking to keep them soft and gooey inside.
- Serve hot with a side of marinara sauce, ranch, or garlic aioli for dipping.
- Add freshness with a sprinkle of chopped parsley, basil, or even a dash of red pepper flakes for heat.
- Perfect as a party appetizer, game day snack, or a fun bread basket swap at dinner.
- Pair with a crisp green salad, pasta dish, or a bowl of soup for a complete meal.
- Assemble the bombs ahead and refrigerate for up to 24 hours before baking. Just brush with garlic butter right before they hit the oven.
- Store leftovers in an airtight container in the fridge for 2–3 days.
- Freeze unbaked bombs on a tray, then transfer to a freezer bag for up to 2 months. Bake straight from frozen, adding 3–5 minutes to the cook time.
- Reheat baked bombs in the oven at 350°F for 5–7 minutes to keep them crisp and melty. Avoid the microwave—it makes them rubbery.
- Spice it up with jalapeño slices or a sprinkle of crushed red pepper inside each bomb.
- Swap mozzarella with cheddar, pepper jack, or gouda for different cheesy surprises.
- Make them vegetarian-friendly with a pesto filling or sun-dried tomatoes.
- Low-carb/keto swap: Use fathead dough instead of biscuit dough.
- Go international: Try an Italian spin with pepperoni and marinara inside, or a Tex-Mex twist with taco-seasoned beef and cheddar.
Taste What’s Next
Vegan Corn Ribs with Aleppo Chili Butter & Lime Zest Cream Cheese
Shrimp Ceviche Recipe
Applebee’s Chicken Wonton Tacos
or you Can Dig Deeper Recipes by clicking this: Appetizer, Breakfast, Lunch, Dinner, and Desserts.
Storage & Reheating
The best part about these Garlic Butter Cheese Bombs—besides the gooey center—is that you can make them ahead and keep the cheesy goodness going all week long.
- Refrigerator: Once they’ve cooled completely, pop the cheese bombs into an airtight container or zip-top bag and store them in the fridge for up to 3 days. They hold up beautifully, and you’ll be glad to have a ready-to-go snack waiting for those busy afternoons or late-night cravings.
- Freezer: Want to really get ahead of the game? Assemble your cheese bombs but don’t bake them. Place the unbaked balls on a baking sheet, freeze until solid, then transfer them to a freezer-safe bag. They’ll last up to 1 month. When you’re ready, bake them straight from frozen—just add 3–4 minutes to the cooking time. No need to thaw, no mess, just cheesy joy on demand.
- Reheating: To bring back that perfect golden crust and melty center, reheat your cheese bombs in the oven at 350°F for 5–7 minutes. They’ll taste almost as fresh as the day you made them. Avoid the microwave—it makes the dough soggy and robs you of that irresistible buttery crispness. A toaster oven works great too if you’re only reheating a couple at a time.
- Pro tip: Serve them warm with a little extra melted garlic butter brushed on top to refresh the flavor. It’s like a bakery-fresh upgrade without the extra work.
Equipment
You don’t need a fancy kitchen setup to make these Garlic Butter Cheese Bombs—just a few basics you probably already have:
- Baking sheet: The stage where all the magic happens. A sturdy, rimmed baking sheet gives the cheese bombs enough room to puff up without sticking together.
- Parchment paper: Your best friend for easy cleanup. It keeps the bottoms from over-browning and saves you from scrubbing baked-on cheese later.
- Pastry brush: Essential for that buttery garlic finish. A quick swipe of garlic butter before and after baking turns good dough into irresistible golden bites.
- Small mixing bowl: Perfect for whisking together your melted butter, garlic, and herbs. Think of it as your flavor command center.
- Measuring spoons: A small but mighty tool to make sure your garlic, herbs, and butter ratios are just right. It’s the difference between “pretty good” and “wow, these are amazing!”
- Optional but nice to have: A cooling rack so the bottoms don’t get soggy and a pizza cutter for slicing dough evenly if you’re making your own.
FAQs
What cheese works best for Garlic Butter Cheese Bombs Recipe?
Mozzarella is the classic choice for gooey centers, but cheddar, provolone, or pepper jack also work beautifully.
Can I make Garlic Butter Cheese Bombs Recipe ahead of time?
Yes! Assemble them up to a day ahead, refrigerate, and bake just before serving.
How do I keep the cheese from leaking out?
Seal the dough tightly around the cheese and chill them briefly before baking to help.
Can I air fry Garlic Butter Cheese Bombs Recipe?
Absolutely. Air fry at 350°F for 8–10 minutes until golden brown.
What dips go well with Garlic Butter Cheese Bombs Recipe?
Marinara sauce, ranch dressing, garlic aioli, or even buffalo sauce are all great options.
External Resources
Conclusion
Whenever I make this Garlic Butter Cheese Bombs Recipe, I feel like I’ve pulled off a little kitchen magic trick. It’s simple, quick, and guaranteed to wow anyone who tries it. You get the golden crunch, the buttery garlic aroma, and that glorious cheesy pull that makes everyone’s eyes light up. I love serving these for game nights, family dinners, or even just a cozy afternoon snack. They’re the kind of recipe that turns an ordinary day into something special — and who doesn’t need more of that?
So go ahead — snap a photo and post it online! Don’t forget to tag me! I want to see your cooking success. Happy cooking!