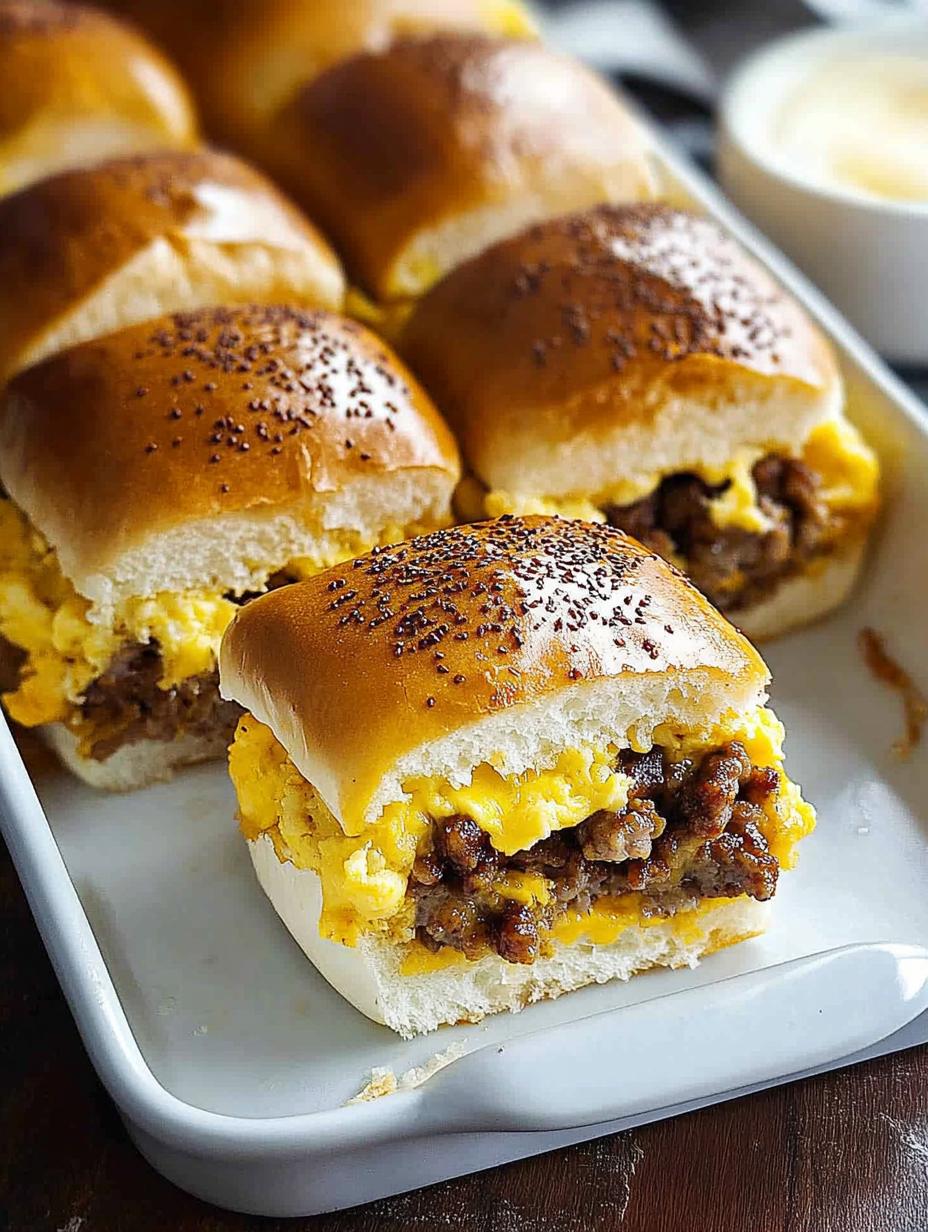
Oh mama, this one’s a morning game-changer! These Hawaiian Roll Breakfast Sliders with Sausage, Egg & Cheese are sweet, savory, and melty in all the right places. I’m talkin’ golden brown tops, fluffy scrambled eggs, juicy sausage patties, and a mountain of gooey cheddar, all hugged together inside soft Hawaiian rolls. It’s a breakfast dream that feeds a hungry crowd—and let’s be honest, a cranky one too. Whether it’s Sunday brunch, a sleepy Saturday, or a grab-and-go school morning, these sliders don’t just show up—they show off.
They’re the perfect fusion of sweet and salty comfort food with the bonus of being easy to prep ahead. I whipped these up for my kids one weekend and—no joke—no leftovers. Not even a crumb. Just a lot of happy, cheesy grins. These sliders taste like home, like weekends, like love packed into a warm sandwich. So, let’s make breakfast the best part of the day!
What’s on the Plate
Overview
- Cuisine: American, Brunch
- Course: Breakfast, Brunch, Potluck Dish
- Prep Time: 15 minutes
- Cook Time: 20 minutes
- Total Time: 35 minutes
- Servings: 12 sliders
What’s in Every Bite
- Calories: 285
- Carbs: 21g
- Fats: 17g
- Protein: 13g
- Fiber: 1g
- Sugar: 5g
- Sodium: 570mg
Total Recipe Cost
- Estimated Total Cost: $12.50
- Cost Per Serving: $1.04
- Main Cost Factors: Breakfast sausage, Hawaiian rolls, cheddar cheese
The Story Behind the Flavor
These breakfast sliders are a modern twist on American breakfast sandwiches, but their roots go way back. Sliders themselves rose to popularity in the 1920s thanks to White Castle’s mini burgers, but breakfast versions didn’t really become a “thing” until the early 2000s when people started demanding better (and more fun) brunch options.
The Hawaiian roll came into play in the 1950s, thanks to King’s Hawaiian bakery in Hilo, Hawaii. Those slightly sweet, fluffy buns were first served with savory meats in Hawaiian luaus and quickly became beloved across the mainland.
So why were these sliders made? Because moms (like us!) needed something quick, crowd-pleasing, and full of flavor that could be prepped ahead, baked in batches, and easily devoured. Today, breakfast sliders using Hawaiian rolls are a staple at baby showers, Sunday brunch spreads, and holiday breakfasts. Their popularity keeps growing—and once you try ‘em, you’ll understand why.
Perfect For
Let me tell you—these Breakfast Sliders are total crowd-pleasers and fit into just about every kind of morning. Whether you’re serving a house full of sleepyheads or just trying to get out the door without chaos, these little guys have your back.
- Weekend Brunch Parties: Got a hungry crowd coming over? These sliders were born for brunch buffets. Stack ‘em on a tray, set out some fruit and coffee, and boom—instant hero status. They disappear faster than the mimosa pitcher.
- Meal Prep Queens: If you like your mornings stress-free (who doesn’t?), these sliders are your new best friend. Assemble everything the night before, pop them in the fridge, then bake while you get ready. You’ll feel like a culinary magician with zero morning panic.
- Busy School Mornings: Forget cereal—just grab a warm slider, wrap it in foil or a napkin, and you’re out the door. They’re portable, mess-free, and guaranteed to hush any “I’m still hungry” complaints from the back seat.
- Holiday Mornings: Add these golden, cheesy beauties to your Christmas or Easter breakfast spread. They’re festive, comforting, and look way fancier than the effort it takes to make them. Bonus points if you serve them on a pretty platter with holiday mugs and twinkly lights.
Why You’ll Love This Recipe
Oh, honey. These breakfast sliders are everything your morning routine has been craving. Whether you’re feeding sleepy kids, hangry husbands, or your own growling belly, these little handheld heroes deliver every time. Here’s why you’ll be totally obsessed:
- Sweet and savory flavor bombs: Buttery Hawaiian rolls, melty cheese, savory meat, and that little kiss of sweet from the glaze? It’s a flavor explosion in every bite—like your favorite diner breakfast tucked into a cute little sandwich.
- Ready in just 35 minutes: You’re only a half-hour and change away from warm, gooey slider bliss. That’s faster than one episode of your favorite Netflix show, and trust me, it’s time well spent.
- Easily customizable: Bacon, sausage, ham, or even veggie sausage—these sliders play nice with everyone. Mix up the cheese, toss in some veggies, or sneak in some hot sauce if you like it spicy. It’s a choose-your-own-delicious-adventure.
- Great for make-ahead mornings: Assemble the night before, and all you have to do is pop them in the oven. You’ll feel like a morning rockstar without even putting on real pants.
- Kid-approved and husband-devoured: My kids demolish these. My husband? Let’s just say he’s got two in each hand before I’ve even sat down. Safe to say, this recipe’s got universal appeal.
- Warm, cheesy, soft, and gooey all in one bite: These sliders are the breakfast equivalent of a cozy blanket. Buttery tops, cheesy middles, warm eggs—what more could your taste buds want at 8 AM?
Ingredients You’ll Need
Core Ingredients
- 1 pack Hawaiian sweet rolls (12-count)
- 6 large eggs
- 6 breakfast sausage patties
- 1 1/2 cups shredded cheddar cheese
- 2 tbsp milk (for fluffy eggs)
- 2 tbsp butter (for brushing tops)
- Salt and pepper to taste
Optional Add-ins
- 1/4 cup diced green onions
- 4 slices cooked bacon, chopped
- 1/4 tsp garlic powder (for buttery tops)
- 4 slices American cheese (for extra gooeyness)
Ingredient Highlights
- Hawaiian Rolls: Their sweetness pairs perfectly with savory sausage and cheese. They’re soft but hold up beautifully to baking.
- Breakfast Sausage Patties: Juicy and full of spice. You can use pork, turkey, or plant-based options.
- Cheddar Cheese: Melty, sharp, and classic. Mix in a little mozzarella for extra stringiness if you like.
- Eggs & Milk: Whisking in milk gives you fluffy, soft eggs that layer nicely.
- Butter: Brushed on top before baking, it helps the rolls get that golden-brown glow.
Step-by-Step Instructions
- Preheat your oven to 350°F (175°C).
- Cook your sausage patties in a skillet over medium heat until browned and cooked through.
- Whisk eggs, milk, salt, and pepper in a bowl. Scramble them gently in a non-stick skillet until fluffy and just set. Don’t overcook!
- Slice Hawaiian rolls horizontally (don’t pull them apart individually!) and place the bottom half in a greased 9×13 baking dish.
- Layer in this order: scrambled eggs, sausage patties (cut to fit each slider), shredded cheese.
- Place the top half of the rolls back on. Melt butter and brush it generously over the tops. Optional: mix in garlic powder or chopped green onions into the butter.
- Cover with foil and bake for 15 minutes. Remove foil and bake 5 more minutes until tops are golden.
- Slice and serve hot!
Pro Tips
Want to take your breakfast sliders from “yum” to YAAAAS? I’ve got you covered with my favorite tricks from years of brunch heroism and morning chaos mastery. These little tips make a big difference—so don’t skip ’em!
- Use parchment paper for easier cleanup: Trust me, you’ll thank yourself later. Line your baking dish with parchment paper before assembling the sliders, and when you’re done? Just lift, toss, and enjoy your clean pan with zero scrubbing drama.
- Mix your cheeses for max gooeyness: Cheddar brings that bold sharpness, mozzarella melts like a dream, and together they create that magical, stretchy, melt-in-your-mouth moment that makes these sliders unforgettable.
- Broil the tops for the last 2 minutes: If you want that picture-perfect, golden-brown top with a little toasty crunch, broil ‘em! Just keep a close eye—things go from “golden glow” to “crispy tragedy” real fast under that broiler.
- Add bacon for a protein boost: Feeling extra? Slide a piece of crispy cooked bacon right into that sausage layer. It’s like a breakfast double whammy—savory, smoky, and oh-so-satisfying.
- Vegetarian version? No problem! Swap the sausage for scrambled tofu or plant-based sausage patties. It still gives that hearty morning bite, and your veggie-loving crew won’t feel left out.
- Let them rest before slicing: Once they’re out of the oven, give them 5 minutes to cool just a tad. This helps the cheese settle and keeps everything together for that perfect pull-apart moment.
Recipe Variations
There’s no one right way to make a breakfast slider—just delicious ways to make them your own. Whether you’re craving heat, veggies, or just want to try something new, these variations let you mix things up while keeping all that ooey-gooey goodness front and center!
- Bacon Lover’s Dream
- Can’t resist crispy bacon in the morning? Ditch the sausage and load up on bacon instead—or better yet, go all out and add both! You’ll get double the smoky, savory flavor, and trust me, no one will complain. It’s the ultimate brunch indulgence.
- Veggie Delight
- Want to sneak in some greens (or just love the texture and flavor of veggies)? Toss in sautéed spinach, mushrooms, diced onions, or colorful bell peppers. They’ll add a pop of color, nutrients, and depth that pair beautifully with melty cheese.
- Spicy Morning Kick
- For the heat-lovers at your table, level things up by using spicy breakfast sausage and swapping in pepper jack cheese. A little diced jalapeño or a splash of hot sauce doesn’t hurt either—these sliders will wake up your taste buds in the best way.
- Tex-Mex Style
- Give your breakfast a south-of-the-border twist! Use chorizo instead of standard sausage, sprinkle in some cumin or taco seasoning, and spoon a little salsa right into the slider before baking. Want extra flair? Serve them with avocado slices and a squeeze of lime!
- Sweet & Savory Combo
- Try using maple sausage and add a light brush of maple syrup or honey butter to the tops before baking. That sweet-salty combo is chef’s kiss—perfect for anyone who loves a little sugar with their savory.
- Mini Slider Bar for Parties
- Hosting brunch? Set up a DIY slider bar with different fillings and let guests build their own before baking. Kids love customizing, and adults appreciate the options. Win-win!
Gluten-Free Version
Yes, you can absolutely enjoy these breakfast sliders without the gluten—and still keep all the flavor and comfort. Here’s how to make it work for your gluten-free crew:
Swap the Buns Smartly
Start by using certified gluten-free slider buns. Can’t find them? No worries—grab your favorite gluten-free sandwich bread and cut it into slider-sized squares. They toast up beautifully and hold everything together just like traditional buns.
Check the Sausage Labels
Some breakfast sausages sneak in wheat-based fillers or flavorings, so read those labels like a pro. Look for sausages labeled “gluten-free” and steer clear of anything with breadcrumbs, modified food starch, or soy sauce unless it’s certified.
Watch the Cheese, Too
Most cheeses are naturally gluten-free, but shredded varieties sometimes contain anti-caking agents that may include hidden gluten. Stick with block cheese you can grate yourself, or double-check the label for a gluten-free stamp.
Bonus Tip:
If you’re using any seasoning blends or sauces (like maple glaze or salsa), make sure they’re gluten-free, too. Gluten loves to hide in sauces!
Kid-Friendly Version
These breakfast sliders were basically born to win over picky eaters—and with a few tiny tweaks, they’ll be gobbled up faster than you can say “school run.”
Keep It Mild and Cheesy
Ditch the fancy cheeses and go for classics like mild cheddar or American slices. They’re creamy, familiar, and a guaranteed win with little ones. Avoid anything too sharp or funky that might scare off sensitive taste buds.
Stick to the Basics
Skip the spicy sausage or adventurous add-ins. Use simple breakfast sausage or classic bacon—both are comforting, salty, and kid-approved. You can even scramble up an egg without any extra seasoning for a super mellow bite.
Slider-Size = Kid-Size
Cut each slider in half (or even quarters!) for those tiny toddler hands. Bite-sized food always feels more fun and manageable—and bonus, it reduces mess.
Let Them Build Their Own
Turn breakfast into a mini DIY moment. Lay out the ingredients and let the kids assemble their own sliders with their favorite combos. It adds excitement, gives them a sense of control, and boosts the chances they’ll eat the whole thing.
Hawaiian Roll Breakfast Sliders with Sausage, Egg & Cheese
Ingredients
Equipment
Method
- Preheat your oven to 350°F (175°C).
- Cook your sausage patties in a skillet over medium heat until browned and cooked through.
- Whisk eggs, milk, salt, and pepper in a bowl. Scramble them gently in a non-stick skillet until fluffy and just set. Don’t overcook!
- Slice Hawaiian rolls horizontally (don’t pull them apart individually!) and place the bottom half in a greased 9×13 baking dish.
- Layer in this order: scrambled eggs, sausage patties (cut to fit each slider), shredded cheese.
- Place the top half of the rolls back on. Melt butter and brush it generously over the tops. Optional: mix in garlic powder or chopped green onions into the butter.
- Cover with foil and bake for 15 minutes. Remove foil and bake 5 more minutes until tops are golden.
- Slice and serve hot!
Notes
Hawaiian Roll Breakfast Sliders with Sausage, Egg & Cheese – Helpful Tips
Cooking Tips & Techniques- Bake the eggs in a pan: Instead of scrambling, pour beaten eggs into a greased baking dish and bake for easy slicing—perfect slider-sized portions every time.
- Don’t skip the butter glaze: Brushing melted butter on top of the rolls with garlic powder, maple syrup, or Dijon adds flavor and gets them perfectly golden.
- Layer smart: Build sliders in this order: bottom buns, sausage, eggs, cheese, then top buns. This keeps things neat and melty.
- Wrap in foil if needed: If you’re making these ahead or for a crowd, foil wrap helps keep sliders warm and gooey without drying out.
- Pair with a side of fresh fruit, hash browns, or a yogurt parfait for a full breakfast spread.
- These sliders are perfect for brunch buffets, tailgating mornings, or even breakfast-for-dinner nights.
- Want a spicy kick? Serve with sriracha mayo, jalapeño slices, or a spicy honey drizzle.
- Make ahead up to 24 hours: Assemble completely (without baking), cover tightly, and refrigerate. Bake when ready to serve.
- Leftovers? Store in an airtight container for up to 3 days in the fridge.
- Reheat in foil in the oven at 325°F for about 10 minutes, or zap individually in the microwave for 30–45 seconds.
- Swap the sausage: Use bacon, ham, turkey sausage, or even veggie sausage patties.
- Add veggies: Sautéed spinach, bell peppers, or caramelized onions sneak in extra flavor and nutrients.
- Cheese it up: Try cheddar, provolone, pepper jack, or a mix of shredded cheeses for different vibes.
- Sweet & savory twist: Spread a thin layer of maple butter or fig jam on the rolls before assembling for that sweet-salty magic.
Taste What’s Next
Cajun Chicken Sloppy Joes Recipe
Tater Tot Breakfast Bowl with Sausage Gravy
Crescent Roll Breakfast Casserole
or you Can Dig Deeper Recipes by clicking this: Appetizer, Breakfast, Lunch, Dinner, and Desserts.
Storage & Reheating
Let’s be real—if you somehow don’t devour all of these breakfast sliders in one sitting, don’t worry. They store like a dream and reheat beautifully. Here’s how to keep that warm, cheesy goodness ready to go when you need it most (hello, hectic mornings!).
- Fridge Love
- Pop any leftover sliders into an airtight container or wrap them snugly in foil. They’ll stay fresh and tasty in the fridge for up to 3 days. Just make sure they’ve cooled before storing—no one wants soggy buns!
- Reheat Like a Pro
- Want them warm and gooey again? You’ve got options:
- Oven: Wrap in foil and bake at 300°F for about 10–12 minutes until the cheese is melty and the tops are toasty again.
- Microwave: For a quick fix, zap one slider for about 30 seconds. Add a second or two if needed, but go slow—no one likes lava cheese!
- Freezer-Friendly Breakfast Hero
- These sliders are freezer MVPs. Wrap each one tightly in plastic wrap, then again in foil to avoid freezer burn. Tuck them into a freezer bag and label with the date (if you’re organized like that). They’ll keep perfectly for up to 2 months.
- To Reheat from Frozen: No need to thaw—just unwrap the foil and bake at 350°F for 15–20 minutes until heated through. The cheese will be bubbly, the bread toasty, and your morning instantly better.
Equipment
- 9×13 baking dish
- Non-stick skillet
- Whisk
- Mixing bowl
- Sharp serrated knife
- Pastry brush (for butter)
FAQs
What is a good breakfast slider recipe with sausage and egg?
This recipe using Hawaiian rolls, scrambled eggs, sausage patties, and melty cheddar cheese is one of the best breakfast slider options for families and crowds.
Can I make Hawaiian roll breakfast sliders ahead of time?
Absolutely! Assemble them the night before, cover tightly, and refrigerate. Bake fresh in the morning for an easy meal.
How do I keep breakfast sliders from getting soggy?
Don’t overcook the eggs and avoid wet add-ins like raw tomatoes. Also, make sure to bake uncovered for the last 5 minutes.
What cheese works best for breakfast sliders?
Cheddar, American, and pepper jack are popular. Use shredded cheese for even layering.
Are breakfast sliders freezer friendly?
Yes! Freeze them individually wrapped and reheat in the oven straight from the freezer.
External Resources
Conclusion
These Hawaiian Roll Breakfast Sliders with Sausage, Egg & Cheese are my absolute go-to for feeding hungry humans on busy mornings. They’ve got the buttery pull-apart top, the melty cheese stretch, and that perfect mix of soft bread, savory meat, and fluffy egg that makes people go “mmm!” after the first bite.
Whether you’re brunching it up with friends or fueling the kids for school, this recipe delivers big flavor without big effort. And hey—there’s something magical about watching the whole pan disappear before your coffee even cools.
So go ahead — snap a photo and post it online! Don’t forget to tag me! I want to see your cooking success. Happy cooking!