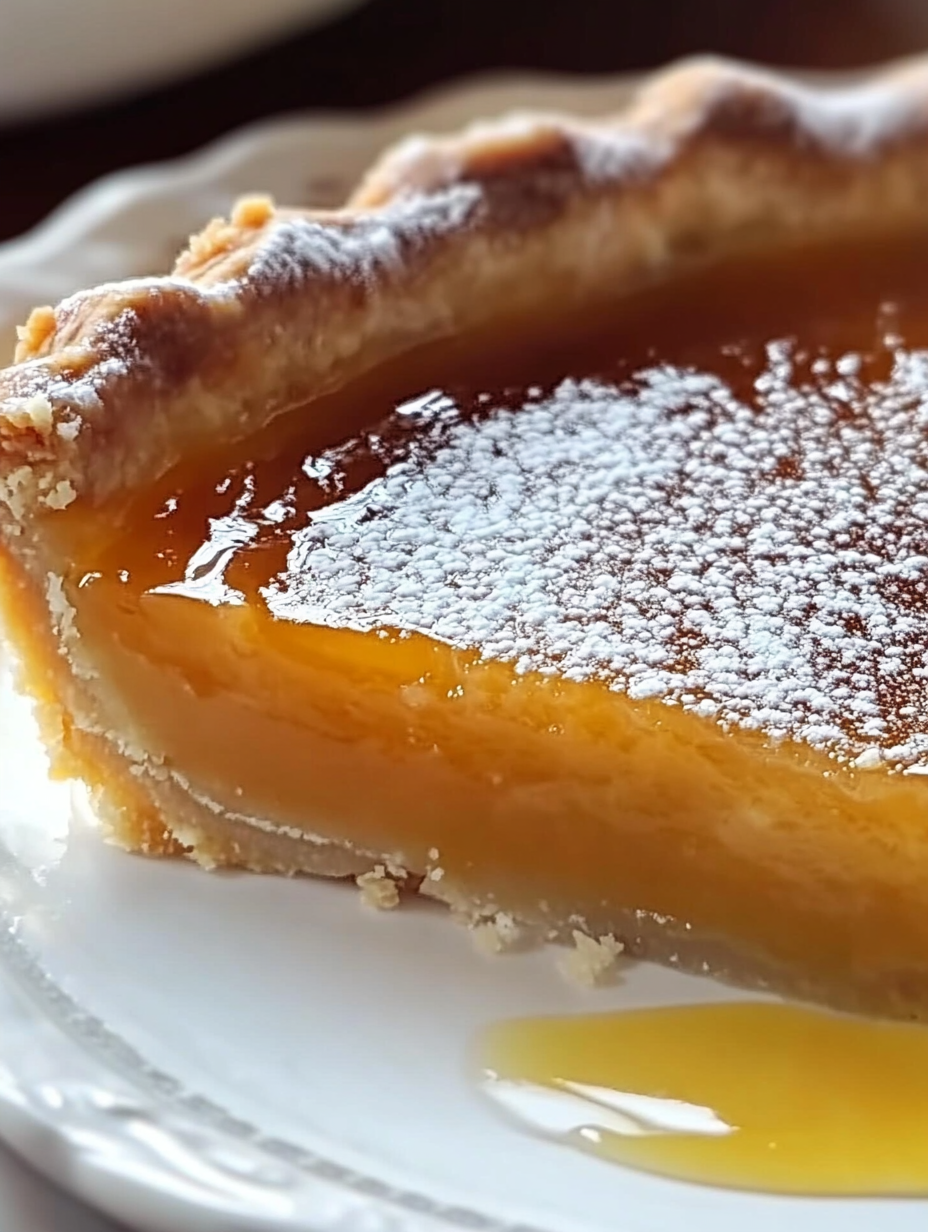
Golden, glossy, and lusciously sweet with just the right kiss of salt—that’s my Salted Honey Pie, a dessert that feels both homey and gourmet at the same time. When you slice through the silky filling, you’ll find yourself amazed at how simple ingredients can create such an elegant showstopper. The buttery crust hugs a rich honey custard, while a sprinkle of sea salt balances every bite. I bake this pie not just as a treat but as a celebration of what happens when sweet and savory hold hands in the kitchen. If you’ve ever wanted to impress at a dinner party or holiday gathering with a dessert that’s unexpectedly sophisticated but comfortingly familiar, this is the pie that will win everyone over. And here’s the best part—you don’t need to be a pastry chef to pull it off. I’ll walk you through every step so you can bring this golden beauty to your own table.
What’s on the Plate
Overview
- Cuisine: American
- Course: Dessert
- Prep Time: 15 minutes
- Cook Time: 50 minutes
- Total Time: 1 hour 5 minutes
- Servings: 8
What’s in Every Bite
- Calories: 410
- Carbs: 52g
- Fats: 20g
- Protein: 5g
- Fiber: 1g
- Sugar: 39g
- Sodium: 210mg
Total Recipe Cost
- Estimated Total Cost: $9.75
- Cost Per Serving: $1.22
- Main Cost Factors: Quality honey, butter, and heavy cream
The Story Behind the Flavor
Salted Honey Pie might sound like a modern twist, but its roots stretch back further than you think. The concept of honey custard pies dates all the way back to the 1930s in the American South, where honey became a treasured sweetener during sugar shortages. Honey pies were baked as an affordable yet luxurious dessert, often served at church socials and family gatherings. Traditionally, bakers whisked farm-fresh eggs with local honey, cream, and a pinch of salt to create a rustic custard that baked into a golden, slightly chewy filling. Over time, this dessert gained popularity across the Midwest and Appalachia, especially in states like Kentucky and Tennessee where beekeeping thrived. The modern “Salted Honey Pie” we know today was popularized in the early 2010s, particularly by bakeries in Brooklyn that revived this nostalgic treat with a gourmet edge. By keeping the classic custard but finishing it with a sprinkle of flaky sea salt, they elevated the pie into the chic, buzzworthy dessert it is now.
Perfect For
This dessert is one of those treasures that works beautifully across so many occasions, and trust me—you’ll find yourself reaching for it more often than you think.
- It’s a natural fit for holiday dinners like Thanksgiving or Christmas, when the table is already groaning with roasted meats, casseroles, and sides. A rustic yet elegant dessert like this brings a sweet balance without being overly heavy, making it the perfect finale after a festive feast.
- It also shines when you’re entertaining guests at dinner parties. You know those moments when you want to wow your friends without feeling chained to the oven? This dessert delivers that “gourmet touch” while still being approachable. Guests will swear you’ve pulled out all the stops.
- For special celebrations like birthdays or anniversaries, this treat feels unique—something more memorable than a store-bought cake. It’s indulgent yet cozy, the kind of dessert that says, “I made this just for you.”
- And don’t underestimate it as the sweet ending to a laid-back Sunday family meal. Imagine everyone lingering at the table, sharing stories, and finishing with warm slices that bring comfort and joy. It’s the kind of recipe that makes simple moments feel a little more special.
- Finally, this dessert is perfect for those times you want something rustic yet elegant—a dish that looks and tastes gourmet but doesn’t require fussy techniques. It’s charming, approachable, and absolutely unforgettable.
Why You’ll Love This Recipe
- First off, let’s talk about that flavor balance. This pie is a little sweet, a little salty, and a whole lot of dreamy. The rich honey brings warmth and natural sweetness, while just a sprinkle of flaky sea salt keeps every bite from tipping into “too sweet” territory. It’s the kind of combination that makes your taste buds perk up and go, “Oh, hello there!”
- Then there’s the beauty of simple ingredients coming together to create something that looks and tastes completely show-stopping. You don’t need a mile-long shopping list or fancy techniques—just pantry staples and a good stir, and suddenly you’ve got a pie that feels worthy of the spotlight.
- The texture is another reason to love this recipe. Imagine a silky, creamy custard filling that melts in your mouth, all tucked into a golden, flaky crust that gives just the right amount of crunch. That contrast is pure magic—comforting yet elegant, and guaranteed to keep people coming back for seconds.
- It’s also a total conversation starter. Place this pie on the table at any gathering, and you’ll hear the oohs and ahhs right away. Guests will ask, “What is this?” followed quickly by, “Can I have the recipe?” It’s not your everyday dessert, which makes it all the more memorable.
- And finally, it’s wonderfully easy to make ahead. Bake it, let it chill, and when it’s time to serve, it slices like a dream. No messy crumbles, no fuss—just neat, picture-perfect wedges ready to be plated (or sneaked straight from the fridge at midnight—I won’t judge!).
Ingredients You’ll Need
Core Ingredients
- 1 prepared pie crust (homemade or store-bought)
- 1/2 cup unsalted butter, melted
- 3/4 cup honey
- 1 cup granulated sugar
- 1/2 cup heavy cream
- 3 large eggs
- 2 tsp vanilla extract
- 1 tbsp apple cider vinegar
- 1 tbsp fine cornmeal
- 1/2 tsp salt
- Flaky sea salt, for finishing
Optional Add-ins
- A pinch of cinnamon or nutmeg for warmth
- A splash of bourbon or whiskey for depth
- Whipped cream or vanilla ice cream for topping
Ingredient Highlights
- Honey: The star of the show, providing floral sweetness and a natural caramel-like finish.
- Butter: Adds richness and gives the filling a silky texture.
- Cornmeal: A traditional thickener that creates body and a slight chew.
- Apple Cider Vinegar: Brightens the flavor and balances the sweetness.
- Sea Salt: The final touch that transforms this from sweet to spectacular.
Step-by-Step Instructions
- Preheat your oven to 350°F (175°C).
- Roll out and fit your pie crust into a 9-inch pie dish. Crimp edges as desired.
- In a large bowl, whisk together melted butter, honey, sugar, cream, eggs, vanilla, vinegar, cornmeal, and salt until smooth.
- Pour the filling into the prepared crust.
- Bake for 45–50 minutes, or until the center is just set but slightly wobbly.
- Let cool completely before slicing. Sprinkle with flaky sea salt just before serving.
Pro Tips
If you’re after that perfect bakery-level finish, these little tricks will make your pie shine every single time:
- Blind bake your crust – For extra crispness and to avoid that dreaded soggy bottom, bake your crust on its own for about 10 minutes before pouring in the filling. Just line it with parchment and weigh it down with pie weights (or dried beans from the pantry). This gives you a head start on that golden, flaky crunch.
- Choose the right pie dish – Believe it or not, the color of your pie dish matters. A light-colored pie dish helps prevent the crust from over-browning before the filling sets. Dark pans absorb more heat, which can sometimes lead to edges that are a little too toasty.
- Don’t overbake – This pie is custard-based, which means it continues to set as it cools. If you leave it in the oven until it looks completely firm, it’ll end up overcooked and lose that luscious, creamy texture. Pull it out when the center still has a little wobble—you’ll thank yourself later.
- Warm the honey – Honey straight from the jar can be thick and stubborn. Warm it slightly (just a few seconds in the microwave or in a bowl of hot water) so it mixes smoothly with your other ingredients. It makes whisking easier and ensures the sweetness is evenly distributed.
- Salt timing matters – Always sprinkle your flaky sea salt after baking. Adding it before can cause it to melt into the custard, losing that delightful pop of crunch and sparkle on top. A post-bake sprinkle ensures every bite gets that perfect sweet-salty contrast.
- Bonus tip – Let the pie cool completely before slicing. It might be tough to resist diving in, but patience pays off—your slices will hold together beautifully instead of pooling into a creamy puddle.
Recipe Variations
One of my favorite things about this pie is how adaptable it is—you can give it a whole new personality with just a few small tweaks. Here are some fun spins to try, depending on your mood (or what’s hiding in your spice cabinet):
- Spiced Honey Pie – Warm it up with a cozy spice blend. A pinch of cinnamon, a dash of cloves, and a little ground ginger transform this pie into something that feels like a holiday hug in dessert form. It’s perfect for Thanksgiving or any chilly evening when you want the house to smell amazing.
- Bourbon Honey Pie – For the adults at the table, stir in about 2 tablespoons of bourbon. It deepens the flavor, adds a hint of caramel-like warmth, and gives the pie that Southern flair that pairs beautifully with whipped cream on top.
- Nutty Honey Pie – Want extra crunch? Scatter toasted pecans or walnuts over the top before serving. The nuts bring a buttery, earthy balance to the sweet custard and add a rustic charm that makes each slice feel a little heartier.
- Citrus Honey Pie – Brighten things up by adding the zest of a lemon or orange into the filling. That little pop of citrus keeps the pie feeling fresh and lively, balancing the richness with just the right amount of zing.
- Chocolate Honey Pie – For all the chocoholics out there, whisk a couple tablespoons of cocoa powder into the custard or drizzle melted dark chocolate over the cooled pie. Honey and chocolate are an underrated duo, and together they create a decadent twist.
- Herbal Twist – If you’re feeling adventurous, infuse your honey with a sprig of rosemary, thyme, or lavender before mixing it into the pie. It gives a subtle, sophisticated layer of flavor that makes the pie taste like something straight off a fancy restaurant menu.
Gluten-Free Version
The great news is this pie can be made 100% gluten-free without losing its magic. All you need are a couple of smart swaps and a little label-checking.
Start with the pie crust—instead of the traditional flour-based version, use a certified gluten-free crust. You can either buy one pre-made at most grocery stores or make your own with a gluten-free flour blend. Many gluten-free pie crusts have a slightly nutty flavor, which actually pairs beautifully with the honey custard.
Next, double-check your cornmeal. While corn itself is naturally gluten-free, some brands process it in facilities with wheat, which can lead to cross-contamination. Look for packaging that specifically says “certified gluten-free” to keep things safe.
Everything else in this recipe—honey, eggs, butter, cream, and salt—is naturally gluten-free, which means you don’t have to fuss with substitutions.
One extra tip: if you’re baking for someone with celiac disease, be careful with your baking tools. Use a clean pie dish, mixing bowls, and utensils that haven’t touched wheat flour to avoid even trace amounts of gluten sneaking in.
The result? A gluten-free honey pie that’s just as silky, rich, and golden as the original—no one will even guess it’s been adapted.
Kid-Friendly Version
The beauty of this pie is that it’s naturally sweet and comforting, which already makes it a hit with kids. You don’t need to change much, but you can make it even more fun and approachable with a couple of small tweaks.
First, keep the recipe as is—the creamy honey custard and flaky crust are gentle enough for little palates. Then, bring on the extras. A big dollop of whipped cream or a generous scoop of vanilla ice cream instantly transforms each slice into something kids can’t resist. The cool, creamy topping balances the rich honey filling and makes the dessert feel like a special treat.
If you’ve got extra time (or want to get the kids involved), try adding sprinkles or a drizzle of chocolate syrup over their slices. It’s playful, colorful, and makes them feel like they’ve got their very own fancy sundae pie.
Another fun trick? Mini honey pies. Instead of one big pie, bake the filling in a muffin tin with mini pie crusts. Kids love having their own personal dessert, and it’s perfect for little hands.
And of course, don’t forget presentation. Serving the pie with a fun topping bar—think whipped cream, chocolate chips, berries, or even a drizzle of caramel—lets kids customize their slice, which usually means they’ll be extra excited to eat it.
Salted Honey Pie
Ingredients
Equipment
Method
- Preheat your oven to 350°F (175°C).
- Roll out and fit your pie crust into a 9-inch pie dish. Crimp edges as desired.
- In a large bowl, whisk together melted butter, honey, sugar, cream, eggs, vanilla, vinegar, cornmeal, and salt until smooth.
- Pour the filling into the prepared crust.
- Bake for 45–50 minutes, or until the center is just set but slightly wobbly.
- Let cool completely before slicing. Sprinkle with flaky sea salt just before serving.
Notes
Salted Honey Pie – Helpful Tips
Cooking Tips & Techniques- Use a par-baked pie crust to avoid sogginess — blind bake until golden before adding the filling.
- Warm the honey slightly so it blends smoothly into the custard mixture.
- Whisk filling ingredients gently to avoid creating too many air bubbles, which can cause cracks.
- Bake until the edges are set but the center still has a slight jiggle — it will firm as it cools.
- Sprinkle flaky sea salt on top just before serving for the perfect salty-sweet balance.
- Serve with a dollop of lightly whipped cream to balance the richness.
- Add a drizzle of extra honey over each slice for shine and flavor.
- Pair with vanilla ice cream or a scoop of mascarpone for a decadent dessert.
- Serve alongside hot coffee or a glass of chilled milk for a cozy finish.
- Make-Ahead: Bake the pie a day ahead; the flavor deepens as it rests.
- Refrigerator: Store covered in the fridge for up to 4 days.
- Freezer: Wrap tightly in plastic and foil; freeze for up to 2 months. Thaw overnight in the fridge.
- Reheating: Enjoy chilled, room temperature, or lightly warmed in the oven at 300°F for 10 minutes.
- Nutty Honey Pie: Add chopped pecans, walnuts, or almonds to the filling.
- Citrus Kiss: Stir in orange or lemon zest for a bright flavor contrast.
- Spiced Honey Pie: Mix in cinnamon, cardamom, or nutmeg for a cozy twist.
- Chocolate Swirl: Drizzle melted dark chocolate over the cooled pie for extra indulgence.
- Mini Honey Pies: Bake in tart pans or muffin tins for individually portioned desserts.
Taste What’s Next
No Bake Lemon Blueberry Dessert
Frozen S’mores
Easy Turtle Bars
or you Can Dig Deeper Recipes by clicking this: Appetizer, Breakfast, Lunch, Dinner, and Desserts.
Storage & Reheating
This pie is the kind of dessert that actually gets better after a little rest—so don’t be afraid to make it ahead or stash away a few extra slices for later.
- Refrigerator – Once baked and cooled, cover the pie loosely with plastic wrap or foil and keep it in the fridge. It’ll stay fresh for up to 4 days. The custard firms up even more as it chills, making it slice beautifully for neat wedges. Pro tip: keep it on a flat shelf instead of the fridge door so the temperature stays consistent.
- Freezer – Yes, you can absolutely freeze this pie! Wrap the whole thing (or individual slices) tightly in plastic wrap, then add a layer of foil to prevent freezer burn. It will keep well for up to 2 months. To serve, move it to the refrigerator overnight and let it thaw slowly. This way, the custard keeps its silky texture instead of weeping or separating.
- Reheating – If you like your pie slightly warm (hello, cozy vibes), pop slices into a 300°F oven for about 10 minutes. This gently warms the filling and brings a little life back to the crust without overcooking it. Skip the microwave if you can—it tends to make the crust soggy and unevenly heats the custard.
- Extra Tip – Want to make it feel fresh again? Add a sprinkle of flaky sea salt or a little whipped cream right before serving. It instantly perks up leftover slices and makes them feel brand new.
Equipment
You don’t need a fancy bakery setup to make this pie shine—just a few trusty kitchen basics will do the job beautifully:
- 9-inch pie dish – The star of the show! A standard 9-inch dish gives the filling the perfect depth and ensures the crust bakes evenly. Glass or ceramic dishes are best because you can actually see how golden your crust is getting along the edges.
- Mixing bowls – Grab a couple of medium-sized bowls for whisking together the custard filling and prepping your crust. If you’re like me, one always ends up being the “wet ingredients bowl” and the other the “everything else bowl.”
- Whisk – Your secret weapon for silky-smooth custard. A good whisk helps the honey, eggs, and cream come together without lumps, creating that velvety texture we’re aiming for.
- Measuring cups and spoons – Accuracy is key when it comes to custard pies. Too much liquid or too little sugar can throw off the balance, so measuring tools are a must. Bonus: let the kids measure the honey—it’s sticky fun, but worth the giggles.
- Cooling rack – Once the pie comes out of the oven, it needs to cool evenly so the filling can set properly. A cooling rack lets air circulate underneath the pie dish, helping it firm up without getting soggy on the bottom.
- Optional helpers – If you’ve got pie weights (or even just dried beans), parchment paper, and a rolling pin, they’ll make blind-baking and crust prep a breeze. Not required, but they do give you that “pro baker” edge.
FAQs
What does salted honey pie taste like?
It’s rich and custardy with caramelized honey sweetness balanced by a salty finish.
Can I make salted honey pie without cornmeal?
Yes, though cornmeal helps thicken the filling. You can substitute with a tablespoon of flour.
Why add vinegar to salted honey pie?
It balances the sweetness of the honey and adds brightness.
How do I know when my pie is done baking?
The filling should be set on the edges but still slightly wobbly in the center.
Can salted honey pie be made ahead?
Yes, it’s best baked a day in advance so the filling can set properly.
What kind of honey works best?
Mild, floral honeys like clover or wildflower let the flavor shine without overpowering.
Is salted honey pie the same as chess pie?
They’re close cousins—chess pie uses sugar and cornmeal, while salted honey pie relies on honey for sweetness.
External Resources
- Harvard School of Public Health – The Benefits of Honey
- Cleveland Clinic – Is Honey Good for You?
- National Institutes of Health – Antioxidant and Anti-inflammatory Properties of Honey
Conclusion
Salted Honey Pie is the kind of dessert that makes people stop mid-bite and say, “Wow, what is this?” It’s nostalgic, rooted in history, yet timeless in flavor. The custard filling is silky and indulgent, the crust is flaky and buttery, and the sprinkle of flaky sea salt makes it downright irresistible. I love serving this pie when I want something that feels special without being overcomplicated. It’s rustic yet elegant, familiar yet surprising—everything a great dessert should be. So bake this pie, slice it up, and let your kitchen fill with the golden glow of honey. So go ahead — snap a photo and post it online! Don’t forget to tag me! I want to see your cooking success. Happy cooking!